Vic Tesolin's Travelling Tool Box
Words and photos: Vic Tesolin
A place for everything and everything in its place is an old adage that couldn’t be truer than in the workshop. It is a joy to work in a well organised shop. Workflow is improved, and you don’t waste time looking for stuff. In my workshop I have a beautiful vintage Gerstner chest that is home to all my marking and measuring tools. However, I didn’t have a smaller solution for travelling that housed my essential tools. These tools are different shapes and sizes with some tools being quite small. With that in mind, I set out to design and build a box that will keep my tools organised.
Start with design
First things first, pile up all the stuff you want to store, and then play with the layout (photo 1).

1. Some grid paper will make the layout easy, especially if you can work full-scale.
In my case, I had some size restrictions for the box because I wanted it to be able to fit in my larger tool tote. I laid out my maximum size for the outside of the box, then figured out the thickness of my sides.
The sides can easily be made too thick, but this is largely an aesthetic point. I settled on 12mm thick sides for this box which is overall 255 x 200 x 125mm tall. I also decided to include a removable, shallow tray to store the things I use most. Things like pencils, markers and rules will live here. The tray side thickness will be half that of the outer box sides at 6mm.
Prep your material
All too often I see woodworkers buy the perfect width of board and just use whatever that board gives them. I prefer to start with wider boards so I have some choice as to where I take out my parts. I’ll do a rough layout using chalk so I can change the marks if I change my mind. A quick wipe with a damp cloth will erase the chalk (photo 2).
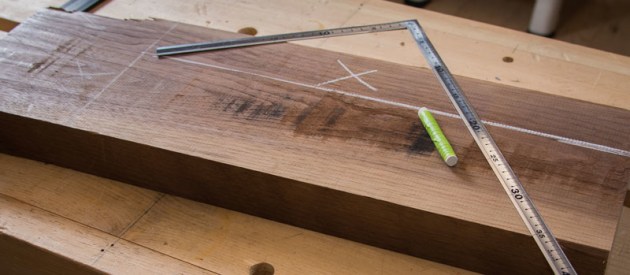
2. Chalk is a great marking tool for rough timber and initial layout.
I spend a lot of time at this stage of the process. To me, one of the best things about being a woodworker is having the ability to choose the grain, figure and colour of the wood so I can achieve visual harmony.
The box is made from black walnut (Juglans nigra) and the board I had was just over 50mm thick. I resawed the board at the bandsaw and finished at just over 12mm which left me some room for handplaning the sides and lid piece (photo 3).
3. The cabinetmakers triangle helps to keep your parts organised.
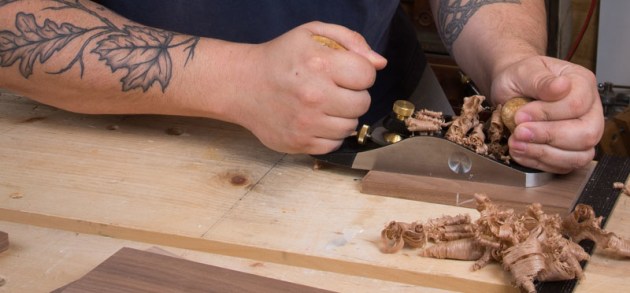
With the boards surfaced, I marked them with the cabinetmaker’s triangle to lock in the orientation (photo 4). I like using a white pencil for darker woods because a regular pencil all but disappears on walnut.
4. The handplane is still the fastest way to prepare the surfaces of these boards.
Rebates all around
I decided to go with rebates bolstered with 3mm wooden pins to join this box together. I wanted a simple, plain aesthetic for this box and something like dovetails would have been a bit much. There are many ways to cut the rebates with either machines or hand tools. With only one box to make I opted for the hand tool method (photo 5). If I had to make multiples then I would have looked at a machine option.

5. A rebate block plane is perfect for this size of work.
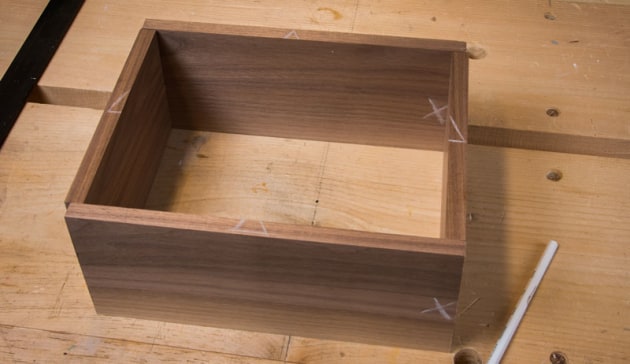
With the rebates cut on the corners of the two long sides, I then cut the rebates for the 6mm Baltic birch plywood. The nice thing about using rebates in the corners instead of dovetails is that the bottom rebates are all through cuts. I chose to rebate the bottom in just in case I have to replace it. Replacing a bottom that is sitting in a groove is impossible, so rebates it is.
If you cut your joints accurately, two clamps should be all you need to clamp the box. Don’t forget to do a trial run for your glue-up prior to getting the glue flowing. You would much rather discover an ill fitting joint before there is glue everywhere (photo 6).

6. A dry-run prior to adding glue can save you a lot of headaches and profanity.
Getting things together
Once I proved out the joinery, I glued in the small ledges that the removable tray will rest on. It was much easier to do this with the sides apart because it allowed me access from all sides to get clamps on. I used a gauge to help keeps thing on the level and I rechecked as the glue set up (photo 7).

7. Check the ledges often as the glue sets in case they slip.
Little pieces like this have a nasty habit of skating around once glue is introduced. Once the glue dried, I finished the interior surfaces with wax. I do this for a couple of reasons: doing it now is easier when the parts can be laid flat, and the finish will act as a glue resist. Any glue squeeze-out on the inside of the box will just pop off.
With the wax applied, I moved on to the glue-up. Nothing special here, just some Titebond III applied to the rebates, then clamp the box (photo 8). I use high quality pipe cleaners to apply the glue and I lay down some tape on my bench to act as a removable glue pallet. Once the glue cured I added the pins.

8. Don’t be heavy handed with the glue so you won’t have to worry about cleaning up.
The pins are 3mm diameter birch dowels. I started by laying out some lines, then used dividers to step off the pin locations (photo 9). Next, I drilled the 3mm holes. I went about 25mm deep with the holes and simply used a flag of tape as a visual depth gauge. I put a small dab of glue into the holes then tapped the dowel home.

9. Take the time to accurately lay out the pins for a refined look.
You should be able to tell once you’ve hit the bottom of the hole because the hammering sound should change. Next, I trimmed the pins so they were just a bit proud of the surface and gave them a couple extra hits to peen them slightly (photo 10). I do this so that the pin will fill the hole completely. You don’t have to go overboard, just a few light hits should do it. The final step was to pare the pins flush with a sharp chisel.

10. Peen the pins for a clean gap-free fit.
The tray
The thickness of the tray sides is 6mm which I feel looks great nested with the 12mm sides of the outer box. No fancy joinery here, the parts are simply butt jointed together with some glue. The tray gets its strength from the 0.8mm birch plywood bottom that is surface nailed on to it. I chose some super small nails for this job so that I didn’t split the sides of the tray. No glue here because I want to be able to replace the bottom if I need to.
Do your fingers a favor and use a set of forceps to hold the nails to get them started (photo 11). While I had the hammer and nail set out, I also sized and attached the 6mm plywood bottom into the rebates of the main box. Again, no glue so that I can replace it if needed.

11. Better to hit forceps than your fingers.
With the box and tray out of the clamps, I prepped the outside surfaces with a smoothing plane to level the joints (photo 12). I had to go easy with the plane on the short sides because there is unsupported endgrain there and I didn’t want any nasty spelching to fix. I also did the outside surfaces of the tray to achieve a nice piston fit.

12. I used a sharp plane with a light cut to smooth the exterior surfaces.
Time to top it off
The only thing left to do was to hinge the lid. I started by simply laying the hinges on the box to see how they looked. I experimented with their location until I found a pleasing location. I used a marking gauge to mark from either end of the box to be sure that the hinge locations where symmetrical (photo 13).

13. Locate the outside of the hinge with a marking gauge...
With those lines marked, I laid the hinges against those lines and used a knife to mark the length of the hinge (photo 14). Don’t bother with measuring with this kind of stuff. A referential measurement will give you the best results.

I wasted out the majority of the mortise with a chisel then finished it off with a router plane (photo 15). This will ensure flat hinge mortises which will in turn allow the hinges to function smoothly.

15. The router plane gives you a flat hinge mortise.
I then laid the lid onto the box, leaving it a bit oversized so I could trim it up after the hinges where installed. Again, the easiest way to locate the hinge locations on the lid was to simply reference the first hinge mortises I cut in the box (photo 16).

16. Use a knife to transfer the hinge location from the box to the lid.
Finishing it off
I decided to try something different for the box closure and used two cut nails and a piece of leather (photo 17). I docked the nails short because to get the nail head size I wanted, the nail length would have been way too long.

17. A bit of leather and more nails keeps the box closed.
A few strokes with a hacksaw sorted out the problem and a bit of epoxy holds the nails in place. The box was then finished on the outside surfaces with some more wax.

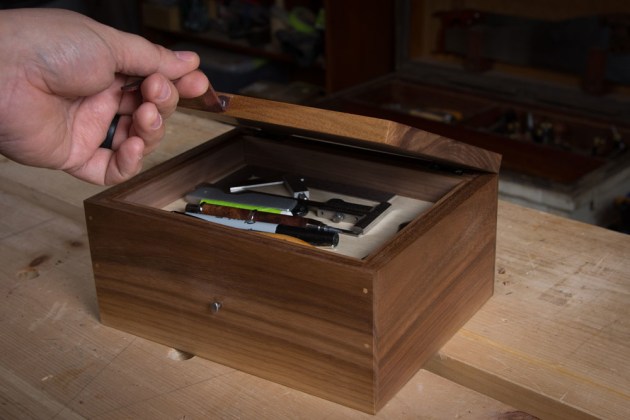
18. A simple elegant home for the tools I use the most.
With the box finished it was time to see how things looked in their new travel home (photo 18). The box holds everything I need with some room to spare. If you have stuff to contain, I highly recommend building yourself a wooden box and leave the plastic on the shelf in the store.
Vic Tesolin is a furniture maker and a Woodworking Partner for Lee Valley Tools. In Australian Wood Review issue 104 he writes about making a cigar-box guitar. Learn more about Vic Tesolin at victesolin.com