The Zen Bed

Words and photos: Vic Tesolin
Illustrations: Graham Sands
When you have a child that is leaving the nest and heading to university, apartments need to be furnished. While much of my daughter’s furniture was sourced from Ikea, she was keen to have Dad make her bed. We worked on the design together and decided that a Japanese-style bed was the way she wanted to go. Not only is this bed beautiful to look at but it is also quite practical. The joinery for the bed allows it to be taken-down easily without tools and moved or stored as required.
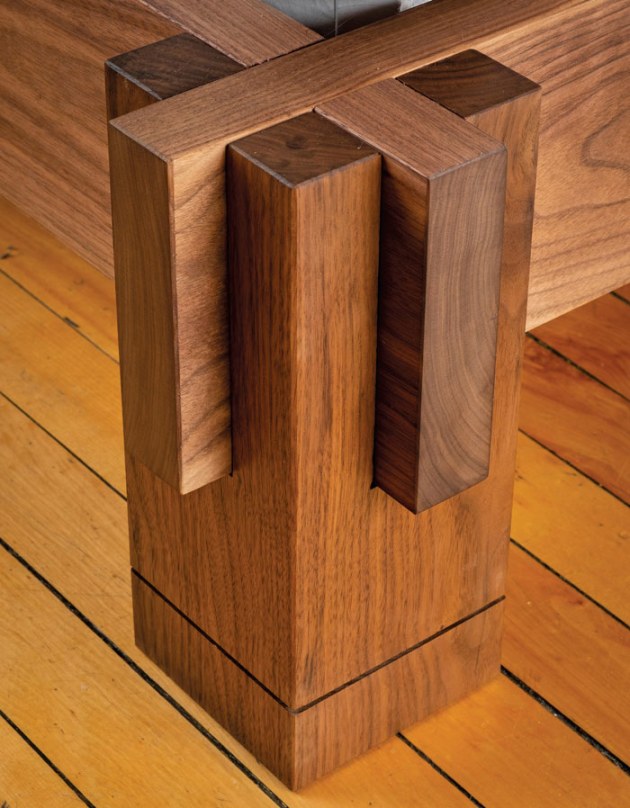
This was a new bit of joinery for me which was exciting. It’s important as a woodworker to always try new things and expand your palette of skills. The rails for this bed are joined with an edge lap and the legs have a cross-shaped section removed from them to receive the assembled rails.

1. Pick your grain well so the laminations will look their best.
2. Dividers eliminate the math to make life easier.

The challenge with these joints is that they are larger than what is typical for furniture so cutting them and handling
the large stock required some consideration. The end result however was worth it.

The first thing to realise is that mattresses come in all shapes and you want to build this bed to match. The best way to ensure that all will work out as planned is to measure the mattress. I have worked out the dimensions of the joinery so all you have to do is add the mattress measurements you have to figure out your rail lengths. In my case, the formula looks like this:
Long rails: 1890mm length of mattress + 210mm (105mm each end) = 2100mm
Short rails: 1350mm width of mattress + 210mm (105mm each end) = 1560m
You have to double the joinery lengths for each length because there is a joint at either end. In my case, I built the bed out of black walnut but any timber you choose will be fine. Prep your rail material to final dimensions that move on to the legs.
Start with the legs
All the components on this bed are stout so the legs are quite beefy. The largest stock I could source for the legs was approximately 76mm, so I had to laminate two pieces together.

If you take your time with this, you can create a pleasing look where the grain and colour of the two pieces works well (photo 1).
Once you have the legs laminated and dimensioned to the final size, you can begin laying out the joint. Start by marking a line all the way around the leg, halfway up (150mm). Lately I have been experimenting with marking lines in ink and have been having good success. Ink planes/ sands off easily and the lines are much easier to see.
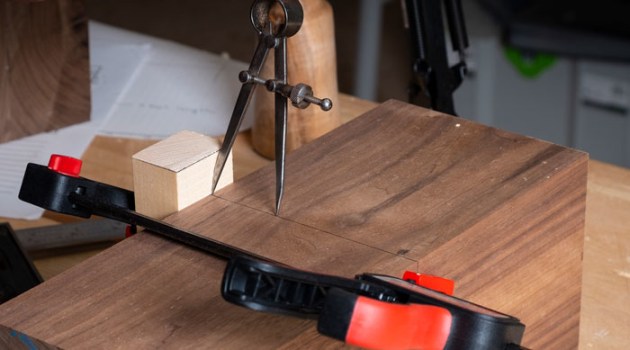
Next, take a pair of dividers and divide the width of the leg into three equal sections – approximately 40mm each. I clamp a block on the edge of the board to help ensure that I’m starting right at the edge (photo 2).
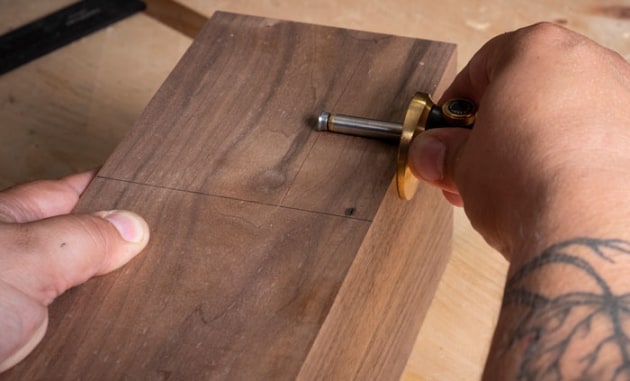
Now, set a marking gauge to this mark and strike lines to your previously marked depth line, dividing each leg into three (photo 3).

I opted to use the bandsaw for cutting this joint (photo 4). Set the fence so you are cutting on the waste side (towards the centre) then make the cuts.

These cuts are fairly simple to make because all you have to do is rotate the leg 90° after each cut – do this four times and you have all the rip cuts done (photo 5). Just be mindful of your depth line and don’t cut past it.
While the leg was still mostly intact, I used the tablesaw to cut a 3mm deep kerf line all around the bottom of the leg around 25mm from the bottom. The kerf swallows light and creates the simple decorative line you can see on the main photo.

Next set up your drill press to hog out the majority of the waste (photo 6). Don’t go any closer than 1mm to your depth line so you have some material left behind to pare. If you don’t have a drill press then have a go with a hand drill or brace and bits.

Drill the holes as closely to overlapping as you can so the waste comes out easily, then gently knock out the large chunks of waste with a block and mallet (photo 7).

Remove the last bits of waste with a chisel and mallet (photo 8). Work back to your depth lines and do yourself a favour by undercutting the joint as you go. This will ensure that there isn’t a hump of material left behind causing the joint to not go fully home during assembly.


Finally, mark the inside finger of the joint at 25mm and cut it so you end up with a short stub (photos 9, 10). This step will allow you to assemble the bed easily and will pull the joint square.
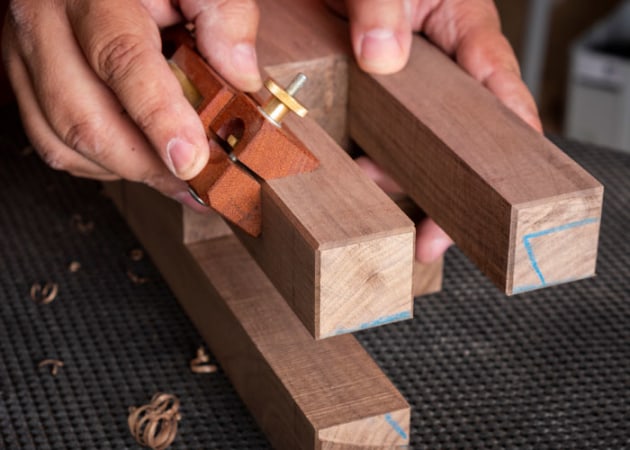
Take the time to place a light chamfer on all the outside edges and along the top of the fingers (photo 11). The stock for your rails should slide in between the fingers.
On to the rails
To ensure that the joinery all lines up, clamp the two rails of each size together, lining up the ends.

Measure in from the end 65mm and strike a line on both pieces and on both ends (photo 12). Then strike a second line 40mm from the first working inwards towards the centre.

The last part of the layout is to knife-in the base line at the center of the rail width – 150mm (photo 13). Boldly mark the waste.

If you cut on the wrong side of the line here, you will have sloppily-fitting joints (photo 14). Do the same for the second set of rails.

Because of the limitations of my workshop I opted to use a router with a straight bit and shopmade T-square guide to cut the notches for the edge lap joints. I went halfway down on one side then flipped the workpiece to finish off from the other side (photo 15).

There are many ways to cut this joint so pick a method you are comfortable with. Then, using a chisel and mallet, remove the remaining waste. You should undercut this joint slightly as well to ensure a smooth assembly (photo 16).

Start test fitting the edge lap joints. If you have a pair that are tight then remove some material off the thickness of the pieces until they slide in easily (photo 17). There is no glue going into this joint and this connection is meant to come apart easily for knock-down and transport so don’t make it as tight as you would normally. Cut a light chamfer on all the edges of the rails.
Now for some support
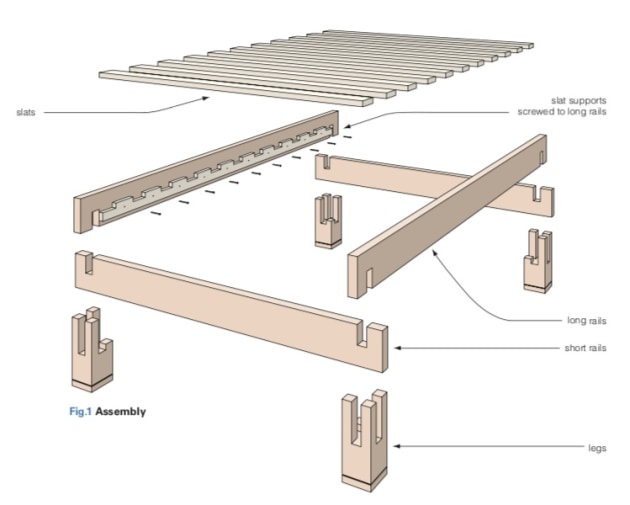
This bed does not require a box spring because it will be fully supported by a series of slats, in this case made from ash. The slats I used were about 76mm wide and there was 11 of them. There were 10 spaces in between were about 105mm. The layout of the slats requires a bit of math to suit the mattress size you have. The one thing to keep in mind is that you want one more slat than space so you have support and both the head and foot of the bed.

When you have the numbers worked out, clamp the two slat supports together and mark out all of the notches
to receive the slats (photo 18).

Use a marking gauge to determine the thickness of your slat material (approx. 22mm) and mark the depth of your notches (photo 19).

With the slat supports still clamped together, saw out the notches for the slats (photo 20). In this case you can saw on the line instead of the waste side of the line. This will give you a slightly larger notch which will make installing the slats easier.

Don’t worry if the slats are a bit loose, they will be kept in place by the weight of the mattress. Chisel out the remaining waste and remove the sharp corners on the supports (photo 21).

Drill pilot holes into the slat supports in between each slat location and attach them to the long rails using screws and no glue. I have repaired a few beds of this style and it makes life much easier if the slat supports are not glued to the rails (photo 22). Now you can make up all the slats to match the width of the bed. I rounded over the edges so they couldn’t damage the mattress and I left them unfinished.
Finishing off
I opted to go with a beeswax finish with a high level of mineral oil mixed in. This finish is normally used for wooden kitchenware, but I really liked how it looked on the bed. The oil darkens the wood and the wax provides light protection. This sheer finish rubs out to a pleasing matte sheen and showcases the beauty of the wood.
All that’s left is to set up the bed. I found the easiest way to do this is to lay out the legs on the floor, insert the short rails with their notches up, then drop in the long rails. Then you can install all of the rails and lay your mattress down. Whether you’ve made this bed for yourself or someone else, you can guarantee a fine night of sleep in style.
Vic Tesolin lives and works in Canada. He writes regularly for Australian Wood Review magazine. Learn more at: victesolin.com