Making Your Mark

Words: Vic Tesolin
Photos: E.K. Knowles
Next to developing good sharpening techniques, I would reckon that solid joinery marking skills are the next to master. Accurate marking techniques will greatly improve the chances of you cutting accurate joinery, especially when working with hand tools. There are some key tools and techniques that we will explore that will make your joinery layouts intuitive and simple.
Is it square?
Before you get too far down the joinery road, you will want to make sure that the surfaces of your parts are square to each other. For the purposes of this article, we will assume that your components need to be square. For joinery that isn’t 90°, you would trade in your square for a tool like a sliding bevel.
The key to success with a square is to understand the parts and how to use them. The thick bit of the square is the reference head and it should be the first part of the tool to touch the wood. Place the reference head firmly on the reference surface and slowly slide the blade (the thin bit) down until it contacts the wood. Then sight down the board to see if the blade contacts the entire surface.
Also, be sure to check multiple locations on the part to make sure that it isn’t twisted. Be wary of simply sliding the square up and down the board. This is poor techniques and will lead to bad readings. Take the time to do it right, if the layout is bad you’ll be fighting it the whole way through the build. With that out of the way, let’s move on to the fun stuff.
A word about pencils

1.It’s best to leave pencils for the design phase.
In the woodworking world, I feel that pencils should be relegated to coarse marking only (photo 1). They’re good for tasks like marking parts for identification and certain layout tasks that don’t require hyper-accuracy. An example is marking the tails of a dovetail with a pencil because the tails will become the pattern for pin board. Be mindful to press softly with pencils because they can dent the wood making it difficult to get rid of them prior to finishing.
Why the knife is boss
I do the majority of my marking with knives of some type or persuasion and to be fair, as a lazy woodworker, I will normally grab the knife nearest to my hand. I have a lot of different knives and that is mainly because I have an affinity to them. Along with dividers and hammers, I collect and use marking knives for different tasks in my shop. The advantage that a knife has compared to a pencil is that you are making a physical mark in the wood. This is an advantage that we will discuss further, later on in this article.
2. The best versions of these knives have a lock built in.
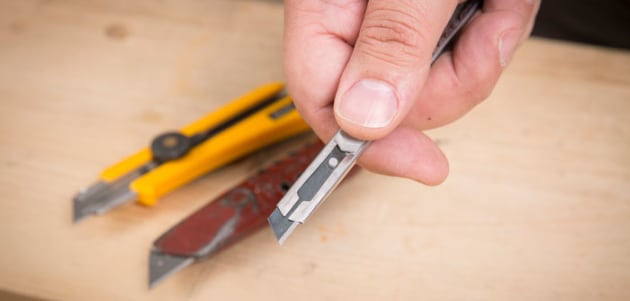
The simplest and most readily available blade is the snap- off variety (photo 2). The beauty of these knives is that they are always sharp – simply snap off the dull portion and carry on with your work. Along with being lazy, I’ve also been called frugal, so sometimes I will sharpen one of these knives a couple of times before snapping off the blade.

3. This blacksmith-made knife is good for more than just marking.
These knives have a double bevel and require the user to tilt the knife slightly in use. This may sound difficult to do, but with a little practice you will wield it like a pro. Other double bevel blades, like the pictured kiridashi-style knife in photo 3, find other uses in the shop such as paring or whittling things like tapering pegs for tenons or even sharpening pencils.

4. No woodworker should be without one of these marking staples.
A more traditional marking knife shape is the dual bevel knife (photo 4). These knives are somewhat spear-shaped and feature a single bevel which allows you to place the knife back firmly against a straightedge or reference piece. The dual bevel ensures that you can work with either edge of the knife while maintaining that solid connection with your workpiece.

5. Buy these knives in pairs to get the most out of them.
You can also find single bevel knives that have much larger flats on the back and wider bevels that make them easier to sharpen (photo 5). The only downfall (if you see it that way) is that you need a pair of them in order to work. This really only comes into play when marking things like dovetails.
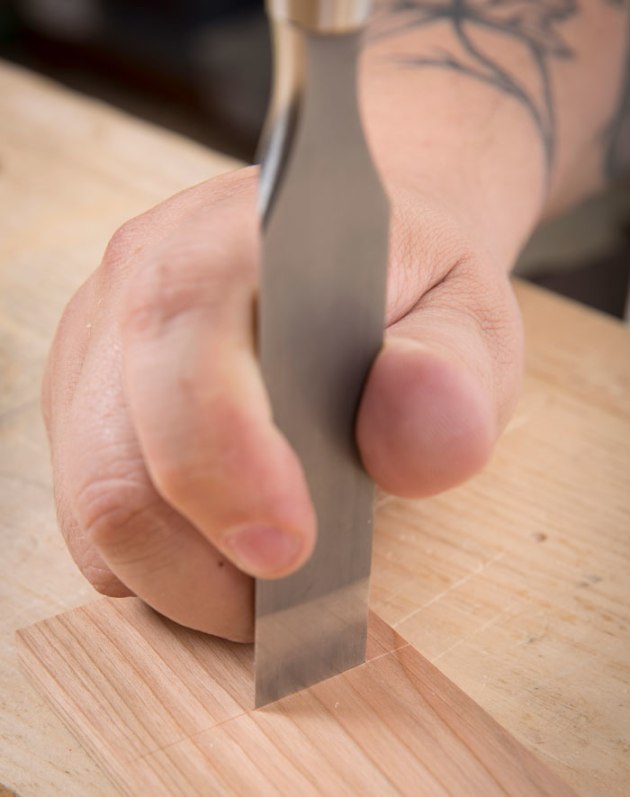
6. Your chisel has nowhere to go but the right spot.
So why all the excitement about the knife? A knife line allows you to use other edge tools like chisels with more accuracy (photo 6). When you place a chisel into a knife line, the chisel registers exactly where you want it. Imagine trying to place a chisel down on the exact same point of a pencil line. You could put that razor-edge down in an almost infinite number of places – none of them the same. It’s for this reason that I always mark joinery with a knife.

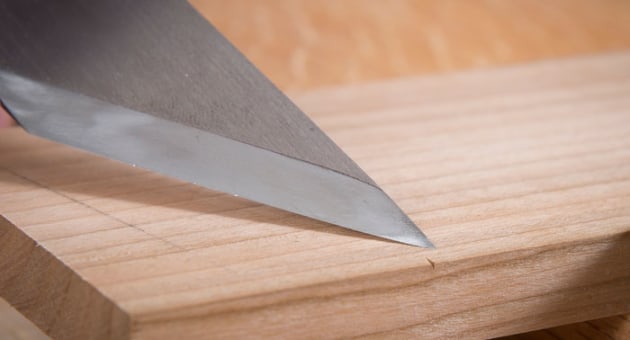
7. These two knife cuts guide your saw for accurate cuts.
You can also guide a joinery saw using a pair of knife lines creating what is known as a knife wall. The vertical knife mark sets the position and the 45° line removes a small bit of waste that accepts the tooth line of saw (photo 7).

8. Just drop in your saw and go.
This is one of the secrets to sawing directly on a line like that of a tenon shoulder (photo 8).
Using a knife usually gets paired with a square or some other reference surface like one half of a joint. This is commonly seen when striking the shoulder line of a tenon.
9. Accuracy starts with just a small notch.
To strike a line using a square, start off with a small notch made with the knife (photo 9).

10. Go easy here – you don’t want to dull your blade.
This notch will likely get positioned by using a rule or another component. Best practice is to place the knife into the notch, then bring a reference surface (in this case a square) and have it come to rest gently against the knife (photo 10).
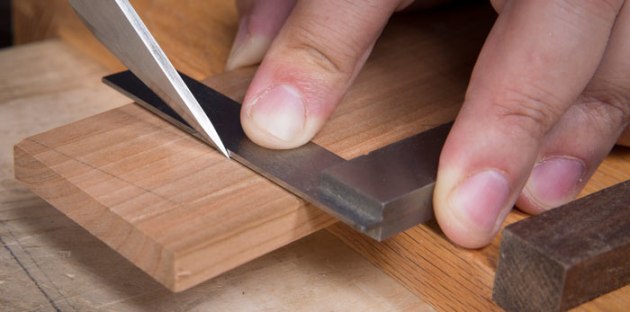
11. A few light cuts are better than one heavy one.
Then remove the knife and make a series of light cuts against the square to ensure a crisp, accurate knife line (photo 11). Don’t go too heavy with the knife or try to make the mark in one pass. Pushing too hard can cause the knife to wander or worse, lead to the knife slipping and cutting you.
Knives in disguise

12. A marking gauge is a knife with a built-in reference surface.
There are other tools available that are based around incising a line into the wood. Marking gauges are essentially a small disc-shaped knife that comes paired with a fence (photo 12). This pairing allows the user to reference a surface and strike a line in relation to that surface. This technique is widely used when marking joinery like the mortise and tenon, and dovetails.

13. Two cutters are better than one when marking a mortise and tenon joint.
There are even marking gauges made specifically with two cutters which make mortise and tenon layout a breeze (photo 13). These gauges can be used in conjunction with measurement tools like rules or referentially using existing parts. Personally, I prefer referential because there are no numbers to gum things up.
When you think about, it’s not often that you really need to know the numerical size of something, so transferring dimensions directly from a piece works well. Take the base line of a dovetail joint for example. You could measure the thickness of a board with a rule then use the rule to set a marking gauge, or you could cut out the middle man and gauge the board directly. Who cares what the numerical value is?
When accuracy really matters, you can always count on one type of knife or another to line things up for you. As with any edge tool, it’s important to keep your knives sharp for optimum performance. As for the pencils, they may be best left for the design portion of your next build.
Vic Tesolin is a regular contributor to Australian Wood Review magazine. This story was first published in issue 98.