Table For Two

Above: Made for a space – Charles Mak’s table in sapele with detailing in contrasting American cherry.
Words and photos: Charles Mak
Diagrams: Graham Sands
For the past several months, my wife and I have eaten our breakfast on a metal, vinyl-padded top folding table – hardly a good place to enjoy a hot cup of coffee and a good book in the morning. That was because our daughter took the old family ‘nook’ table with her when she moved out. After some typical woodworker type procrastination, the time had come to build a new kitchen table.
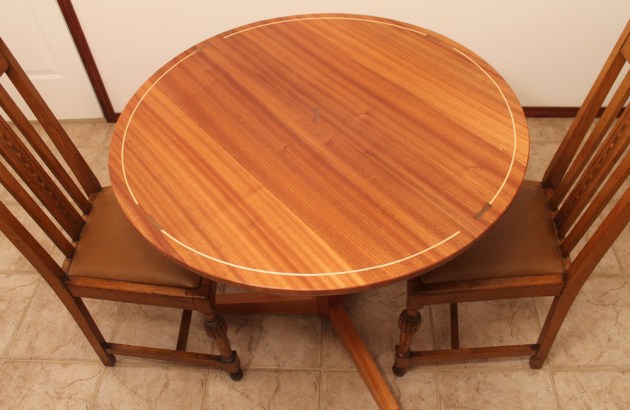
Our design criteria for the new table were both objective and subjective. On the objective side, it is standard height (765mm) and at 890mm in diameter fits the space in the room. We both wanted a round top with a pedestal base – to keep the obstruction under the table to a minimum. Lastly, I tried to add a distinct touch of craftsmanship by including an inlay border design.

As with many projects, the best part often comes down to choosing your favourite tools and techniques. I built this table using a variety of proven techniques and tools that I will soon illustrate in detail. Techniques aside, I will also share how I handled a few errors that crept into the process.

Joint the panel

1. The tablesaw with its cutting sled handles long stock much better than my light-duty jointer.
Sapele, which I have used in some smaller projects, was my primary choice of timber. I started by ripping away the rough edges, using a cutting sled (photo 1).

2. For the top, break a large glue-up into smaller sub- assemblies first.
After planing the boards to thickness, I cut the mating edges by alternating the rip cuts on the tablesaw so any out-of-square cuts cancelled each other out in the glue-up. Here, I also used dominos, but more for alignment than for added strength (photo 2).
Saw the top

3. I knocked off the corners with a jigsaw and trimmed the panel to size in progressive cuts.
I prefer the tablesaw method for cutting circles*. Why the tablesaw? The top is fully supported on the saw table, giving you better control over the cutting, and you stay in one place as you make the cut, freeing yourself from dealing with the tangle-prone cord. After installing a circle jig on the tablesaw, I trimmed the panel in passes until it was round (photo 3).

4. You can precisely dispense CA glue with an economical and reusable plastic dropper.
However, upon examination, I discovered a tenon placement mistake: I had positioned a couple of dominos too close to the edge and they were exposed on the sawn edge. To fix that, I chiselled out a small cavity at each spot and filled it with sawdust (photo 4).
Inlay the stringing

5. Keep the curve guides tight to the edge and set each pass to cut no deeper than the bit diameter.
To cut grooves for the inset inlay border, I used an easier- to-control rotary tool fitted on a plunge base, instead of a palm router. For best results, I routed with the grain and made progressive passes (photo 5).
I also prefer to make my own inlay strips – 1/8" (3.17mm) square in this case – as the wood choices are limitless. One way to cut square inlay strips safely on the tablesaw is to set the fence and make four rips with the blank on edge. Then reset the fence and cut out the four strips so they fall on the waste side of the blade.

6. The hold-down works both as a retainer and a safety device.
A more precise method, gleaned from American teacher Charles Bender, involves no resetting of the saw fence. His method uses a hold-down to keep a stock in place while the stock is pushed through the blade (photo 6).

7. Use a plane upside down to make controlled cuts by pulling the stock over a sharp blade.
When you rip inlay strips, leave them a hair wider, and slightly thicker. Then, finetune the width to match the grooves by drawing the strip against a keen edge (photo 7). This is how you get tight fits that make others wonder how you did it.

8. When planing the inlay, skew the plane across the grain and push to slice.
To install the inlay, slightly chamfer the bottom edges of the strip and apply glue with a brush or syringe to the groove (not the string as it may expand with moisture). After the glue is set, plane or scrape the inlay flush (photo 8).
Inlay the butterfly keys
Here is another blunder confession: The butterfly inlay was not part of the original design and was added to cover my second slip-up! I overshot at one end as I routed, resulting in an erratic groove. For the fix, I used my wife’s suggestion and extended the borders with attractive butterfly inlay accents.

9. I used paper inlay mock-ups to visualise their decorative effects.
First, I used paper butterfly keys to try out various design ideas before cutting out the walnut keys (photo 9). I chopped the mortises by hand using a chisel and a router plane. Number the butterfly keys and corresponding mortises as they may vary slightly in size or shape.

10. Butt the key against the mortise wall and trace along the other edge of the key.
Trace the keys on the workpiece and remove the waste on only half of the mortise, starting the first cuts slightly away from the outline. Place the key in the partially cut mortise and retrace the outline on the uncut side (photo 10).

11. To ease the installation, chamfer the key’s bottom edges slightly.
Finally, finish the mortise to the last traced line (photo 11).

12. Soak the dent with a drop of water and iron the spot with a wet cloth.
As I was about to plane the keys flush, I spotted one last glitch: a dent near one of the keys from a careless hammer tap. The fix was simple and quick, though: Set an iron on medium hot setting and iron a wet cloth over the dent to raise the compressed fibre (photo 12). Plane or sand the area smooth.
Shape the edge

13. I moved the pin towards the sawblade and cut the bevel in multiple passes.
I tilted the blade to 50°, repositioned the centre pin on the circle jig and added a slight bevel to the underside of the top (photo 13).

14. Steady the plane with fingers under the bottom and change the angle slightly after each pass to round over the edge.
But for the rims, I used a wooden plane to get that authentic handcrafted look and feel (photo 14).
Make the pedestal
One practical but less accurate way of cutting a hexagonal post is to layout a hexagon of the desired size on the end of a square blank and use it as a guide to set the saw fence for the 60° angled cuts.
However if you prefer, you can also use formulas to find the tablesaw settings as I did – thanks to a refresher received from knowledgeable woodworker Robert Lee, see below "Cutting Perfect Hexagons".

15. Using the same bottom to cut the first sides reduces cutting errors and inaccuracy.
After setting the saw, I made the first 60° cut on the post. Instead of rotating the post around for my second cut, I rotated it end to end to rip the second hexagonal side (photo 15).

16. Hand planing gave the post a surface ready for finishing without sanding.
I made the last two cuts in the same manner to complete the post (photo 16).
Cut the arms and feet

17. The ends of the feet should be about 65mm inside the footprint of the top.
The span of feet for a table is usually 75% of the top’s diameter. I used that guideline to work out the length of the feet (photo 17).

18. The table is easy to move around with the angled feet design as only the front bottoms touch the floor.
I then tried out a few different angles for the feet to be attached to the post (photo 18).

19. Lay out the bottom of each foot perpendicular to the joint end.
Finally, I scribed a line on the front bottoms of the feet and planed them flat (photo 19).

20. Secure the stock down on the jig and cut the taper in two progressive cuts.
I tapered the arms and feet on the tablesaw with a tapering jig (photo 20). Another option is to taper the parts on the bandsaw and then sand or plane them to the line.

21. Chamfer the edges by hand, leaving a handmade look on the piece.
Lastly, I cut out the screw slots and broke all the sharp corners and edges (photo 21).
Join the arms and feet to the post

22. I studied the domino size and spacing to determine the strongest joint set-up.
If the top is not too large and heavy, the arms and feet can be joined to the post with dowels. I have a domino joiner so floating tenons were used. I used double dominos in two rows for each joint (photo 22).

23. I used a spacer stack to increase the registration surface on the post.
Before I cut the mortises, I labelled all the mating parts properly and double-checked the mortise placement (photo 23).

24. Dominos are easier to work with if you microwave them before a dry-fit.
I recommend clamping one joint, or one after another on the same side, at a time. After an hour or so, you can clamp the second pair and so on. Of course, dry-fitting must not be skipped (photo 24).
Finish to protect
I sanded the top to 220 grit and the edge to 400 grit to make it look closer to the face grain. After five coats of polyurethane, I predrilled and screwed the top in place. Finally, the most satisfying moment came when I set the seal on the piece, signing my name underneath with a pen.
They say heirlooms are elegant, exhibit fine craftsmanship, and stand the test of time. I’m pretty sure that my small table fits the bill after I overheard my daughter saying that the nice-looking new table would look even better at her place!
* See AWR#83, 6 Workshop Machine Tips, also written by Charles Mak.
Cutting Perfect Hexagons
To figure out your tablesaw settings first determine the kerf thickness of your sawblade. Next, determine the desired width of the pedestal post faces. As an example, my blade kerf is 1/8" (3.17mm) and the desired face was 3-1/2" (89mm).

Step 1: Machine a square blank to the face width. In this case, start with a 3-1/2" x 3-1/2" (89 x 89mm) blank.
Step 2: Find out how much material is removed by the kerf in a 60° cut with this formula: 2 * k * 1/Tan 30, where k is the kerf thickness and Tan 30 is 0.577. So, my 1/8" kerf blade tilted at 60° will remove 0.443" or 7/16" (11mm) of material.
Step 3: Reduce the thickness of the square blank by the figure arrived at in Step 2. The modified blank is now rectangular, 3-1/16" by 3-1/2" (78mm x 89 mm) (fig.1).
Step 4: Find the waste to be cut off from the base (X) with this formula: Tan 30 * Half of the thickness of the blank, which is 0.577 * 3-1/16" / 2 = 0.88" or 7/8" (22°) (fig. 2).
Step 5: Set the cut so the base of blade is 2-5/8" from the fence (3-1/2" – 7/8") and raise the blade to just a hair about the centre line of the blank.