Tuning and using a Japanese plane
Words and photos: Iain Green
In a past issue of Wood Review magazine, Iain Green shows how to make a traditional Japanese hand plane* – here he shows how to tune it.
Tuning planes is a core skill for Japanese woodworkers. As a result, planes are not usually sold in a fully tuned condition and require an initial tuning before they can be used. In this way, planes may be tuned to personal preference or to suit a particular project. As wooden plane blocks also react to changes in weather, the first task of the day may be to check and perhaps adjust the sole.
I would like to outline the initial tuning and the regular maintenance tuning so that anybody who has made or bought a Japanese plane, or has an old one in the back of the cupboard, can turn it into an effective part of their toolkit. I will also summarise the Shuko-kai** technique for using a Japanese plane. Firstly, it is important to know how to insert and remove the blade.
Inserting and removing the blade

To insert the blade, feed it in by hand, making sure that it is straight, and then tap it home – Shuko-kai use a 300 gram steel plane adjusting hammer. Make sure that the ends of the cutting edge are aligned with the sides of the mouth and tap the top of the blade sideways to redirect it if necessary. If there is a chipbreaker, insert it with the blade and tap it down as the blade advances, making sure that it does not progress beyond the cutting edge.

To remove the blade, strike the end of the block alternately on either side, in line with the side channels that hold the blade. Use a glancing blow by bringing the hammer down parallel to the blade while holding the hammer so that it hits the end of the block squarely. Keep pressure on the blade with your other hand so that it doesn’t jump out unexpectedly. Do not strike the back of the block in the middle as this can split it.
Initial tuning
Use the following steps before using a new plane to ensure that the internal setup is appropriate. They also serve as a good checklist when you are having problems with a plane.
1. Check lateral movement
Rub an HB pencil along the sides of the blade and insert and remove the blade. Any black marks in the side channels indicate that the blade is touching and a shaving is required. Repeat this process until there is no side contact.
Now insert and remove the blade a couple of times to check lateral movement of the blade as it is adjusted to cutting depth. There should be enough lateral movement, particularly at the entrance to the side channels, to allow the fully inserted blade to be adjusted to the parallel position from both directions, by tapping the top of the blade sideways. Use a small chisel to shave any black spots in the side channels which indicate restrictions in lateral movement.
2. Check grip on the blade
Insert the blade to cutting depth and get a feeling for how firmly it is being held. On my larger planes, there is 7–9mm of adjustment from the point of initial grip as the blade is inserted to cutting depth. If the grip is on the loose side be cautious that further adjustments may result in insufficient grip for effective use of the plane.

Coat the back of the blade with pencil lead, insert it into the body and adjust it to cutting depth. Any tendency for the blade to drift to one side indicates that there is more grip on one side than the other. A very small shaving is required from contact points on the back of the throat (photo 1), on the tighter side – be very cautious here.
Remove the blade and check for contact in the middle of the blade, indicated by lead marks in the centre of the back of the throat. While contact in the middle of the blade can help to reduce chatter, excessive pressure in the lower part of the middle can distort the sole. Carefully remove a shaving from contact points in the lower central area, making sure that contact is maintained along the bottom edge.
Adjust the blade to cutting depth and insert a thin feeler gauge into the opening in the sole behind the blade. Check for any contact between the blade bevel and the thin strip of wood across the sole behind the blade. Contact here leads to distortion of the sole and potential cracking of the sole. Take shavings from this strip to remove any contact and retest.
If earlier adjustments have led to inadequate grip on the blade, it is possible to remedy this with filler. Dip the blade in oil, coat the bevel in filler and insert the blade. This will leave a smear of filler in low spots.
3. Check the chipbreaker
Prepare the chipbreaker in the same way as I outlined for sharpening blades in Japanese Blades in AWR#54, with the exception that you need to put an 85° microbevel on the front edge. This assists the breaking action of the chipbreaker.
Place the chipbreaker on top of the blade and check there is no rocking—hone the back of the chipbreaker to remove this. Hold the blade and the chipbreaker together and look from the back between them to see if any light comes through the front contact. If one isn’t flat shavings can get between them.
The fit of the chipbreaker into the plane should be just firm enough to keep it in place and to ensure that shavings can’t get under it. There should be full contact with the metal pin across the width of the chipbreaker. If necessary, the rear corners of the chipbreaker can be adjusted to change the firmness of the fit. Note that the blade should be held in place by grip in the side channels, not by pressure from the chipbreaker.
4. Adjust the sole

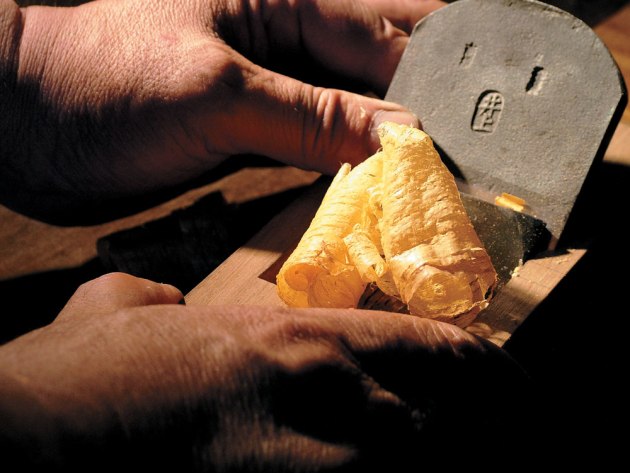
Insert the blade (and chipbreaker) so that it is 1–2mm back from the mouth. If this is the initial tuning of the plane, then flatten the sole using a scraper plane (photo 2) that has been tuned to have a flat sole itself—unfortunately this requires a second scraper plane. (I used an HNT Gordon high angle smoother plane with the blade reversed to tune my Japanese scraper plane.)

Hold the scraper plane with your hand over the blade so there is even pressure over its length and alternate the direction every five strokes or so to avoid bias as you scrape the sole (photo 3).
The sole needs to be flat from every angle. Use a straight edge to check across the sole and along its length at several points. Also check diagonals from the front corners to the ends of the mouth and the rear corners.
Now scrape across the central area of the front half of the sole so that a straight edge placed along the sole contacts only the first 20mm back from the front and for 10mm in front of the mouth. A sliver of light should show in the central area. Next, scrape across the rear of the sole so that a straight edge shows a similar sliver of light in this area. Check that these slivers of light are consistent as the straight edge is moved across the width of the sole and is placed along each diagonal. As a guide, the gap created on the front and rear of the sole should be 0.2– 0.3 mm for a plane taking a medium shaving, and 0.1–0.15 mm if the shaving is fine.
The effect of this scraping is to reduce friction so that it is easier to pull the plane. It also means the timber immediately in front of the cutting edge is under pressure which reduces tear-out and improves the quality of the cut.
5. Square the sides
If the plane is to be used with a shooting board, use a scraper plane to square the appropriate side to the sole.
Daily tuning
A plane that is tuned to take fine shavings is affected by very small changes to the condition of the sole. Small amounts of wear to contact points or movement in the block from weather change can have a significant impact. The first step be- fore using a plane is therefore to check the sole to ensure that contact points are flat and that there is clearance across the middle region of the front of the sole and across the rear of the sole.
It is quite usual for some minor adjustment to be required most days. Check and adjust the contact points so they are flat and then check and adjust clearances. The contact in front of the mouth should be flat up to the edge of the mouth. I have more trouble ensuring there are no contact points across the rear of the sole as they are often difficult to find – and they do disrupt the cutting action. Other aspects of the tuning need only be reviewed occasionally, usually when there is a problem.
Variations to tuning
Shuko-kai use the setup that I have described and a single flat bevel to the blade. I suspect that mastery of this combination goes a long way to enabling quality woodwork. However, the wider Japanese tradition does encompass other options. Some craftspeople use curvature on the blades of roughing planes to remove material quickly, and on fine smoothing planes to avoid marks between strokes. Some longer planes are set up with additional contact points across the front of the sole.
A secondary bevel is not used in traditional Japanese woodwork and I have found that honing a single bevel on a Japanese blade works well. People who are more comfortable with using a secondary bevel on plane blades could try both options on a Japanese blade to see what works best for them.
Adjusting the blade

Insert the blade (with chipbreaker) until it is almost in place, with occasional side taps to keep it straight if necessary. To adjust the chipbreaker, hold the plane in your hand and look down the throat in line with the chipbreaker bevel and tap it down until the bevel just obscures the cutting edge (photo 4).

If you draw the geometry here, this must place the front edge of the chip- breaker very close to the cutting edge. Turn the plane upside down and sight down the sole from the front, keeping your eye in line with the plane of the sole (photo 5). Tap the top of the blade until the cutting edge just emerges through the mouth.
The objective here, if you are tuning for a fine shaving, is to get the barest hint of grey from the blade showing evenly across the mouth. I find it helps to put a piece of white paper on the bench as background and shine a bright light onto the sole. The light colour of Japanese oak is an advantage as it contrasts with the blade – it’s more difficult with darker wood in the plane body.
Often, one corner of the blade will emerge first and you need to tap the top of the blade on the side to bring it back to square. This is an iterative process where you will need to correct the sideways adjustment a few times. You are quite likely to bring the blade out too far and then have to withdraw it a little and repeat the process.
Using the plane
At last! Japanese planes are used on the pull stroke which takes a while to get used to, if you are familiar with western planes. The Japanese tradition includes both a kneeling and a standing position when planing. I will assume here that most people will be more interested in the standing option, though I can assure you that kneeling works fine also.

Posture is important. Reach forward to the end of the workpiece, holding the plane with one hand around the back and the other over the front of the plane body (photo 6), brace your feet, arch the small of your back and pull the plane towards you through your upper body at an even speed. Keep an even pressure from both hands and an emphasis on pulling from the front hand.
Of course it takes practice to develop a smooth planing stroke with even pressure on the workpiece. Some of the issues to con- sider as your planing skill develops include:
• Rounding over the ends of a workpiece. If you consider that a plane has three contact points on the sole—front, mouth and rear – then at the start of the stroke, use the forward hand to emphasise pressure on the front two contacts, moving to balanced pressure as the rear of the plane moves onto the board. As the front of the plane moves off the board, shift the emphasis to the remaining two contact points.
• Shiny tracks on a board. If there is too much contact from the strips along the side of the sole outside of the cutting edge, they will burnish the board, leaving shiny tracks. This particularly applies to the area adjacent to the mouth—relieve it slightly with a scraper plane.

• Obtaining an even burnish on a wide board with no marks between strokes. Use a finishing plane with a sharp blade and a flat bevel (no rounding of the corners of the blade) and set it for the thinnest shaving. Starting on one side and using only light pressure and an even speed, take a number of strokes in the one position until a full width, full length shaving is taken (photo 7).
Then move to the adjacent position on the board and repeat this process. An even burnish is certainly the hallmark of skillful planing and requires practice. Heavy pressure and multi- ple shorter strokes won’t get the same even burnish.
• Handling hardwood and complicated grain. Selecting a plane with a higher blade angle is one answer here of course. However, a plane can also be tuned to some extent to improve its ability with more difficult wood. Options to consider are: selecting a plane with a narrow mouth opening and a very tight grip on the blade; tuning the sole with a broader contact ahead of the mouth and an additional small contact immediately be- hind the mouth; adjusting the blade for a thin shaving.
Caring for a plane
Japanese planes are pretty robust and can be adjusted to new situations or repaired as the need arises. They are susceptible to changes in the weather and are sometimes kept in glass-fronted cases with glasses of water to keep humidity high at those times of the year when the air is very dry. However, most woodworkers have a lot of planes and keep them handy on racks around the workplace. I think they just accept the overhead of tuning the sole regularly, or use airconditioning to control humidity.
Soles wear over time as a result of this tuning and this leads to the mouth becoming larger. It is quite common to see older planes with an insert cut into the sole ahead of the mouth, as a way of resetting the mouth opening.
Observations
The effective use of a Japanese plane requires a higher level of insight into adjustments that affect its operation than is necessary for other types of plane. As the finetuning can vary daily through wear at critical points and through weather changes, there is greater potential for a Japanese plane to not work properly. A higher level of ongoing maintenance is therefore required. However, this daily tuning is a relatively minor task and it keeps focus on and builds skills in an aspect of using planes that is usually neglected. I think that this can contribute to improvement in the end result – the finished surface.
* Iain Green's article on making a traditional Japanese kanna plane is at this link
See also an article by Terry O'Loughlin on making a Japanese style shoulder plane here
** Shuko-kai is a traditional woodworking group in Japan.
First published in Australian Wood Review, issue 58. Iain Green studied traditional Japanese woodwork in Japan and has written several articles for Australian Wood Review magazine.