Making a traditional Japanese kanna plane

Words and photos: Iain Green
I lived in Japan for some time and took part in the training program of a local woodworking group called Shuko-kai, which is dedicated to preserving traditional Japanese hand skills. Hand planes are central to fine woodwork in Japan. Traditionally, Japanese woodworkers aim for a final finish from hand planing that needs no additional sanding. As a result, a lot of emphasis is placed on tuning planes to ensure fine shavings and a smooth finish. Learning how to make these planes can lead to deeper insight into tuning and using them.

At that time I completed a project under the oversight of Tokio Inoue from Shuko-kai, where I made a hira-kanna plane which I set up for taking fine shavings. The photo above shows the wide range of planes of this style of construction. Further variation to tuning of the sole, the mouth and the blade sharpening allows these traditional Japanese planes to be used as cutting down, rough, medium and fine cut planes.
Differences
Japanese planes (kanna) are used on a pull stroke rather than being pushed as is the case with western and other Asian planes. As a result, the blade is placed well back in the body to give a large reference surface at the front of the plane. The other important difference is that the front and back surfaces of the blade aren’t parallel so the blade acts as a fine wedge. The blade slides down a slot in each side of the body and this wedge effect causes the blade to be gripped firmly as it reaches cutting depth. The blade bed angle is determined by the hardness of the timber being used. For hira-kanna planes, the blade angle ranges from 31–42° though for other planes it can be as high as 90°.
An advantage of this system is that woodworkers have direct control over all aspects of the plane. They can make new planes to any configuration they want and can tune planes for different situations. In Japan, there are competitions for making the finest shaving and competitors use these planes to produce full width, full length transparent shavings of only three microns thick, so they can give exceptional performance. A disadvantage perhaps is that the wood in the body wears with use and moves with the weather which means that regular adjustment of the sole is inevitable.
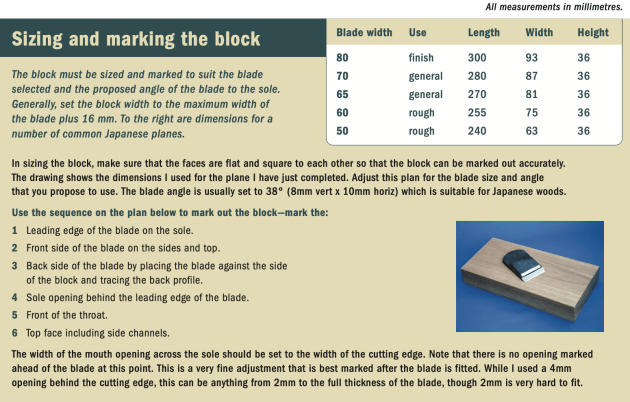
The traditional approach to making a Japanese plane uses simple tools—a plane for sizing the block, chisels for opening the throat and small saws for cutting the mouth opening and starting the side slots. However, fine control over the blade setting requires very precise fitting of the blade to the body.
Shuko-kai feel that well developed skills are necessary if this level of control is to be achieved. The risk is that too much material will be removed in critical areas, such as the throat or the mouth opening, or the grip on the blade will be ineffective. In order to improve awareness of subtleties to the blade fitting that are difficult to describe in an article like this, I strongly recommend becoming familiar with tuning and using a Japanese plane before contemplating making one.
Because of this risk of ruining a block by removing too much material in some critical areas, the traditional approach that I will describe closely follows some of the principles that Robert Howard outlined in his Zen Rules for Woodwork in AWR #48. In particular, it is important to creep up on the end point through a number of small steps and to look for confirmation that you are on target, as you go.
Selecting the materials
As the operation of a Japanese plane depends on the wedge effect of the blade, the only option that I am aware of is to use a Japanese blade. In AWR #54 I described the characteristics of a Japanese blade and outlined how to sharpen them. The plane described in this article uses a 70mm blade that I obtained locally in Tokyo. Japanese blades can be obtained locally through www. japan-tool.com or www. japanwoodworker. com (see Plane Blades under Japanese style planes) or other supply sources on the internet.
The wood usually used for planes is Japanese oak (Quercus acuta) which is quite hard, doesn’t crack when it is hit, and gives a very fine shaving with a scraper plane. The colour is light which is important to Japanese woodworkers as they use the contrast in colour between the blade and the body to assist fine tuning the set of the blade. Jugo Ilic, a wood scientist who writes for Wood Review, suggests that white mahogany (Eucalyptus acmenoides) or a light coloured spotted gum may be reasonable alternatives that Australian woodworkers could try.
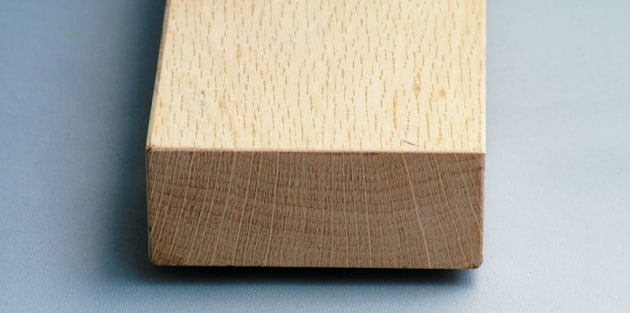
The block selected for a plane body should be from a backsawn board, with the growth rings across the ends of the block as parallel to the sole as possible. When marking out the block, set the sole to the face that would have been to the outside of the tree and the peak of growth rings on the sole to the front of the plane. This will help reduce friction as you pull the plane towards you.

Bedding the blade in the block

There are seven steps for removing material from the block. The most certain way of getting to a controlled end point is to complete each stage as accurately as possible before moving on to the next.
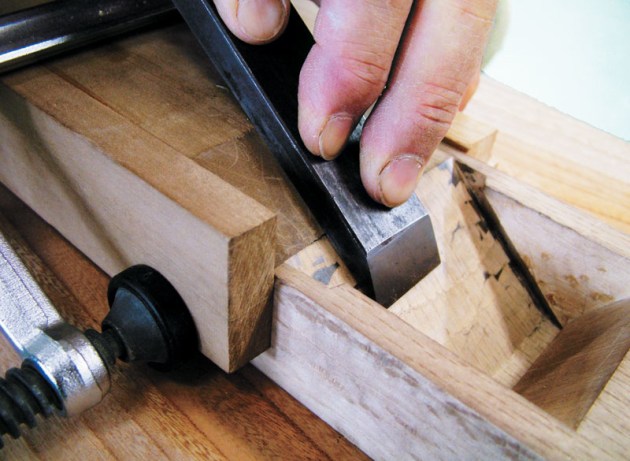
1. Remove the central throat area, leaving a safety margin 1 of 2mm on the front face and 1mm on each side face. Sharp chisels with flat backs are essential for true surfaces. Shuko-kai use a smear of camelia oil on the chisel to ease the cut and to maintain the cutting edge as long as possible. I used a number of cards cut to the profile of the throat as it developed, which helped to monitor progress. Regularly check the depth of the throat – you don’t want any surprises here. I also found that chisel guides set to the angle of the front and rear of the throat helped enormously to cut an accurate surface. A chisel guide is used in the photo above.

2. Extend the back face of the throat to mid-way between 2 the front and back surfaces of the blade after completing mark-up steps 1 and 2. Set the slope to that of the back of the blade. Mark the front face of the blade on the inside of the throat.

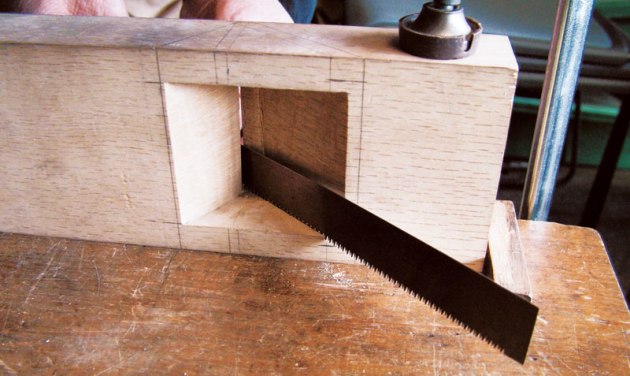
3. Remove the central area of the mouth opening on the sole using a vertical chisel cut along the rear edge and a cut along the front edge, in the plane of the front face of the blade. Then use a chisel to extend the cut from the front edge as far as possible and make a corresponding cut from the inside. If this doesn’t cut through, use a saw with a curved edge to cut through along this chisel mark. The initial sole cut is shown above.

4. Open the throat a little without increasing the opening in the sole. Keep the amount removed on the top side to about 1mm.
5. Use a small saw to cut the top edge of the channel on either side—extreme caution is required here. Clean the side channels and ease the back of the throat a little on the sides to reflect the slight curve across the back of the blade. Chamfer the top corners of the channels to avoid damage as the blade is inserted.

6. It should now be possible to insert the blade into the 6 side channels a little. If necessary, ease the side walls of the channels so that there is no side pressure from the blade as it is being fitted into the block. Monitor this as you progress as side pressure could damage the block.
Give the back and sides of the blade a liberal rubbing with a HB pencil. You will need to renew this covering a couple of times through the fitting. Tap the blade firmly into the block and then withdraw it by tapping the back of the block on either side in line with the side channels. Ideally, strike the block parallel to the plane of the blade. Never withdraw the blade by striking the middle of the back as this can split the block.
The lead from the pencil will have marked the block at contact points with the blade. Use a broad chisel to take a shaving at each of these spots. Keep repeating this process of inserting, removing and taking a shaving to bring the blade down into the body. This is a slow process (it took us 5 hours) but taking it carefully is the best way to reach a controlled fit. It takes some experience to know how hard to hit when inserting and removing the blade. Use the force you would use on a fitted blade on an existing plane as an indicator.

A further guide is the distance you drive the blade home after the point of loose contact. With my planes, that distance is between 7 and 9mm. Anything less would leave the final fitting too loose.
As the blade moves down, monitor the sideways fit. There needs to be enough slack to allow lateral adjustment of the blade. At the point of loose fit, I can move my blades 1–2mm. As you insert the blade each time, make sure it is entering straight.
As the blade approaches the point of emerging through the slot in the sole, pay very careful attention to any contact between the blade bevel and the strip along the sole behind the opening. Any contact here will distort the sole and may split the bottom out of the body. Use lead on the bevel or a feeler through the opening in the sole to check for contact. It is quite likely that the strip behind the opening will have to be relieved to allow the blade to come through.

7. Finally, clean up the block:
• Remove the safety margin from the front of the throat.
• Also remove the safety margin from the side faces of the throat so these faces align with the ends of the cutting edge – this should require removal of 1mm from each side.
• Give the exterior of the block a final surface.
• Chamfer top edges for comfort.
Review the opening ahead of the cutting edge and the clearance through the throat. Relieve sufficiently to allow the plane to be used. As a guide, the opening ahead of the blade for a plane tuned for fine shavings should be about 0.3mm. For a plane tuned for general purpose use, an opening of 1mm is reasonable. I suggest that you keep below these targets at this point and fine tune these critical areas as you become familiar with how the plane is meeting your needs.
Fitting a chipbreaker
Most planes are fitted with a chipbreaker. Scraper planes don’t need one and planes used only for very fine shavings don’t have one either. Breaking the shavings isn’t necessary when they are very fine and the weight reduction is thought to assist taking a very fine shaving.
The chipbreaker is held in place by a pin or nail that is inserted through the body above the blade. Note that the blade is held in place by the wedge effect of the blade in the side channels and not by pressure from the chipbreaker. There should be sufficient pressure between the chipbreaker and the blade to ensure that shavings can’t get between the two but not so much as to distort the sole when the chipbreaker is inserted.
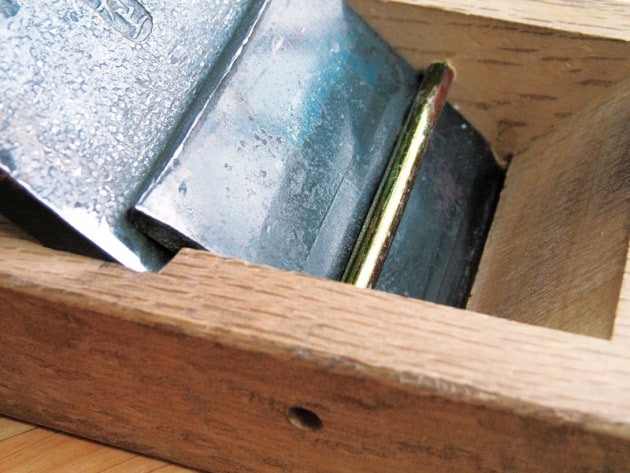
Installing the pin for the chipbreaker
1. Ensure that the chipbreaker fits comfortably into the throat and sits on the blade without rocking.
2. Set the chipbreaker in the throat and mark the top edges on the inside faces. Transfer these lines to the outside of the body.
3. On one side, mark the thickness of the nail and then mark the centre point of the nail, one third of the thickness of the body from the top.
4. Drill this side. If a 3.8mm nail is used, use a 3.6mm drill, for example.
5. Using camelia oil to lubricate the nail, insert it and while holding the nail against the chipbreaker, mark the centre point on the other side.
6. Transfer this mark to the outside of the second side. Drill this side and fully insert the nail.
7. If the chipbreaker is too tight or too loose, fine tune the fit by honing the back face or by tapping the leading edge on a steel block. The chipbreaker should fit firmly with even contact across the nail.
Observations
The plans and instructions I have outlined here are for hira-kanna planes which encompass a broad range of planes used within traditional Japanese woodwork. These planes have a maximum blade angle of 42° and I suspect that western woodworkers using harder wood are likely to prefer a 45° blade angle.
As this style of construction works perfectly well with a blade angle up to 90°, I think the plans can readily be adjusted for this higher pitch. The front face of the throat would have to be adjusted to something like 4:3 (vertical to horizontal) slope, to keep the throat open enough to avoid clogging with shavings. In addition, the steel in the cutting edge of Japanese blades is harder than that in western blades and as a result is also more brittle. So, it would be a good idea to use at least a 35° bevel on a blade being used on hardwood with this higher blade angle.
I have found that the really critical adjustments change very quickly. In particular, towards the end of seating the blade and when you are setting the mouth opening, it is very easy to go too far and end up with a loose blade or a mouth that is wider than you intended.
First published in Australian Wood Review, issue 57.
Iain Green studied traditional Japanese woodwork in Japan and has written several articles for Australian Wood Review magazine.