The Green Wood Spoon
Words and photos: Barton Chesworth
Years ago I stumbled across wooden spoons in a museum whilst living abroad in Sweden on a student inter-university exchange. At the time I remember thinking how cool and beautifully handcrafted they were.
A couple of years later I felt a need to reconnect and pursue woodwork once again, however at that stage I was living in the top floor of a unit complex in Brisbane. Despite the limitations, spoon carving jumped into my life with full force.
Spoon carving requires few tools – axe, straight and bent knives – and can be performed anywhere. It makes minimal noise, wood chips not dust, and utilises freely scavenged timber. These are the factors that have caused a boom in this craft around the globe in recent years.
Why green woodworking?
Spoon carving traditions mainly originate from Scandinavian, Celtic and Roman cultures. My interest in lies in green woodcarving that celebrates the use of readily accessible timber. Here, the biggest advantage of using green or wet timber is that it’s much easier to work and less taxing on your tools.
In a country full of endemic hard timbers this is hugely beneficial. Apart from the experience of a handful of shingle cutters and chairmakers at the turn of last century, Australian green woodworking is an exciting realm to explore.
You can experiment with what’s at hand. Native and exotic species I have had great success with include sheoaks, broad leaf paperbarks, native cherry, privet, sycamore, jacaranda and fruit woods*.
Green branches from 80 to 150mm diameter are best for eating spoons, and offer the beginner quicker log-to-spoon carving time. Here I’ll show one way of carving a spoon from straight branch wood.
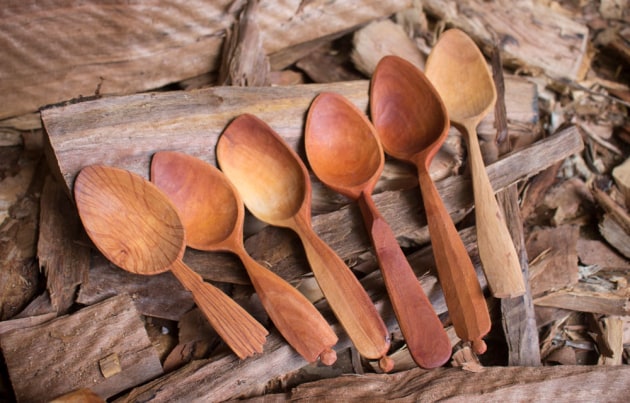
Eating spoons
A simple spoon is really a three dimensional sculpture that should not only look good but also perform. Eating spoons are generally carved for either solid or liquid foods.
An understanding of grain direction and the properties of timber must be developed, as a structurally weak spoon will fail in time. The ultimate goal is to carve the thinnest, strongest spoon possible.

Axe work
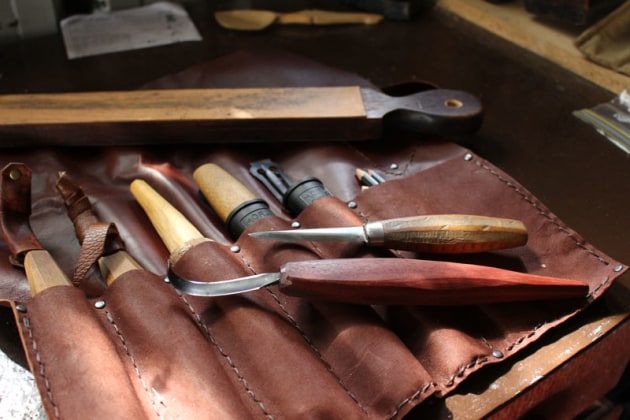
A basic kit for green spoon carving is a chopping block, a saw, an axe or hatchet, a straight knife and a bent knife.
If you feel comfortable using a carving axe, saw your branch into around 250mm lengths. If you are new to carving cut them longer to allow more room between the axe and your dominant hand. Typical eating spoons fall between 150 and 210mm in length but always leave a little extra in case you have to navigate knots, and to buffer for checking.
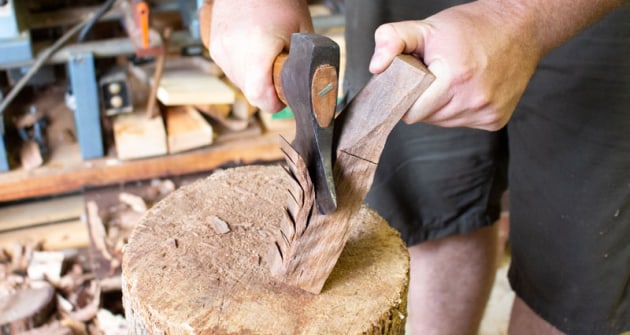
Identify the pith in the cut end and mark a line through it. Place your axe over the line and lightly strike the back of your axe with a wooden mallet or piece of discarded branch. Only sharp light force is required, the aim is to safely split the branch into two pieces.
Inspect each half for any knots or any other possible issues, and only proceed with nice clear grained timber with minimal defects. Next, remove the pith and the first few growth rings from the split half, this is a critical step that will significantly reduce the likelihood of your spoon cracking or checking later on.

The half branch semicircle is now turned into a long rectangular brick shape as shown above. This is achieved by taking two cheeks off the semicircle, splitting the bark off and truing up the outer edge. This step may seem unnecessary, but if you work in a methodical way and keep the timber square to the eye, your spoons will be more symmetrical.
Rule of thirds

Start to plan your spoon by measuring its desired length. Mark the ends, then draw two more lines across the blank, a third from each end. From here you can begin to visualise the basic spoon proportions, one third will become the bowl of the spoon and the remaining two thirds will become the handle. Then divide the bowl section into thirds – this will mark where the ‘crank’ is required in the next step.
The crank angle
A spoon made from a flat piece of timber is fine for using an overhand grip and stirring a pot, but not for eating.
A crank or angled bend enables room for your hand and keeps the spoon bowl level to ensure no food is lost on the journey to your mouth.
The angle of crank varies – for example soup will require a spoon with a larger crank than a spoon designed for dry foods. Next time you pick up a metal spoon study it and notice the crank angles vary according to purpose.
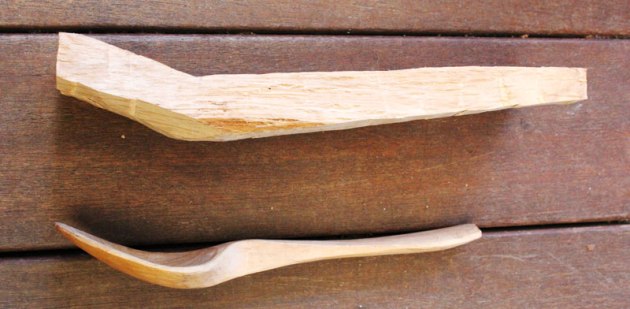
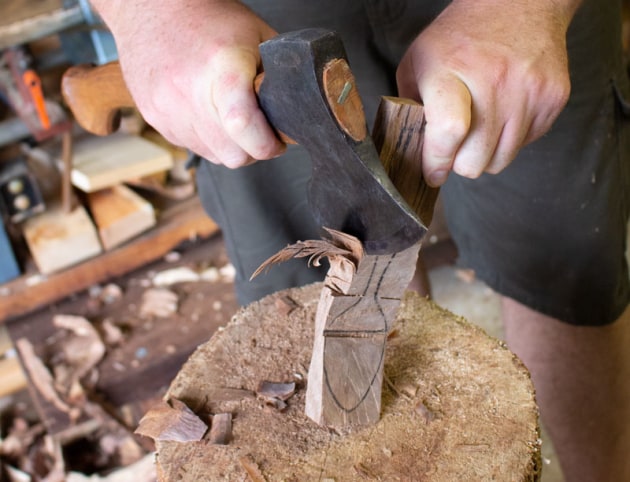
The deepest part of the crank should be two thirds down from the tip of the spoon bowl: saw a 10mm deep cut at this point across your blank as shown on the top blank in photo 4.
Now, using your axe, carve down at a gradual angle from the handle tip down to the cut line and depth. Turn the blank around and and carve a gradual angle from the spoon tip back down to the cut line.
Now flip your spoon blank over and shape the back of the spoon as shown above. The aim is to mirror the top side profile onto the bottom. Hence you will carve from the deepest part of the bowl (top of the mountain) back down to the tip of the handle and then again down from the mountain to the spoon tip.
The outline

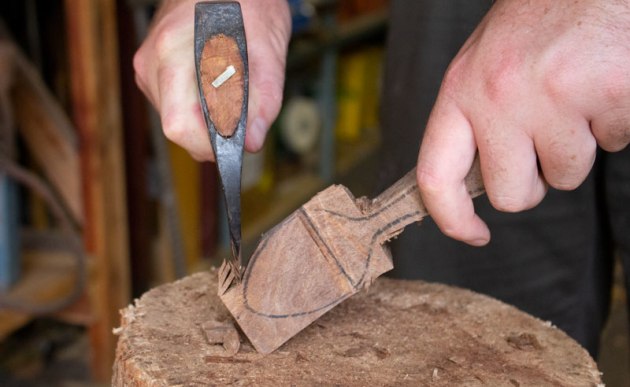
Now design and draw your spoon top view outline, ensuring the widest part of the bowl is two thirds down from the spoon tip. The photo above shows the stages. If you are looking for design inspiration, use your favorite metal spoon as a template and keep designs simple and flowing.
Remove the waste wood from each side of the handle. Focus is required here as an axe blow misplaced here will shear off half your spoon bowl. A little trick here is to saw stop cuts on each side of the thinnest part of the handle neck where the bowl meets the handle.
To be safe, hold the tip of spoon and carve down from the stop cuts as close to the lines as possible. Then flip the spoon on its tip and lightly carve back to the stop cuts. Alternatively, if you are feeling confident with an axe, you can cut V-notches instead of the stop cuts.
Shape the bowl outline. Place the tip end of the spoon bowl on the chopping block and using a straight down carving action, carve the tip of the bowl shape by rotating the blank slowly. You now have a spoon blank roughed out ready for knife work – time to put down the axe.
Knife work and finishing
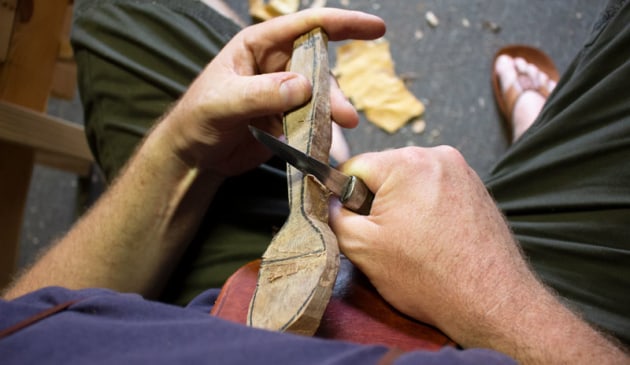
Use your straight knife to carve right up to your pencil outline. If you are new to carving with a slojd knife I highly encourage you to study different knife grips, these are well published in Jögge Sundqvist’s recent DVD and explained well in Barn the Spoon’s book, Spon.
The side profile will ultimately determine the strength of your spoon. Dimensions that are wide in plan view can be thin on side view, and vice versa. This means the handle end can be carved thin and gradually thickens all the way to the base of bowl. The critical section, that is, the weakest point, is the neck of the handle where it meets the bowl. I like my eating spoons to be at least 10mm deep here to ensure strength.
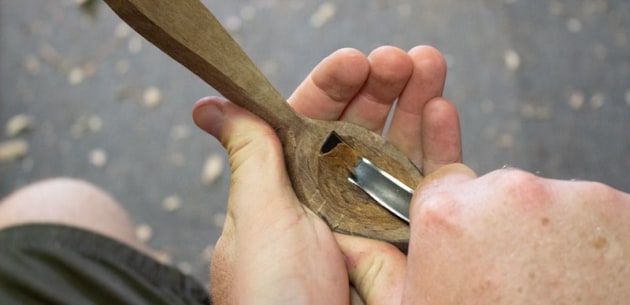
Time now to switch to the spoon or bent knife to start hollowing the bowl. Attempt to make many shallow cuts across the grain, ensuring you pull the blade out of the cut. Avoid taking deep short cuts, you will create a ridge that will require chasing out and make carving far less enjoyable.
Work with the grain where possible, rotating your spoon around until you create smooth cuts. Mouth feel is a critical element when designing an eating spoon. Eating spoons are best carved at a maximum depth of around 7–8mm, this mirrors the top lip and ensures a nice and comfortable mouth feel.
Once you are happy with the inside of the bowl change back to your straight knife and thin down the back of the bowl. Proceed to finish carving the handle, removing as much timber as possible without compromising strength. When you’re 95% finished, it’s now time to stop carving and allow your spoon to completely dry or season.

Seasoning usually only takes one or two days. To finish carve the spoon remove any sharp edges, and
note your blades need to be razor sharp in this step to achieve an overall nice knife finish. Lastly, apply a light
coat of a food grade drying oil: linseed, walnut, tung or sunflower oils are my preferences.
Regardless of your woodworking journey I encourage you to try spoon carving. There is something immensely satisfying about taking a branch from your garden and turning it into a useful object within hours, utilising only few tools in a dust free, quiet and transportable woodwork style.
Spoon carving has much to offer the pondering philosophical woodworker and designer. I can safely say you are only as good as your last carved spoon, and your last spoon is never good enough, and that will keep you hungry for a lifetime.
* For more on using native species for green woodworking, see Jeff Donne's Green Wood Guide in issue 101 of Wood Review
Barton Chesworth is a green woodworker and spoon carver who lives in Brisbane.