Making the Peddle Chair

1. Jon Grant in his southern Tasmanian workshop. Photo: Joe Chelkowski
Words and process photos: Jon Grant
Illustrations: Graham Sands
The high school I went to in Hobart’s inner north in the 1970s was formerly a technical college. At the time, nearly half of the school was dedicated to workshops of one trade or another. There were classrooms exclusively set up for technical drawing, workshops for woodworking and metalwork, and there was a forge shop.
Some of the more privileged kids went on an interstate trip in their final year. My parents didn’t have that sort of disposable income, however they did allow me the privilege of buying the materials to make a wood lathe as my Year 10 metalwork project.
This lathe has been a constant in my life and I’ve used it for over 40 years. When I discovered chairmaking it seemed such a natural fit for me. I loved woodturning, particularly between centres, and living in regional Tasmania I had good access to fresh blackwood logs. These lend themselves well to turning chair parts and also to steambending.
Who was George Peddle?
When I first read Denis Lake’s book, The Men Who Made The Celebrated Chairs: Windsor Chairmaking in Tasmania, it struck a chord in me. Denis’s work in this book has shed light on an important Tasmanian chairmaking story, however it was more than that. As a Tasmanian and a chairmaker I felt uniquely positioned, almost incumbent if you like, to carry the George Peddle story forward for future generations.
George Peddle arrived in Hobart Town in the winter of 1884 from England. The fledgling capital city of Van Diemen’s Land offered promise to those escaping tough times in their homeland. At 29 years of age, George quickly gained employment working in Risby’s Sawmill on Franklin Wharf and settled his family into their new life.
George had been a chairmaker for most of his working life before this bold move, firstly in High Wycombe and then in Scotland. He came to Van Diemen’s Land with ambition, and as soon as he was able to secure a land grant, moved a little out of the city, left the sawmill and returned to his previous trade as a chairmaker. Tasmanian blackwood was his timber of choice and he used this exclusively to produce his chairs.
The city of Launceston in the State’s north soon attracted George’s attention with the promise of a growing and prosperous society, so he moved his family north in the hope of building his small business further. Demand for his chairs was strong and he also saw opportunities to diversify. Further to the north-east, a rail line was being pushed out which opened up the region’s lush forests – forests growing on rich soils with high rainfall and of course, plenty of blackwood.
George settled at Nabowla and started to diversify into sawmilling. By 1895 he had encouraged his brother-in-law to leave England and join him. Henry ‘Harry’ Hearne was also a chairmaker and the pair continued to make their blackwood Windsor chairs through to the start of the First World War. The two men continued to work in very traditional ways using only a foot-powered treadle lathe and simple hand tools. Both men were now over 60 years old and production diminished from that point on.
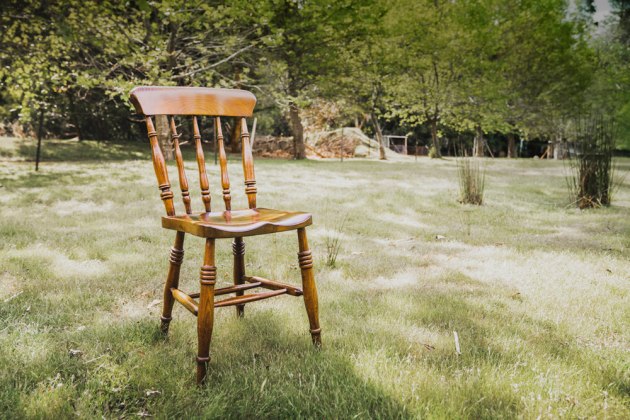
They made a range of chairs, however the Nabowla Pattern Utility Chair was by far the most common, being found in schools, offices and railway stations to name a few places. The following information is a guide to making the Nabowla Pattern Utility Chair which George Peddle and Harry Hearn produced in their small workshop/shed at Nabowla, Northern Tasmania around the turn of the 20th century.

Choice of timber
Fig.1 shows the general construction of the chair. To be made in true spirit of George Peddle this chair should be made from blackwood, however any hardwood or structurally sound timber will do just as good a job. In the past I have made these chairs from Tas oak/Vic ash, celery top pine and even Huon pine.

2. Materials docked as per the cutting list shown below.
Whatever timber is chosen it should have clear straight grain. In relation to the seat, this will allow ease of carving and not present complex grain which will be difficult to work. For the legs, stretchers, spindles and posts this is even more important, as chairs gain much of their structural integrity from wood fibres that run the length of these components. If a spindle or narrow part of a leg or back post were to have cross grain, this will be more likely to break when put under the pressure of everyday use.
Using hand tools
A level of familiarity, both with your materials and your tools, can only come with time and repetition. Intuition takes even longer. The pleasure that comes from finding the sweet spot on an edge tool can only be surpassed by knowing and feeling the grain well enough that you instinctively adjust your skew with each pass to meet the changing grain direction that is presented as the surface recedes.

Sighting
Sighting is a critical skill in chairmaking. This means being able to stand back and sight a chair for balance during its construction, so a judgment can be made based on not only measurement, but also on aesthetics. It’s also about developing tolerances that you as a maker are prepared to accept.

Chairmaking in particular requires the maker to drill holes at all sorts of angles as shown in figs.1 and 3. These angles are the sum of rake and splay in legs and often sighted against projection lines, parallels, mirrors, bevels or lasers. Your accepted tolerances as a maker will evolve over time and will define your work. You create your own interpretation of what perfection means for you.
Turning
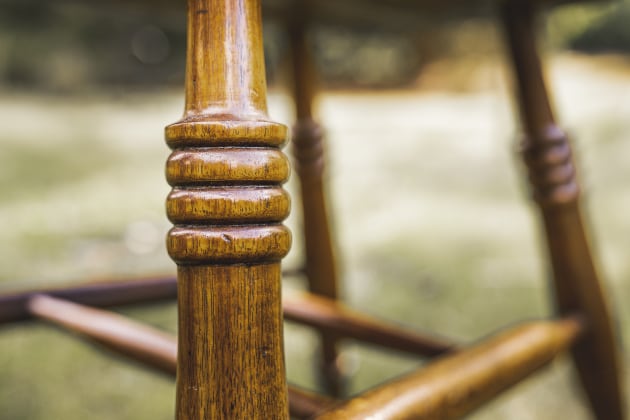
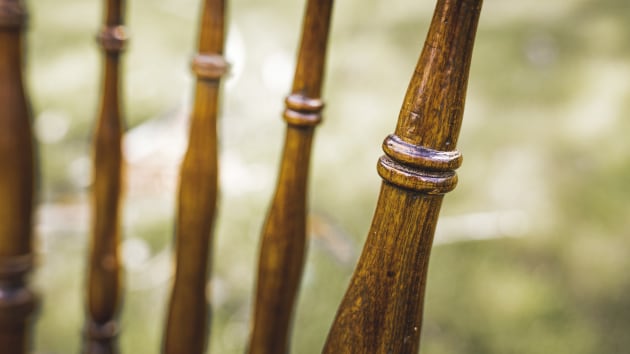
George and Harry must have spent a lot of time on their treadle lathe. Apart from the seat and crest, every component of this chair is turned as per fig.2. I would suggest doing some practice pieces to help develop your skills turning beads and coves. The legs, back posts and spindles all have these configurations. For those confident with a skew chisel, this is an effective tool to use for this, however a small spindle gouge sharpened in the fingernail style will be just as good without as much risk.

Shaping the seat
Fig.3 shows the seat contours. The 25mm diameter blind mortises for the legs can be drilled 30mm deep with a Forstner bit – the short lead point allows for a deep mortise without popping the lead point through the top. This is particularly relevant if using an auger or spade bit.
Traditional chairmaking tools such as a scorp or travisher are ideal for carving the seat, however your means can be as simple as using a gouge. George and Harry would have done theirs with an adze so that is also an option.

Shaping the crest
As per fig.4 the crest is cut out of a larger piece of timber. The cut is both curved and set at an angle of 17°. This is best done on a bandsaw with the table set to this angle. The faces can be cleaned up with spokeshaves and finished with a cabinet scraper. Drilling the underside of the crest to accommodate the back posts and spindles will require a mirror to enable you to see the angles you have marked.

4. Lateral view of sighting against bevel set to 15° for back posts and spindles.
5. Back posts are set into through mortises with a 6° reamed taper. Lasers are used to align – or use mirrors and bevel or square.
6. Set the back posts to equal depths with dividers.
Assembly
The most appropriate glue for chairmaking is hide glue. Now available in pre-mixed form from a number of manufacturers, this just needs warming up by sitting the bottle in a jug of hot water. Hide glue can not only be re-activated with steam or hot water should you need to dismantle a piece for repair, it also has a good working time. PVA also has good working time but under friction fitting (as in chair mortises) it can lock up and not allow any wriggle room to adjust. Hide glue will not do this.

The cutting list provides for all the turned components to be marginally over length. In my experience every chair goes together a little differently. You may have to slightly reduce these lengths in some cases to get the chair to ease together nicely. It’s part of the charm of chairmaking!

7. With the legs in their mortises, stand the chair upright and use elastic to mark the height and centre of the side stretchers.
8. The angle of the stretcher mortise can be found using a protractor.
9. The stretcher mortise can also be directly drilled by rotating the leg to align with the angle of the drill extension.
The best approach to assembly is to put the undercarriage together first followed by fitting the seat. I don’t like to use hammers to put the joinery together but rather ease it together by hand, then bring it up tight using a clamp. Much more gentle!

10. After the side stretcher mortises are drilled, find the required stretcher length using two bamboo skewers as a trammel.
11. When the side stretchers are fitted the centre stretchers are located and measured using the same method.
12. Clamp the crest evenly to the back posts. Mark post alignment to enable sight line for drilling mortises.
Once the undercarriage and seat are assembled fit the back posts and spindles, then ease the crest down over them again using a clamp to bring it all together.
Past and present
Soon to be overrun by industrialised manufacturing, George Peddle and Harry Hearn were the last of an era of chairmakers who built their chairs by hand from scratch. There are subtle differences in each man’s turning style that differentiate their work
and demonstrate that they worked intuitively and hand made every part. Even in earlier times in England, chairmakers would specialise in making specific chair parts, however George and Harry made all the components of their chairs individually.

13. Step out the positions of the spindle mortises on the crest using dividers.
14. Mark spindle mortise angles by scribing a line on the crest using a straight edge aligned with the spindle mortises on the seat.
15. Drill the back post and spindle mortises into the crest by sighting the drill and alignment marks in a mirror. The mortises are also aligned directly parallel to the front and back faces of the crest.
When I make these chairs I like to imagine what their work environment would have been like, and try to understand the level of skill they developed working in the way they did. How did they achieve such a smoothly carved seat without sandpaper? How did they hold the crest securely whilst they shaped it?
I avoid using machines (apart from my lathe!) and jigs when I make a George Peddle chair and try to work in a manner as close to theirs as I can as a way of honouring such skilled craftsmen. I encourage others to do the same and embark on a journey that will both develop your skills using handtools and provide you with an opportunity to reflect on the great craftsmen who came before us.
16. Mark out the seat blank for carving and drill depth holes as shown on fig.3, the seat pattern.
17. Material is removed using a scorp, or use a gouge if that is all you have.
18. The edges of the seat are cleaned up using a spokeshave. The edges are only slightly rounded.
Jon Grant’s strong sense of place can be traced back several generations in Tasmania. He fuels his inspiration by maintaining a ‘line of sight’ to the tree from which the timber originated, and by using traditional techniques and hand tools wherever possible. He teaches a range of chairmaking classes from his workshop near Hobart. Learn more at handmadematters.com.au