Making a simple edge tool
Words and photos: Ian Wilkie
Decorative edge-treatments can add greatly to the appearance of a piece of furniture, and there are plenty of bearing-guided router bits available, in numerous profiles. These can do a good-enough job for you in many situations, but what if the edge you wish to profile is curved?
A bearing-guided bit can follow a simple convex curve if it is gradual enough, but it is tricky to pull off without using a jig of some sort to steady the router or hold the piece as you feed it past the bit. Sometimes, hand tools trump the electron-burners, and one such situation is when you wish to add small decorative flourishes to parts with complex curves.

1. Basic scratch-stock fitted with a cutter profiled to cut a quirked bead.
However the task is well within the capability of the scratch-stock shown in photo 1. This very simple, home- made tool can take double curves and recurves in its stride. And the best part is it takes far less time to cut a bead than you may think.

2. Stock, shaped cutter, and the files used to prepare the cutter.
Makng a scratchstock
Photo 2 deliberately shows an old war-horse that was made from a piece of scrap wood for some job, at least
30 years ago, tossed in the toolbox, and re-used many times with different cutters, as you can see from the extra bolt holes. It consists of nothing more than an L-shaped piece of wood with a slot cut through the long arm and part-way into the shorter, wider arm.
A single 5mm bolt and wingnut are all that is required to hold a small cutter in place. There are no rules as to size, just make it big enough for your hands to hold comfortably. Note the rounding of the inner edges, which enables it to follow concave curves more easily.
Cutters can be made from an old card scraper, or a scrap of sawblade. Metal about 0.8mm thick is ideal, easy enough to file and shape, but rigid enough not to flex in use. The profile has to be a negative image of the shape you wish to make, of course. Here the cutter is shaped for a quirked bead, the ‘quirk’ being the groove that defines the inner edge of the bead. It was shaped in a few minutes with the chainsaw file and small, fine-toothed, flat file shown in photo 2.
For cutting a simple bead, I make the profile just a tiny bit deeper than a semi-circle, then ease the outside corner a little, so it won’t leave a line on the outside of the bead. The little projection that cuts the quirk needs to be wide enough to be solid, but a narrow quirk looks better, so you may need to experiment to find the width of quirk your cutter material will manage.
Tapering the outer
edge helps to cut a neat quirk. File carefully, keeping the files at right angles to the blade. You can refine the filed edges with stones, and/or apply a burr, but I find they work well enough straight off the file, on most woods.
Once the cutter is shaped, slide it into the stock and set it so that one side of the bead is flush with the stock. Some like to make the top of the bead flush with the cross-arm, to act as a depth stop, but I find this doesn’t work very well for me.
I make mine protrude by at least 1.5mm. This is because it’s easier to cut with the tool leaning slightly towards the direction of cut (so the cutting edges are ‘trailing’). It also minimises build-up of shavings, which will otherwise stop the cutting. You don’t really need a depth stop, as it’s quite obvious when the profile has been fully formed.
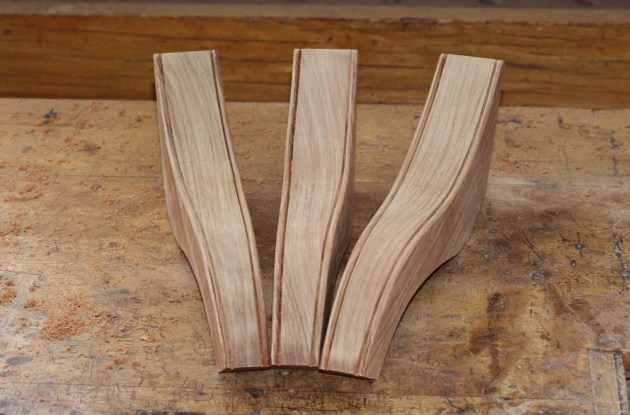
The scratchstock shown was set up to bead the outer edges of a set of tripod table legs. These could have been done with a router, but there is a rapid transition from the parallel part where they join to the stem and to the taper, which would make using a beading bit very awkward.
Using the scratchstock
I first made a few light passes along the whole length to define the quirk, then work the profile to full depth in short sections, about 50–60mm at a time (photo 3). Once you have reached full depth, at the front of the section being worked, move back a similar amount and blend that in, and so on, until you have completed the full length.

3. The bead on the right side has been completed, while the one on the left has been defined, and is being worked to full depth a little at a time.
While scraping cuts are not too sensitive to grain direction, it does depend on the wood you are working with (softer woods are generally more difficult to scrape and may leave a ‘furry’ surface), so you might have to work predominantly in one direction to obtain a smooth finish.
The wood being used here is New Guinea rosewood, which can have pretty wild grain at times, but responds very well to scrapers. With a little care, you should end up with a very clean result that requires only minor sanding. The occasional small imperfections sign your work as truly handmade!
Ian Wilkie is a Brisbane furniture and hand tool maker who has written several article for Australian Wood Review.