

Ronnie Rozenga: The Butterfly Project
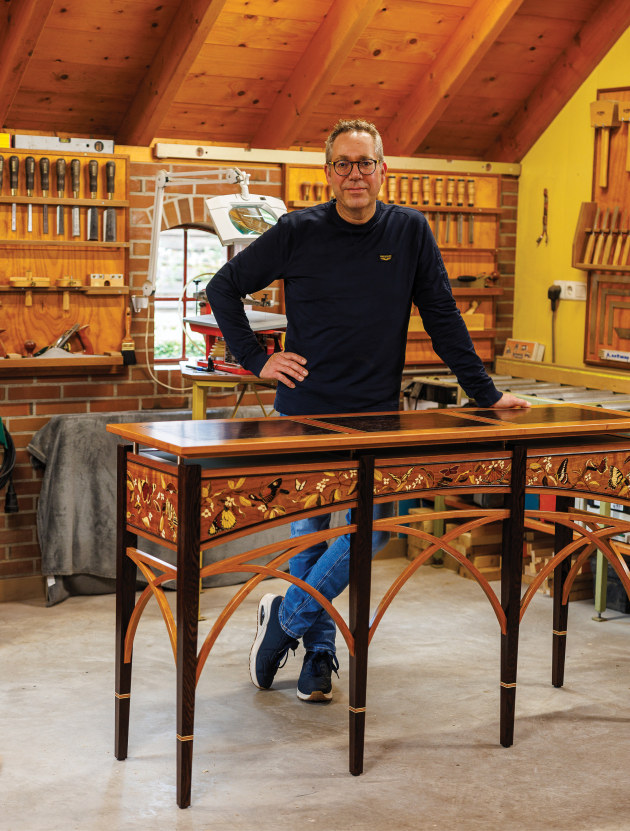
A lifelong woodworker, both professionally and at home in the Netherlands, Ronnie Rozenga creates one-off masterpieces. Marquetry often features in his work, and for this he prefers to use thick veneers that are glued rather than taped together. He writes about his background and the creation of his award-winning Papliones table.
Words: Ronnie Rozenga
Portraits and studio photography: Otto Kalkhoven.
Process photos: Ronnie Rozenga
Born and raised in the North of the Netherlands I spent much of my childhood in the workshop of my father’s painting company. Although painting runs in the family genes, my attention has been focused on working with wood since childhood. When I was 16, I studied mechanical engineering and then construction engineering, and ultimately chose to work as an employee in restoration carpentry and masonry. Over the years I specialised in fine interior work, both new and restoration. Unfortunately, due to physical problems, I had to stop professional woodworking a few years ago.
Over the years I built up my own workshop, where the emphasis was on making furniture, doors, stairs and interior panelling. In 2013, I discovered the beauty of marquetry in a 70s documentary about three furniture maker brothers who made chairs with marquetry in the backrests. Fascinated, I started practising, even though I knew little of the different techniques yet.
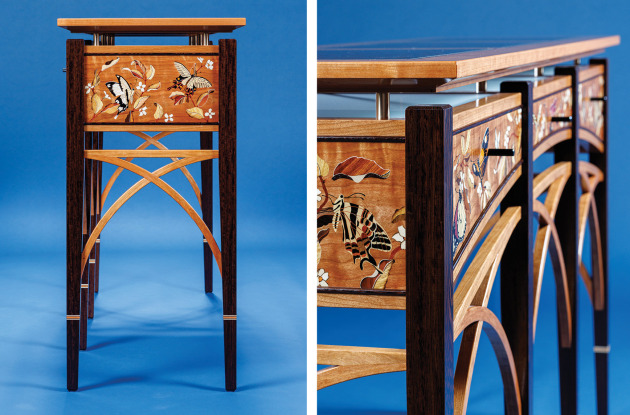
1. The side view of the Papliliones table shows the floating top and decorative frame arches. 2. The sides and drawer fronts present a wrap-around scene of 13 species of butterflies along with leaves, branches and flowers.
In the Netherlands, marquetry is a kind of lost art, there are hardly any opportunities to learn it, so I was left to my own devices. After diving into books and the internet, the techniques and materials became clearer to me, and Silas Kopf’s video on the double bevel technique became my guide.
After time, I found this way of working did not suit me well and I made some adjustments to the technique. Most marqueteers use thin veneer, but I really don’'t like to work with that. The veneers I use now are shopsawn at a thickness of 3mm out of solid woods, all selected for their colour and grain.
Another thing I didn’t like was using veneer tape to keep everything together and having to work from the back side of the marquetry. Being able to view my work face side up allows me to judge whether I am satisfied with the result, which is why I started gluing the parts together. The masking tape used is temporary and removed as soon as the glue has dried. A big advantage of this method is being able to work in very small detail and with thin lines.
The Papiliones project
Papiliones is an ode to the butterfly. These beautiful insects with their vibrant colours have captured our imagination for many centuries. They symbolise resurrection and eternal life, love and happiness, but above all, the butterfly is loved for its beautiful colours and graceful flight. Creating marquetry that invites you to immerse yourself in the scene was my starting point for this piece (photos 1, 2).
I had in mind a wide panorama of butterflies, and from there the design emerged. A table with three drawers would form an arch with six legs and architecturally shaped arches between them. To maintain a full view on the marquetry without restricting light, the top is raised and ‘floats’ on eight brass bushings. The drawers are joined with hand cut half blind dovetails and have satin glass covers to mask their inner contents. Inlaid bandings accentuate the lines and visually divide the heights, widths and lengths.
The primary woods for this project are wenge and cherry, two woods that match perfectly. As a further contrast, maple bandings are used in the top and legs, as well as for the drawer sides.

3. Hand drawn and coloured pencil sketches were first created for the marquetry. 4. Each marquetry image is a ‘package’ of veneers. Shown here are completed leaves, ready to be inserted into the background cherry veneer.
Designing the marquetry
Creating the marquetry panorama was the first step. Detailed drawings were made of the butterflies, branches, leaves and flowers which run in five panels from left to right over the sides and drawer fronts (photo 3).
The colours of the wood species used for the imagery were carefully considered. Bringing marquetry to life is all about contrast, in this case with the cherry background. Similar colour tones can visually disappear however there are ways to solve this. For example, on a dark background, a very thin light wood highlight on the edge of a leaf can really make it pop. This will also reflect light, enhancing the sense of depth and liveliness.
For lighter images on light backgrounds, sand shading can separate the colours beautifully, giving a feeling of light and shadow. It is important to imagine the direction of the light source – some imagery will then ‘catch the light’, while others will be shaded.

5. A detail photo of two completed butterflies shows how each is composed of separately cut pieces.
Making the marquetry
The marquetry panels are made from smaller parts that are later assembled (photo 4). Each leaf, flower and butterfly is made separately (photo 5) and then sawn into the cherry background.

6. The author working at the marquetry bench. Each coloured sketch is traced onto the veneers selected for each part of the image.
The first step is to trace the drawing of each part (for example, a butterfly) using transparent paper. To join two pieces of wood, the tracing paper is placed on the wood, and the saw line is transferred with carbon paper (photo 6). The veneer I want to add is then slid underneath and fixed with masking tape, taking in account the desired grain direction.

7. The scrollsaw table is tilted a few degrees to achieve the double bevel technique. 8. The author prefers to use 3mm shopsawn veneers which may then be glued.
The marquetry is completely hand made using a double bevel technique. Using the scroll saw, the two layers of veneer are now sawn in one go, with the table tilted a few degrees to eliminate the saw cut (photo 7).

9, 10. Each image of a butterfly or leaf is made of separate parts sawn from woods selected for their colour and grain features.
Now the two pieces fit together seamlessly and are glued together (photo 8). Each piece has some excess to allow the next cut to be made in the same way. In this way, new pieces are added continuously (photos 9, 10) until the part (for example, a butterfly) is complete.

11, 12. These completed butterflies are ready to be inserted into the cherry veneer background. 13. A full scale drawing was used to set angles, mark out for joinery and later check all was correct during assembly glue-ups.
The butterfly now has excess all around, on which the contours are drawn, again with the tracing and carbon papers (photo 11, 12).
Assembling the marquetry panels
The butterfly is now oriented in the correct place on the background veneer, fixed with masking tape and then sawn into it.
When the pieces are added to the background, always work from back to front. The furthest parts always go first, the parts in the foreground last. In this way you avoid having to saw difficult transitions. This is why some legs and antennae of the butterflies are cut in first.
When all the marquetry for this project was completed, the marquetry sheets were glued to the substrates, in this case ayous for the aprons and cherry for the drawer fronts. To avoid the panels warping due to seasonal changes, a back veneer was added, using the same 3mm thick cherry veneer as the face side.
For veneering I used polyurethane glue. It is not my favourite but for veneering it has one big advantage. Most glues contain water – this always causes the veneer and substrate to expand and creates tension in the panel. Polyurethane glue doesn’t contain water, but it is slightly foamy and can bleed through thin veneer. As I am using thick 3mm veneer, this doesn't give me any problems and leaves a nice flat and stable panel without any tension.

14. For the arches, 4mm thick strips of wood are first bent in a steam pipe and then held in a mould until dry. Glue is next applied between each layer. 15. The glued laminates are next clamped in a custom made mould.
Table frame and carcase
The architectural arches are a connecting element between the legs. After drawing up various design options, I opted for a double arch construction with a continuous arch under the drawers and a second row of arches that crosswise connect the legs. To determine the correct radius of the arches and the position of the joinery, I made a full scale drawing (photo 13).
After the radius was determined, I could begin making of the arches. To get the right shape I choose a combination of steambending and laminating. Cherry strips were planed at a thickness of 5mm, steamed, fixed in a mould and dried for a week (photo 14). The radius of the mould was about 20% smaller than the actual radius, because there is a certain amount of springback in steam bending. The strips were then laminated in a second mould that had the actual radius (photo 15).
After dry fitting (photo 16) the five intersecting arches were connected with lap joints (photos 17, 18).

16 Dry-fitting the arches to check before glue-up. 17. Gluing up the half lap joins on the arches. 18. Gluing up in stages simplified the process. Here the front legs and arches are glued together.
Joinery
This table has a lot of joinery in it – legs to aprons, legs to arches and and rails of the drawer case. All this joinery was done with mortise and tenon joints, using the full scale drawing to mark out (photo 19).

19. Using the full-scale drawing to mark out tenons for the arches. 20, 21. The tenon for the arches were hand cut – all differed in size.
The mortises were made with my horizontal mortiser, with the rounded corners straightened with a chisel. The arches meet the legs at an angle, the curve of which was also carved with chisels. The tenon arches were all cut by hand (photos 20, 21) after they had each been marked individually, because they all differed in size.

22. Hand cutting the mortise and tenons for the leg to frame joinery. 23. Contrasting woods are used throughout. The maple banding inlay on the top accentuates the transition between the cherry and wenge.
The aprons and the legs have double mortise joinery with loose tenons (photo 22). These are staggered to prevent the legs from weakening – this can happen if too many joints meet in one place.
Inlay bandings
As mentioned, inlaid bandings were added for different reasons. Firstly, I like to use contrasting woods in a piece of furniture. Adding a maple inlay to the top accentuates the transition between the cherry and wenge (photos 23, 24). Secondly, inlay bandings can optically break the heights and widths of a piece of furniture.

24. Contrasting wenge and cherry in the tabletop.

25. The marquetry panels are bordered by wenge inlays.
By adding the wenge lines above and below the drawers (photo 25), the whole of the drawer fronts and drawer case looks less bulky. The bandings in the legs make the length of the legs appear smaller and add visually (photo 26).

26. Bandings were added to the lower legs continue the contrasting theme and make the wenge legs look finer. 27. For the leg bandings, strips of 3mm thick maple, wenge and cherry were sawn and inlaid into grooves in the legs.
The leg bandings were made by gluing five layers of thick wood veneer together, a combination of 3mm thick strips of maple, wenge and cherry. The mitres were cut with a fine saw and refined with a mitre plane on a shooting board for a perfect fit before inlaying them into grooves in the legs (photo 27).
Assembly
After the joinery was completed and the marquetry and banding added, it was time to glue up the table. I like to glue up in stages (photo 28). Table sections were glued one by one and then glued together into a whole. This gives more control over squareness, and also makes it easier to position the clamps. Once again, the full scale drawing was used as a guide to check all the dimensions and keep everything aligned.

28. Glue-ups were done in stages to make squaring up and positioning the clamps easier.
Most of the gluing was done using a liquid hide glue, although white PVA glue was sometimes used. Liquid hide glue can be used without heating and has the advantage of not leaving stains in the finish, which PVA glue can do. However, I like to tape glue joints so that any squeeze-out can be removed easily.
The drawers
The marquetry drawers were next made and fitted. The first step was to fit the drawer fronts into the drawer case, taking into account the sides of the drawers had to be planed when fitting the drawers. The bottom of the drawer fronts have an arch shape – this had to be made to fit perfectly as I wanted to keep the gaps between the drawers and the frame to a minimum.

29. Tests were made before deciding on a polyurethane finish to give best results for all species. The completed table was a personal project that’s now a family heirloom.
After the fronts were made to size I cut the half blind dovetail joints by hand (photo 30). As the marquetry was completed and could not be replaced, there was no room for error when cutting the dovetails, so checking each step more than once was not an unnecessary action...
Fortunately, everything went well and after the half lap joints for the backs had been cut, the drawers could be glued. Afterwards these joints were pinned with cherry pins and the drawers were fitted in the table. To make the drawers slide smoothly, I polished the wooden rails and the sides of the drawers with candle wax, my favourite lubricant for this task.

30. The bottom of the drawer fronts were shaped to an arch and carefully fitted to keep the gaps between the drawers and frame to a minimum. The drawers were joined with half blind dovetails.
Applying the finish
After completing the top of the table, everything could be finished with a clear varnish before the final assembly. I chose a polyurethane/alkyd based varnish because after several test samples this finish gave the best result. I also tried oil and wax based finishes, but on the wenge they just didn’t give satisfying results as it gave the surface a bit of a ‘dead’ appearance. However, satin gloss varnish gave it a nice, rich natural colour and accentuated the grain beautifully.
The pores were deliberately not completely filled, because I consider the pores as an essential part of the wood surface and I certainly want to keep them visible. They add a lot to the natural ‘feel’ of a piece of furniture in my opinion.
To apply the varnish, I choose to use brushes and to apply the techniques I learned from my father, he taught me everything I know about painting.
What’s next?
The table was built to reside in the entrance hall in my own house. It has been a project that took a few years between the first thoughts and completion, but I am very happy with how it turned out. Sometimes when you’re at a dead end, you need to let it sink in and set it on hold, then pick it up again with a fresh perspective.
What’s next? Well, as usual, inspiration always comes in different ways and reignites the fire until there are enough ideas to take on another project. So who knows what will follow...
Ronnie Rozenga @ronnierozenga lives in the Netherlands. His Papiliones hall table was international runner-up award winner for the furniture category in Maker of the Year 2025.
First published in Australian Wood Review, issue 130, March 2026