

Dominic Grasso: A Journey of Reinvention

Above: Dominic Grasso with his Volta Chair in ash.
Words and photos: Dominic Grasso
Illustrations: Graham Sands
Growing up in the Blue Mountains, my childhood was defined by the urge to create. My afternoons were spent outdoors, building forts in the backyard, making wooden swords, constructing bike jumps, and exploring nature with my siblings and neighbours. My grandfather, a skilled maker who could figure out how anything worked given enough time, was a significant influence. I recall fond memories working with him on projects around the house including building my treehouse complete with deck and sandpit.
I did not realise it at the time, but those early experiences were the initial sparks of creativity that would eventually lead me to a career in furniture design. However, somewhere during high school, I lost that passion. I followed a more traditional path, completing an undergraduate degree in business followed by a postgraduate law degree.
The legal chapter
I worked in the law for a decade and practised as a commercial disputes lawyer trading the great outdoors for the courtroom. On my first day as a paralegal, a senior lawyer offered advice that stuck with me: ‘Law is 99% sweat and 1% creativity.’ While I don’t fully agree – law requires its own kind of ingenuity – he wasn’t far off the mark. The legal world is process-driven and can often stifle the creative spirit.
Coincidentally, during this time, I needed an entryway bench, a place to change shoes between work and home. Realising nothing within my budget fit the space, a thought occurred to me: Why don’t I make one myself? Looking back I don’t know why I decided to make the bench myself, I didn’t have any tools and it had been years since I had picked up a saw.
Undeterred, I borrowed basic equipment from a local tool library and built a Nelson Bench with ebonised legs. Just like that, a switch flicked. I was hooked. I loved every aspect of making the bench, from sourcing the right timber all the way to the sense of achievement I felt when I applied the first coat of finish.
Woodworking became my meditation. It forces you to be present; if you lose focus, you risk making mistakes or worse an injury. The ability to step into the workshop and leave the stress of the legal world behind was nothing short of therapeutic. A career as a litigator is not always compatible with this hobby. As my legal career progressed, my time in the workshop dwindled, leaving me longing to be back in the workshop. I could never summon the courage to take the plunge to try woodworking as a full-time career, I found all sorts of reasons not to do so.

Catalyst for change
In late 2023, my wife received a three-year job offer in Scotland. We packed our bags (and two cats) and moved to the UK in 2024. Relocating was the catalyst I needed to evaluate what was truly important. It forced me to recognise my unfulfilled need to rediscover my early creativity and pursue a more tactile path. Starting a new career feels less daunting when you are already starting a new life on the other side of the world.
Last year I completed professional training in furniture design, making, and restoration at the Chippendale International School of Furniture near Edinburgh. The course was intense, but I loved every minute of it and it proved the perfect environment to rekindle my creative spark. Set amidst the Scottish countryside, its rolling fields and beautiful coastlines allowed me to reset my mind and reconnect with nature. I was even fortunate enough to see the Northern Lights during my second week – an experience I will carry with me forever.
Authenticity in design
Near the end of the course, designing and making my own pieces of furniture was the most daunting challenge and one of the many doubts that held me back from taking the plunge. Whilst I felt I had a strong background in making, the designing process of translating ideas or concepts to fully realised pieces never felt like my strong point, I had not flexed my creative muscles in a very long time.
For these reasons, I wanted the work I designed to both push my abilities but also to be authentic to me. By this I mean I wanted my work to be a reflection of myself and my unique background that has influenced me as a furniture designer maker.
I have always enjoyed the way modern and contemporary design is able to express larger concepts whilst utilising very simple shapes or minimalist forms, it was these principles that drove my design process. To anyone out there that finds it difficult to start when designing a new piece I would say find something that excites you, it could be anything, your favourite building or piece of architecture or something you’ve observed from nature, it could even be light or shadow, start there to build a concept and you’d be surprised how quickly the ideas begin to flow.

The final piece I designed whilst at Chippendale was the Volta dining chair shown above and was easily the most challenging. Chair design is inherently difficult as you must consider all aspects of good furniture design equally including ergonomics, strength, durability and aesthetics. No one wants to sit in a chair that is not comfortable, but equally it has to look good from every angle.
The Volta Chair speaks to my own personal journey and references a change in direction or perspective, as seen in the twist in the steam bent component of the chair and the most striking aspect of the design.
Lessons in steambending
Attending an earlier steambending course with the masterful designer maker Isabelle Moore was invaluable. It opened a door to possibilities I had never imagined were achievable with wood and I knew I wanted to incorporate steam bending into a piece. Most of the Volta design was consumed with achieving the steam bent element.
Steam bending can be a very economical way of incorporating bent wood elements in furniture as it often involves less waste or use of adhesives as compared to bent lamination.
Drawing upon both my personal experience and the accumulated wisdom imparted by those wiser than me, there are fundamentals that will invariably yield optimal results and minimise failures when attempting even the most complex bends.
1. Wood selection
Not all species of wood are equal. In the UK oak, elm, walnut and cherry are the woods of choice but ash is often preferred for its coarse grain structure providing greater elasticity. Australia has a lot of hardwoods that are suitable for steambending including mountain ash (Tasmanian oak), spotted gum, jarrah, blackwood, Queensland maple.
Green or air dried timber felled less than a year is optimal. The higher the moisture content the better, anywhere between 20–40%. If you can’t find suitable timber it is possible to pre-soak wood for 24–48 hours per inch of thickness prior to bending.

1. Ash logs in a sawmill near Glasgow.
Select stock with straight grain that is parallel to the bending direction with minimal runout, the general rule is less than 25mm runout over a 300mm distance. I recently visited a sawmill local to me where I was fortunate enough to hand pick green logs (photo 1).
For the Volta Chair I used locally sourced Scottish ash. Ash has naturally straight grain, which prevents breakout. It also has exceptional flexibility, toughness, and shock resistance, allowing it to bend to tight radii and hold its curved form. This makes it the perfect material for the complex bends including the twist that occurs when the backrest transitions bending planes.
2. Preparation of stock

2. Preparing stock for steambending starts with machining stock.
All machining and surface preparation must be done before steambending (apart from joinery) as it will be much harder to do this afterwards. For components it does not matter that the stock is dead flat, rather that all faces are square and surfaces are prepped, therefore my process starts at the thicknesser to clean up both sides (photo 2). I then square off the edges and dimension to final size using the bandsaw, top planer and thicknesser.
3. Steam boxes

3. A basic steam box made from a wallpaper steamer and polythene tubing.
Take the time to get your bending formers and drying racks right, ensure they are robust enough to withstand multiple uses. A simple or makeshift steam box (photo 3) can be made from a wallpaper steamer and heavy duty polythene tubing. This was my approach as the stock used for the Volta chair was longer than a standard sheet of plywood.
Bending straps are a great way to support the grain as it is bent but it is possible to bend without a strap in situations where the bending radius is greater than seven times the stock thickness (i.e. a radius of 175mm or greater for stock 25mm thick). Given the radius of the bend coupled with the twist, straps were essential to achieve the desired shape for the chair.
4. Bending formers
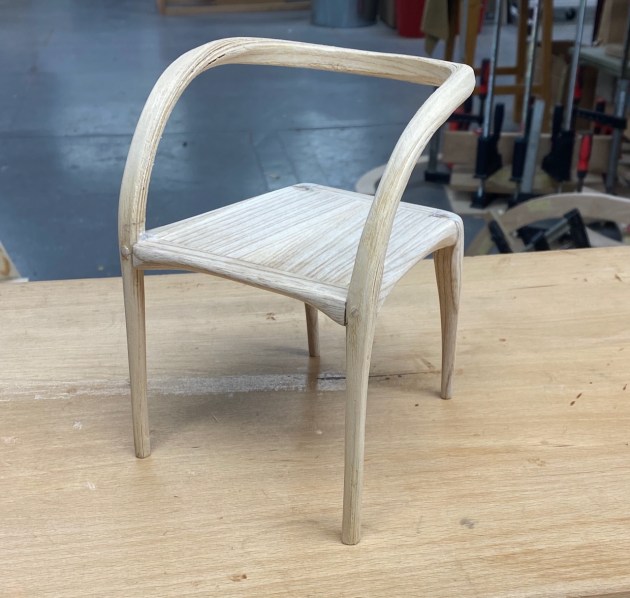
4. Quarter-scale models were made to finalise the design.
Making the bending former is arguably one of the most involved steps in the process. For the Volta chair I needed robust formers with plenty of clamping places as the bends required a lot of force to pull the stock around the tight radii.
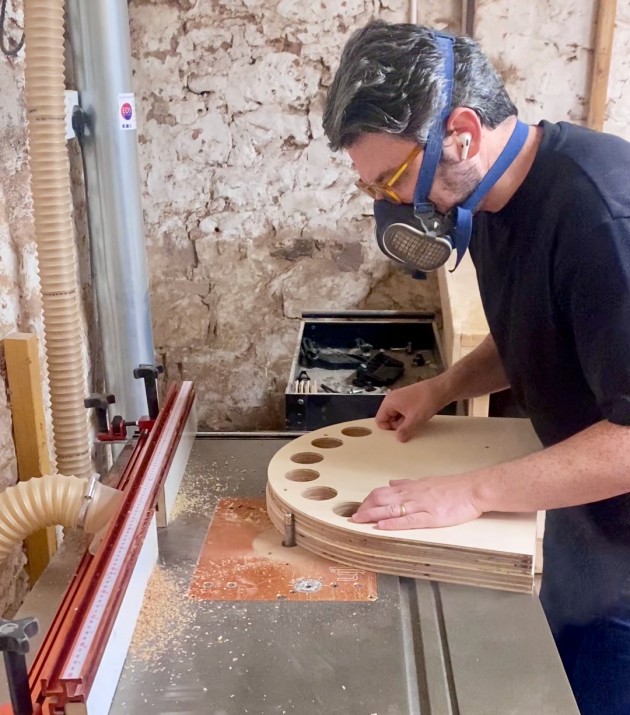
5. Plywood was cut and machined to make the formers.
After finalising the shape of the chair through quarter-scale models (photo 4), I used CAD to design the bending forms that would create that shape (fig.1), and a Shaper Origin CNC to cut these out of plywood. I then build up the form using the bandsaw (or a jigsaw) and a router table (photo 5). The finished formers can be seen in photos 6 and 7 below.


6, 7. Showing the completed formers.
5. Steaming the wood
Be sure not to oversteam your stock, the general rule is one hour at 100°C per 25mm of thickness. Steaming for longer has no added benefit and can diminish the integrity of the wood if over-steamed. There was quite a bit of trial and error in getting the thickest stock I could that would bend to the form whilst applying the correct amount of tension on the stock whilst bending. Too much pressure and you’ll get compression failures (appearing as crease or wrinkle on the inside surface), not enough and you will inevitably get breakout.
6. Bending the wood
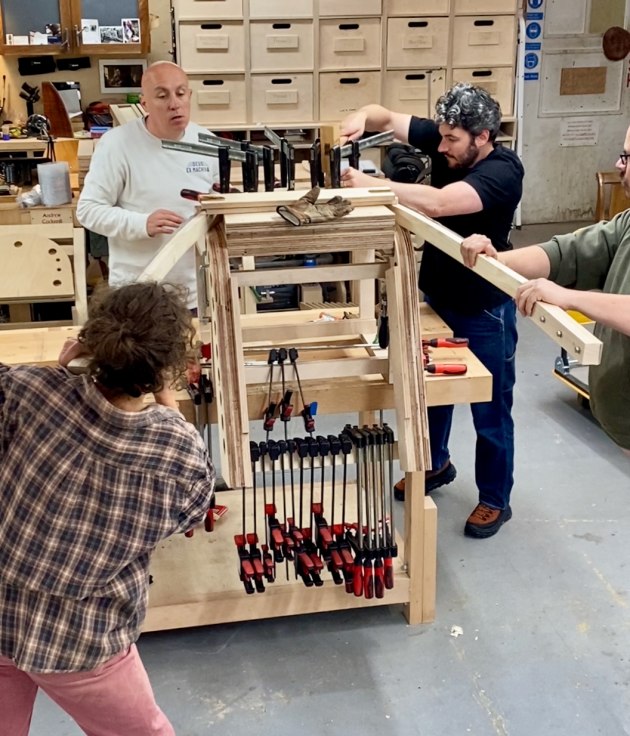
8. Do some practice runs before your first attempt and enlist some helpers.
Have a plan for this in place and do some practice runs before your first attempt. Be sure to pick a good team of helpers (photo 8)! When the wood comes out of the steam box you only have 3–5 minutes before the wood cools again and the lignin starts to harden. Wrapping the wood in clingfilm, or polythene tubing can extend this working time. If possible use blocks or cauls to prevent dents in the wood and apply even pressure when clamping.
7. Drying and resetting the wood

9. After steaming and bending, attach fixings that allow greater airflow to all the surfaces whilst retaining the desired shape.
You need to allow the wood to dry thoroughly in its new shape, aim for around 7% finished moisture. The process of steaming opens up the cells in the wood which allows moisture to flow freely; air drying generally takes about 4–5 days for 25mm thick stock. Using drying racks or attaching fixings that allow greater airflow whilst retaining the desired shape and flatness will also speed up the drying process (photo 9, 10).
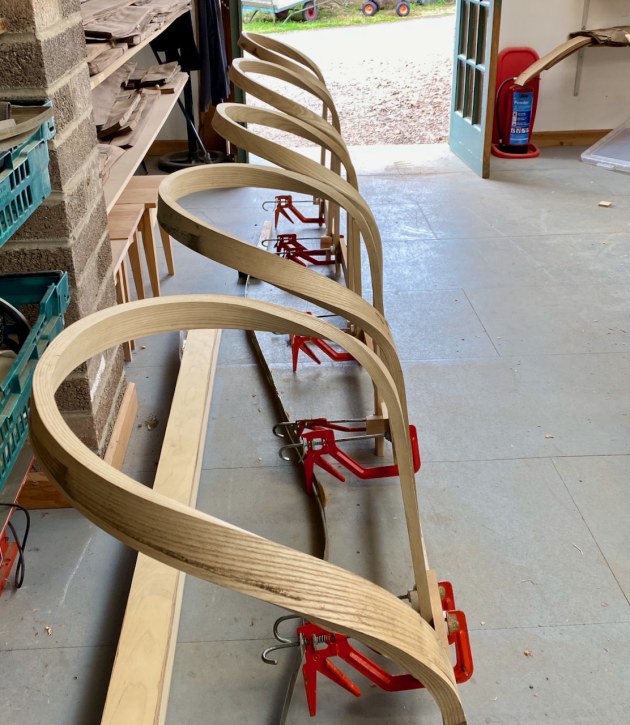
10. A batch of steambent Volta components in drying racks.
Cutting the joints
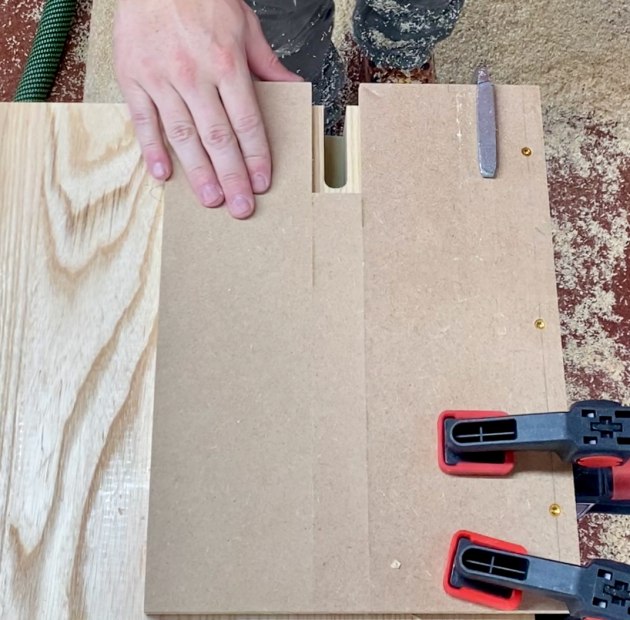
11. Router jigs with guide bushings were used to cut the seat mortises.
While the steambent components are drying, I start work on the joinery for the seat and the back legs. I chose a finger joint for the back leg as it is extremely robust but also allows me to cut into the geometry of the joint whilst carving and shaping the seat and not affect the appearance or strength of the joint. To cut the mortise for this joint accurately and repeatably I use router jigs with guide bushings (photo 11).
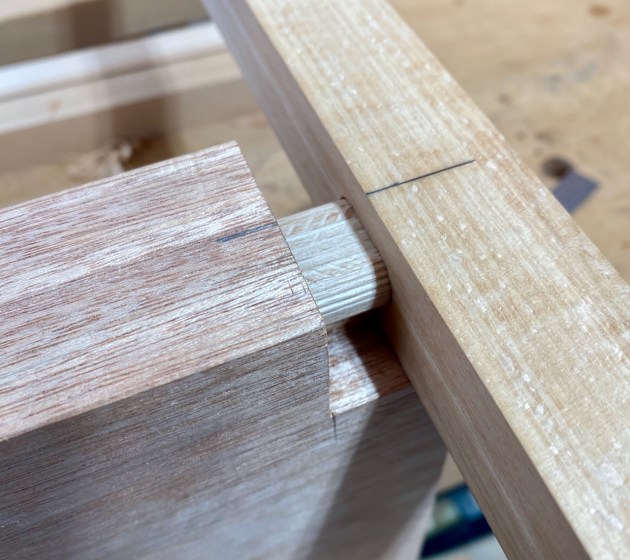
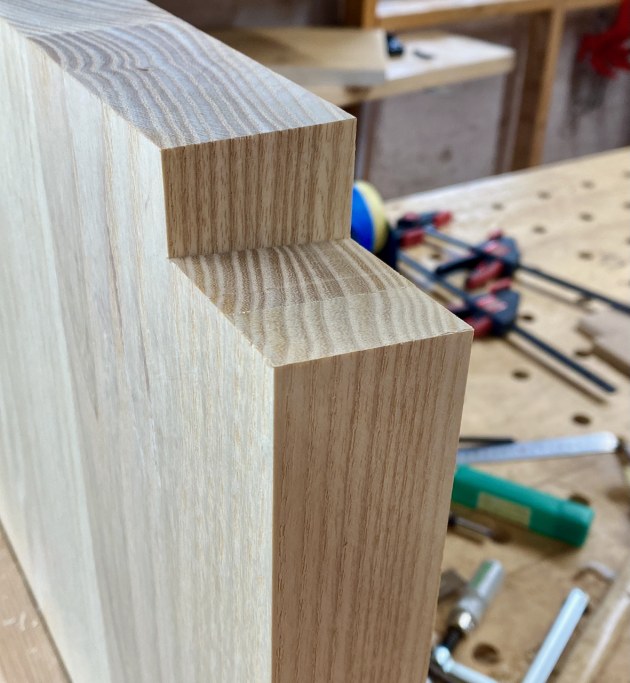
12, 13. Showing the joinery for the front leg in progress.
The front leg joinery is also cut out using a router and templates which allows me to cut an accurate angle for the front leg. I use loose tenons to help with alignment of the joint and adding strength (photos 12, 13). After gluing up I drive two screws and plug the holes similar to a Maloof style joint.
Shaping the seat and the back legs
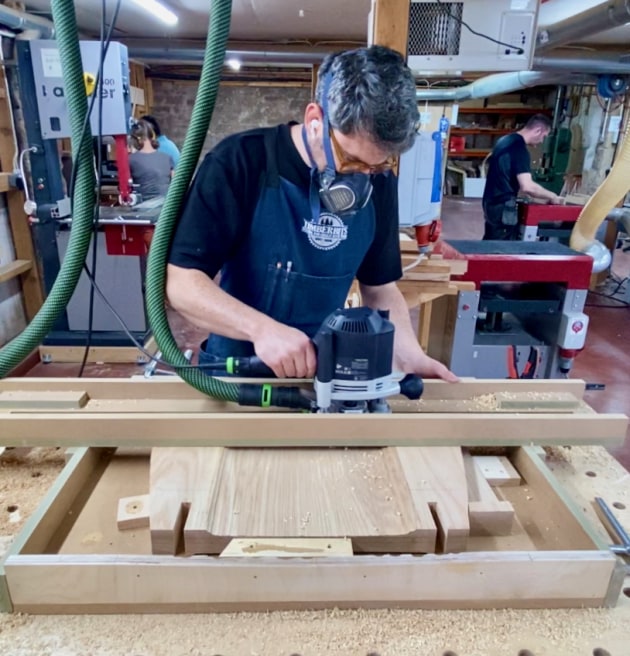
14. A router sled was used for the initial shaping of the seat.
The last process is to shape the seat and the legs to create the organic look I am aiming for. I cut the rough shape of the seat on the bandsaw. Next I remove thickness from the underside with a router and a sled to remove bulk material (photo 14). The seat stock starts at 50mm thick but once I am done it is closer to 30mm at the thinnest point (photos 15, 16).
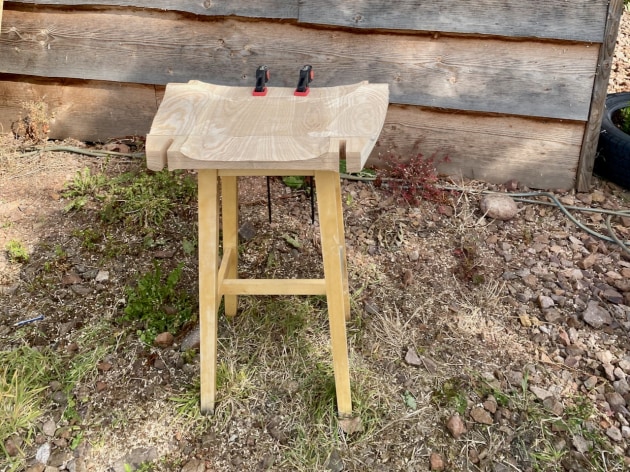
15. The shaped seat with joinery cut.
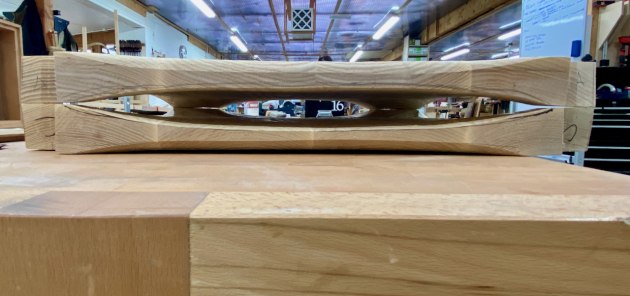
16. The seat stock starts at 50mm thick but is reduced to around 30mm thick after shaping.
To refine the shape and smooth out the curves I use a combination of modern and traditional techniques including an angle grinder with carving discs for fast stock removal and then travishers, spokeshaves and rasps for more precise shaping and fairing curves (photo 17).
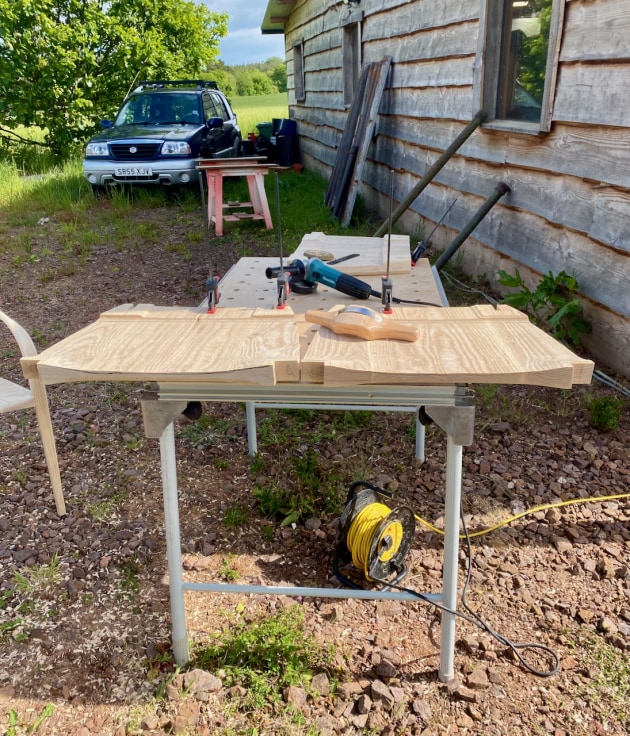
17. Hand tools were used to complete the seat shaping.
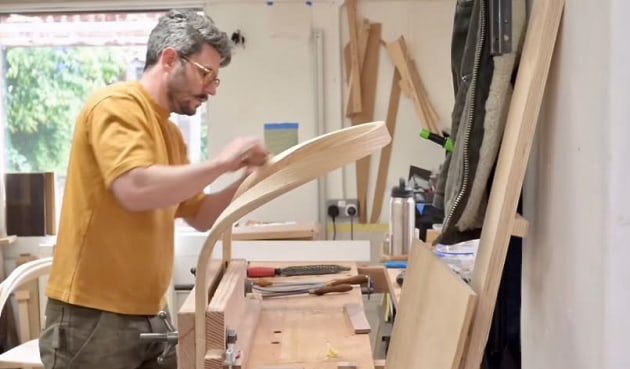
18. Rasps and spokeshaves were used to round over the edges of components.
I also shape the bent component with rasps and spokeshaves, adding a nice round-over to all edges, softening the backrest and adding slight taper to the legs (photo 18). Once I am close to the shape I like I glue up the chair in stages, starting with the back legs and then the continuous bend component (photo 19). After the chair is completely assembled, I do final shaping and sanding to soften the transitions at the joints and to ensure a smooth organic form.
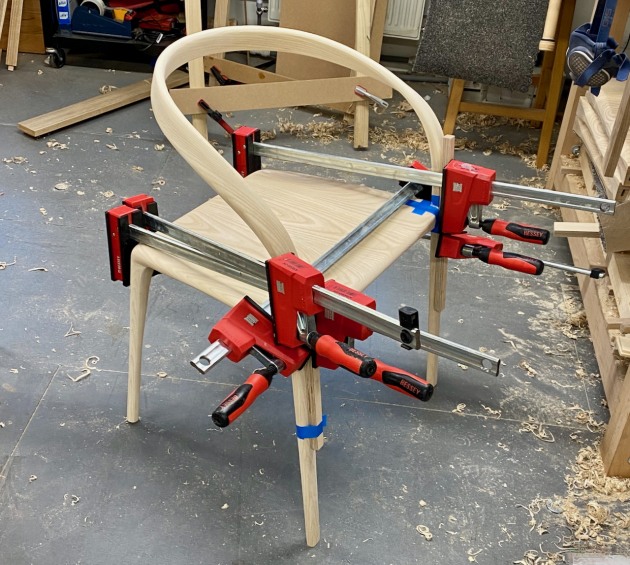
19. The chairs are glued up in stages.
Overall I’m really pleased with the end result, I was aiming for a very organic looking shape and I think I’ve achieved this. I feel the design of my Volta chair is not yet fully realised, and I intend to explore the steam bending technique further, pushing the technical boundaries of tension and form to see just how far I can take the material.
What’s next?
Beyond the bench, I am embracing the challenge of building a sustainable business from the ground up, navigating everything that is involved in that process. My aim is to build a studio that produces lasting furniture, that blends traditional craftsmanship with the creative freedom I have found in Scotland.
First published in Australian Wood Review issue 131, June 2026
Dom Grasso @domgrassofurnituredesign is an Australian designer maker who currently lives in Glasgow, Scotland. Learn more at domgrassofurniture.com/