

Daniel Spielman: Meeting challenges

Above: Daniel Spielman’s award-winning Credenza 2 cabinet was made from reclaimed timbers and materials.
Words and process photos: Daniel Spielman
Studio photography: Pier Carthiew
‘Ever tried. Ever failed. No matter. Try again. Fail again. Fail better.’ – Samuel Beckett.
I arrived at furniture making in a roundabout way. When I was a teenager, I laboured for a designer/builder team, Dick and Barb Hewitt, who were doing unusual house renovations in and around Melbourne. Between jobs we would go to their rugged block at Avenel and slog away planting and watering trees. My first pay cheque was a hammer, chisel and toolbelt and my second was a beautiful axe. They extolled proper hard work, a deep appreciation of native flora and a kind of discerning creativity – and although I wasn’t much good at any of the work, I cherished my time with them. I found structure in it, and was fascinated by all the terminology, physicality and knowledge.
By the time I left high school, it was pretty clear that I wasn’t cut out for institutional learning. Put simply, my interests were too divergent to fit into conventional study or vocational training. I didn’t have a singular focus and I was much more interested in following my nose than choosing one profession. It was at this time I was also discovering a passion for stage and screen acting – also collaborative endeavours brim-full with multi skilled practitioners, and making and performing have come to form the balance in my working life. Though I am still pursuing both careers, I have never undertaken formal training.
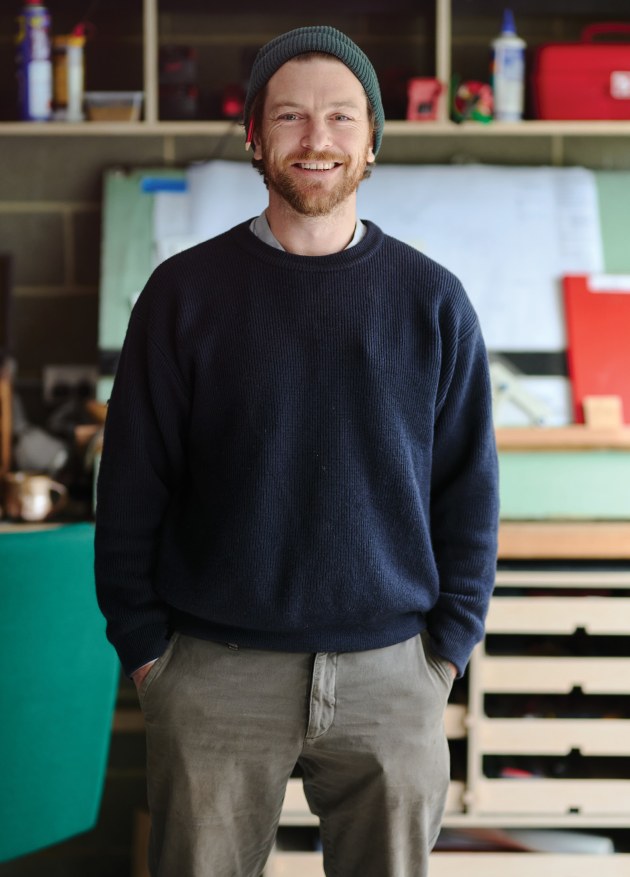
Portrait of Daniel Spielman by Pier Carthiew
Over the past 30 years I have worked in theatre, television, carpentry, fit out and joinery, prop and set building and visual art. In all these settings, I have found people who are not merely focussed on commercial competitiveness or the jargon of prestige, but on provoking thought and taking care, of finding elegant solutions to complex problems and of sharing the values of the endeavour. In a way, the objects I’m making now are dedications to the diversity and generosity of all the conversations I’ve been having over the years.
I set up my first workshop in Grandma’s garage in 2017, and this credenza was the final commission I made in that shop. It was also the most ambitious.
The commission
The commission came from a dear friend, and the quality of the conversation was great from the start. It was enjoyable to talk about the possibilities for the object in many different ways, while at the same time not having to lock down the details. A lot of the most valuable direction related to abstract thoughts like: what the feeling should be to have this object at the centre of their daily activities; that it could be monumental but should not overstate itself; it should somehow reward the kind of private, quiet consideration that happens when you live with a beloved piece of furniture.
As rare as this type of brief might be, it suits the way I work to discover solutions as I go, rather than the usual way, which is to be governed by efficiency and decisiveness. Obviously, this also has its challenges. To say the least.
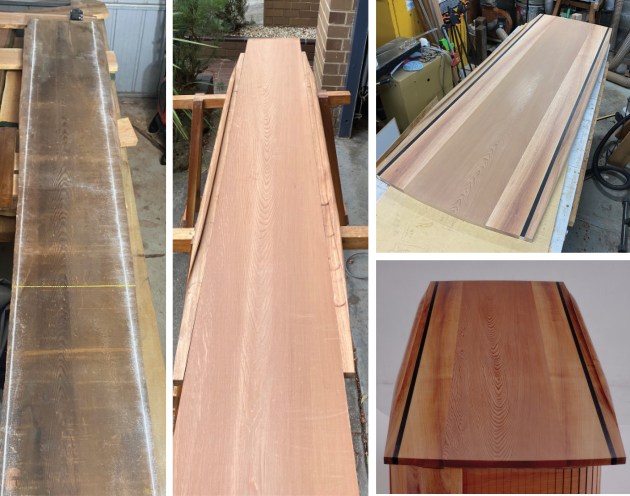
3. Reclaimed from a demolition house, one board stood out. It was 350mm wide with symmetrical cathedral grain pattern along its entire 3000mm length. 4. Freshly dressed, the figure in the red pine feature board was revealed. 5. The credenza top had the red pine board in the centre, with book matched blackwood borders and stained ramin detail. 6. Showing the completed credenza top.
Once we had settled on using salvaged red pine, brass and blackwood and the arrangement of tambours and drawers, I was entrusted with a lot of time and autonomy in designing how it all came together. I sent the clients a rendering to indicate basic proportions and a photograph of samples of two timbers side by side to suggest the tone. Otherwise, I was left to my own devices.
The materials
A few years ago, I found the red pine hiding behind coats of thick enamel paint in a house scheduled for demolition. One board in particular was gorgeous – nearly 3m long and 350mm wide with a symmetrical cathedral grain pattern along its entire length. The same house had a large central staircase, and the solid brass carpet runner stays were all still attached.
My friend Nicholas Dunand provided the substantial lengths of heritage ramin – which he acquired 30 years ago from a retiring patternmaker. Once he had given me a box of reclaimed ebony piano keys, and I also had some ebony given to me in a big box of offcuts by one of the guys working at the Maton guitar factory.
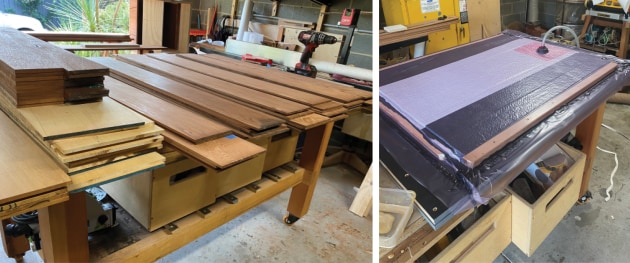
7. Matching sets of red pine and ramin were resawn for the doors. 8. Vacuum pressing the red pine faces and ramin core for the doors.
The blackwood came from a very mixed pack I bought years ago in an estate auction which was held in a muddy paddock out the back of Colac. Some of it was straight, some unusable, some spalted and figured – and it was all very gnarly and hard.
The beautiful Japanese sen ash veneer board came from retired master joiner George Henderson who had it in stock from when it was popular in the 70s and 80s.
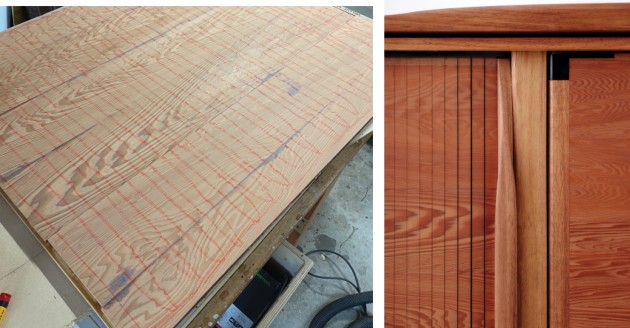
9. Showing one of the red pine veneered door panels marked up for drum sanding. 10. Detail of finished tambour and front doors.
My ambition for the credenza was to use only salvaged or extant heritage material – but I opted for one new element – which was the Corian of the tambour tracks. To be honest, most aspects of the piece provided difficulties for me, but the tambours and the shelving were the two primary challenges.
The tambours
My initial thoughts were about how to ensure the correct alignment of the tracks, top to bottom, because I was unsure what the tolerances would be with regard to friction as the doors moved around the curved track. My solution here was to use CNC to cut the complex mortises for the tracks and rib supports in the carcase panels. Secondly, the tracks themselves could be made from something dimensionally stable and hard-wearing such as the ‘engineered stone’ product Corian.
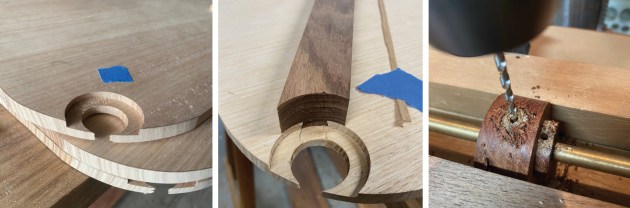
11. The Vic ash shelves were machined to size and rebated to receive the shelf supports. 12. Blackwood ‘rib’ supports were dovetailed into the underside of the shelves. 13. Drilling holes for 3mm brass pins in the shelf assembly.
Many of the tambours I looked at succeeded by being lightweight and having grain running with the tambour sticks. I knew I wanted the red pine’s grain to flow horizontally and so my concern was how to stabilise the panels when they were going to be cut up into such small pieces.
I also preferred the idea of a reassuring heaviness in the tambour action. The weight could be used to my advantage if I could make the tenons and the tracks like enough in hardness to provide minimal friction and wear. I had recent experience with some extremely dense brushbox which I thought could be a smooth and durable option for the tenons.
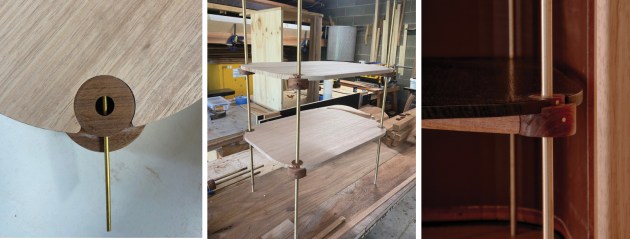
14. The brass pins fix the shelf supports to the brass rods. 15. Assembling the shelves, the supports and brass rods. 16. Detail of the completed pinned shelving supports.
I decided the doors would be laminated: red pine front and back but with a core of ramin running in the opposite orientation to counteract any distortion. I would use a vacuum press to do the lamination – theoretically providing equal clamping force all over the panel.
I had a finite amount of red pine to use for the four doors, and although I might have liked to make the tambour sticks slightly finer – it came down to how much material I would lose in the cuts, and the minimum distance I needed the tambour to travel.
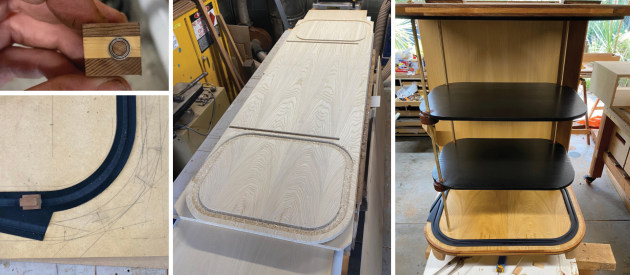
17. A 5mm bearing was fitted to the leading tambour sticks to prevent binding along the track. 18. Testing a brushbox tenon in the Corian track. 19. Tambour tracks were routed into the cabinet carcase base. 20. The Corian tracks have been fitted, and shelves (now stained) in place.
The process was quite involved, and it nearly came cropper at the very end. Resawing and dressing the material; keeping track of the matching sets of almost psychedelic red pine; setting up the vacuum press and achieving a good adhesion for the panels; tweaking the setup with test pieces; putting the panels through the drum sander to ensure a flat surface for bonding the vinyl backing and because the pine has such a contrast between the early wood and late wood, it was liable to dish out with a hand-held sander or delaminate if you so much as looked at it sideways…
All this went surprisingly well, but it was one of the final, (embarrassingly basic) operations where I nearly got beaten. I decided to cut the tambour sticks by making a jig with the track saw. I fixed the track to the jig and had an end stop to make the dozens of crosscuts. As it happened, each cut wandered about 0.2mm out of square – this is small enough to be virtually invisible, but by the time I’d made 40 cuts or so, each one being the reference for the next, the first panel was running out of square by over 8mm. This happened late in the game and I only had enough material for the two tambours and two centre doors. Not for the first time with this cabinet, I closed the workshop door and went home.
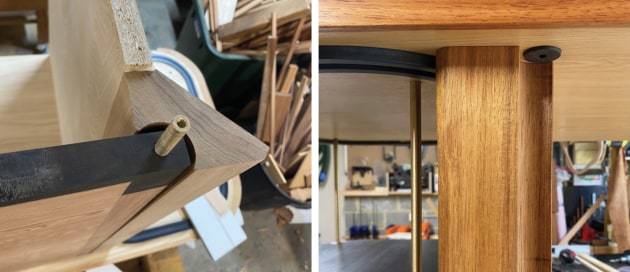
21. The doors pivot on shopmade sprung brass rod ‘hinges’ that have a small keyway for removal. 22. An internal view of the shelf fittings.
The solution was to reset the jig even more carefully, and check the work periodically, correcting any wandering cuts. While feeling sick about whether I would be able to read the error enough to cut the second one better…basically, I just had to keep going.
I also made adjustments to the tenons and the handles. I had designed the handle resting in its closed position at the rear of the cabinet, but with the cutting errors, and the way the track design and proportions came out, it was necessary to shift the handle to the leading stick, and in addition place a small 5mm bearing in place of the tenons on the leading piece – to mitigate it binding as the force of pulling the door made it hinge along the pliable vinyl backing.
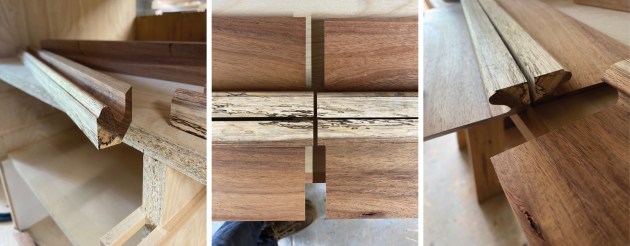
23. Spalted blackwood sections were profiled for the drawer handles. 24. The grain on the handles was matched and continues across the drawers. 25. Detail of the profiled front door pull.
The shelves
I salvaged two dozen 3/8" solid brass rods from the staircase of the house demolition. I would use them for all the shelf supports and door hinges. I wanted to have the shelving behind the tambours cantilevered – floating at the outermost corner. This meant devising a way to both suspend them on three brass rods, and also stiffen the solid timber shelves.
To make components that didn’t interrupt the fine lines of the brass meant making connections that had a good amount of glue surface and also a mechanical fixing. I cut these circular connections out of blackwood with a combination of forstner bit, hole saw and rebate cutter in the trimmer.
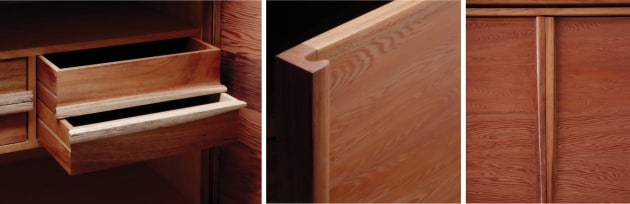
26, 27, 28. The finished drawers and door pulls.
I also opted to dovetail some support ribs into the underside of each shelf. The ribs would have to meet the round connections snugly, so there was decent adhesion and then 3mm brass rod would pin the joint through the whole assembly.
This was a classic case of the whole thing being utterly flimsy until all the elements were glued in place. The way I fixed the brass shelf support rods top and bottom was to tap the ends of each rod and use brass machine screws and washers to hold them in tension through the carcase.
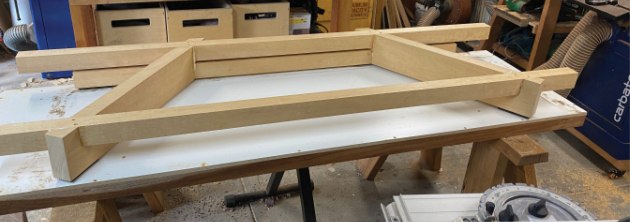
29. The ramin cabinet base frame assembled before shaping.
Overall, the build was enjoyable, but deeply challenging, and amounted to the cabinet behaving like a complex instrument. So many aspects had to be working together for it to succeed. And in the time-honoured way of such big jobs – it saved a little bit of terror for the very last minute. I had to disassemble and reassemble it several times, to transport it from the shop to the photographer’s, and then to the client’s high-rise apartment. I was so careful and so tired. After the triumph of not damaging it in all its travels, I assembled it finally in position, packed up and went home, shattered and happy.
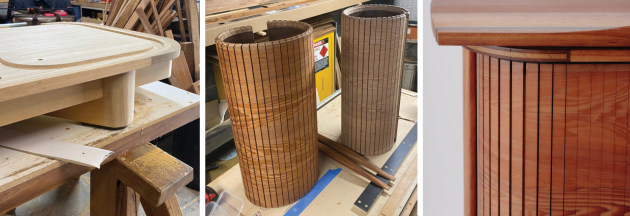
30. The cabinet supports have been rounded and the carcase base fitted. 31. The red pine tambours and door pulls midway through finishing. 32. The colours and grain of the finished cabinet are highlighted.
A couple of weeks later I received a message saying that one of the central doors had dropped and one of the tambours was binding. In fact it was worse – when I got there, the cabinet was behaving in a very strange way – things were out of square, but not consistently – it was like it was dimensionally melting and none of the readings I was taking made sense.
I was convinced I was in for a nightmare of recutting and fitting and had finally packed up my horde of measuring tools – and was about to leave when I thought: ‘I’ll just put the level on the parquetry floor and see what it’s like.’ Just measuring across the length of the cabinet base, it had 12mm hump in it. The whole thing had slumped in several directions. One big packer and it all went back to alignment, and I have never felt so relieved.
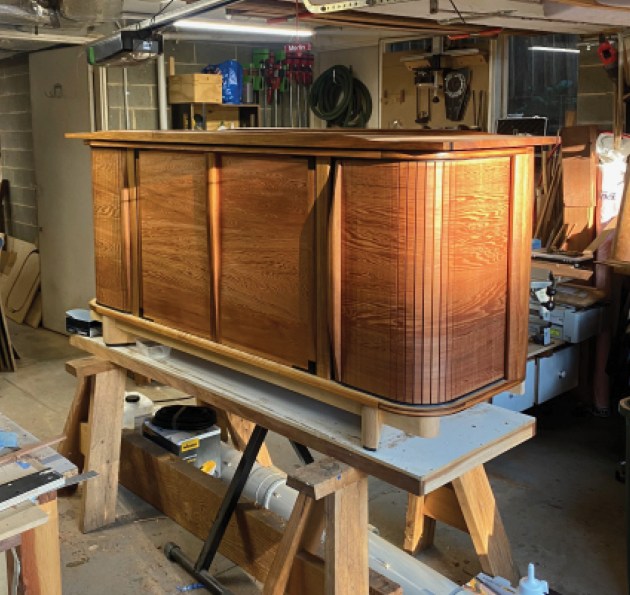
33. Awaiting delivery, the finished cabinet is the culmination of evolving design decisions and challenges overcome.
Making things hasn’t come naturally to me. I’ve always had to work quite hard to grasp the necessary skills – and from early on I had to come to terms with making a lot of mistakes. For many years this amounted to frustration and humility, but I’ve come to learn that mistakes are the ever-reliable sign that I’m reaching my limits. So long as I keep making them, I’m still learning. The rest is persistence.
First published in Australian Wood Review, issue 131, June 2026
Daniel Spielman’s Credenza 2 was runner-up Australian Furniture category winner for Maker of the Year 2025.
Learn more about Daniel Spielman at www.danielspielmanjoinery.com and Instagram @daniel_spielman_studio