


This diminutive folding arm mitre saw station occupies less than one third of a square metre. But, when it spreads its wings, it transforms from a Cessna into an Airbus. Lengths of three metres can be handled with ease.
My double garage dedicated workshop does not have enough room. With an industrial half panel sliding tablesaw shoehorned in amongst all the other toys one just has to have, I figured I simply did not have the room for a chopsaw station, and probably didn’t need one.
I was wrong—mitre saws do some things more conveniently than a tablesaw, and for some projects they work well in tandem, saving tedious set ups. For many, a sliding mitre saw is the only option.
The key to the problem was to engineer a small footprint into a dead space. This proved to be right alongside the middle pillar at the front of my workshop. All the bits jutting out the back of the saw sit alongside the pillar for maximum floor setback. When needed one or both extension arms unfold across the garage doors (without obstructing the view).
The table is a solid and compact unit, quick and inexpensive to build from hardware store timber requiring no thicknessing, or even no finishing, if you wish. Front and side rails are tenoned to solid pine legs. The MDF top has overhanging hardwood edge strips and is simply glued and pinned to the top of each leg.
Fence extension boxes
The folding extension fences are hinged onto small boxes either side of the saw (photo 1). Each box, made from butt jointed, pinned and glued 18mm MDF, is 100mm wide x 110mm deep x 70mm high. They are screwed to the table with their backs flush and square to the aluminium saw fence.
A 160mm wide x 115mm deep 18mm edged MDF ‘lid’ is glued and screwed on top, exactly level with the saw table.

Photo 1: Left extension fence hinges under box lid.
Left tabletop fence
Given that wood is mainly fed from left to right it seemed logical to fit a fence, complete with a scale to the box on the left side. I discovered the hard way that this prevented the saw from tilting 45° to the left for compound mitres. The problem was solved by hinging the left box fence to the table and securing its upright position (photo 2) with a woodscrew. I can now remove this screw and flip the fence back for compound mitres (photos 3).

Photo 2: From the rear: hinged left tabletop box fence, up.

Photo 3: Hinged box fence flips back for left tilt compound mitre cuts.
Folding fence extensions
The 800 x 115mm wide extension bases (photo 5, A) are made from 18mm MDF with a 12mm hardwood edge. The fence, glued and screwed square to the back of the base B, is two thicknesses of 16mm MDF, pinned and glued together, also 800mm long, but 70mm wide. Incra ScaleTrack (32 x 13mm) is secured by screws on top to provide a net above base fence height of 65mm. (With hindsight, I would use one thickness of 18mm MDF with 18mm Incra or Kreg T Track).
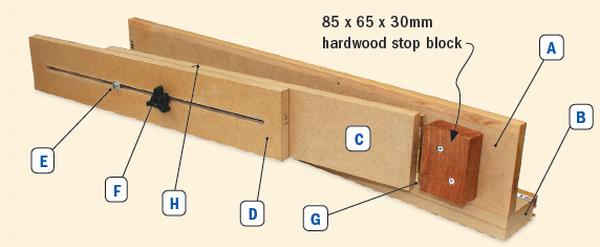
Photo 5: Right hand fence and leg assembly. Two-part legs are made from 18mm MDF, each 550 x 100mm.
Extension leg supports
These are the only fiddly bits. Photo 5 shows a right hand fence and leg assembly. The upper extension leg C hinges to the extension base with a 90mm heavy duty butt hinge positioned just in front of a hardwood stop block about 110mm from the fence end.
Two centred 6mm guide bolts are secured from inside the upper leg with threaded star washers. The bottom bolt E is capped with a Nyloc nut and washer. The top bolt F fixes the lower leg extension height with a locking 45/6mm finger knob. The guide bolts are positioned 40mm and 155mm respectively from the upper leg bottom. The lower leg D is slotted down the centre with a 6.5mm router bit to about 28mm from each end.
Butt hinges (90mm) secure each fence G to the bottom of the table box lids. Use a spirit level to adjust the extension fence heights and mark the top lower assembly position onto the upper leg with a black marker pen H.
Stop block
The sliding stop block (photo 6) is made from aluminium square section with a bit of hardwood glued and screwed to the front. A 1/4” bolt and finger knob secures it to the ScaleTrack. Proprietary versions of this track and flip-stop system (such as Kreg) are available from tool retailers.

Photo 6: Stop block slides along extension fence.
Space miser
Main photo shows what a space miser this powerful workhorse is with its connected shop vac underneath and wings down.
Using and securing the extensions is simple. Pull outwards and upwards so the bottom legs drop down, then visually position the lower leg top to the upper leg mark and lock with the finger knob. A front table apron power board connected to the shop vac provides convenient sanding tool connections when using my router/finishing table and vac hoses which are located nearby.
Geoff Birtles