


This project began as an example of how a 150mm (6”) wide board could be doubled into a 300mm bowl, but a number of hurdles drew it out along the way.
I felt the beautiful board of Tasmanian myrtle deserved better than just a 150 mm bowl. Lamination was the obvious solution, but rather than gluing two boards side by side I turned a segmented form that would later be separated and re-joined with components that would act as supports (legs) for the finished bowl.
Preparing the blank
Two boards of 150mm width were glued side by side separated by a sacrificial 12mm filler of radiata pine. Once dry, the blank was cut in half across its length and another piece of 12mm pine glued in between the myrtle segments. With a blank made up of four myrtle quarters separated by a cross of sacrificial radiata pine, it was turned to a sweeping bowl form of about 7mm thickness.
To check for consistent thickness I drilled holes into the pine so I could see any variation.
Satisfied with profile, thickness and sanding of the form I was able to focus on the legs. They would replace the pine to bind each of the bowl quadrants and form a stand that was integral to this design.
They couldn’t simply be add-ons but needed to be functional and blend in as an integrated part of the design. I cut the turned form into two halves, sanding the cut surfaces on a disc sander to remove any residual pine and glue. Keeping the bowl as two halves rather than four quarters helped keep components rigid and avoid moving them out of their correct plane.
Tracing the profile onto paper I was able to explore leg shapes and consider colours complementary to the pink myrtle. A number of sketches led to a shape that was copied onto thick plastic which, when cut, formed a template (photo 1). I traced the shape onto 12mm thick redgum, cutting four pieces that were stacked together with heat-sensitive glue ready for final shaping on a spindle sander (photo 2). Although stacking helps to ensure identical pieces, you need to use very hot glue so it can squeeze out flat and allow surfaces of each component to lie parallel. If pieces are angled your forms will be tapered, and hence very different.

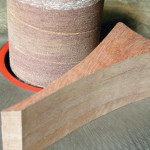
Image 1 Image 2
Sanded to required form, the legs were separated and interior triangular material sawn away on a scroll saw (photo 3).

Image 3
I refined this area with a series of files before they were stained black (photo 4). I tried ebonising the wood with vinegar and steel wool (ferric acetate), but the resulting colour was disappointing so I turned to a spirit-based stain. Again the result wasn’t as expected, but the deep brown-black seemed more natural than a true black.
A new problem arose. The change from pink myrtle to black needed something to break the transition. I decided to laminate a thin sheet of white coloured maple veneer to the edges of myrtle that would touch the blackened legs. This required some tricky clamping including MDF, rubber bands and a lot of faith.
The end result was satisfactory (photo 5) and excess veneer was trimmed, first with a sharp knife and then with careful sanding.
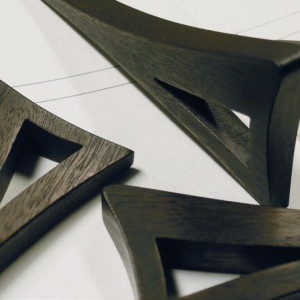
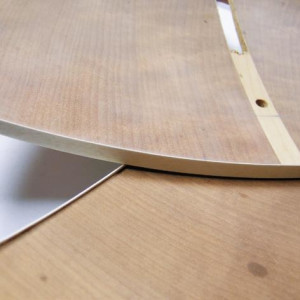
Image 4 Image 5
Leg placement
Where to place the legs in relation to the bowl’s upper surface?
What effect would be created by fitting legs flush with the bowl, set below, or raised above? I tried setting them low, but then realised they needed to sit proud of the interior.
Two legs were glued onto one half of the bowl and then drilled to accept pins that would help hold the bowl together (photo 6).
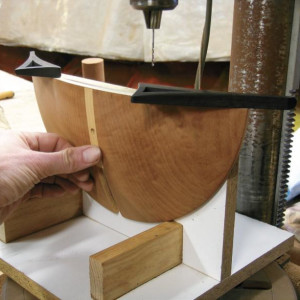
Image 6
Matching holes were drilled into the other half before gluing.
An old jig I’d used on another project helped support each piece parallel to the drill bit and reduce my worry that I may drill through the side of the bowl. Once holes were drilled in one side of the bowl small pins of stiffened wire were inserted onto the holes allowing a pointed millimetre to stick out. These acted in the same way as dowelling centres do. Pushing matching surfaces together the pins marked where to align the centre of the drill so both pieces should fit together flush.
With halves glued together and legs fitted in place (photo 7) I cut away the sacrificial pine, releasing the myrtle quarters. I then repeated the processes of laminating veneer, fitting legs
and drilling holes (photo 8) for another set of connecting pins before finally assembling the bowl.
Patience and care were required to glue the two half bowls together. Pinned and glued with superglue and held with hand pressure, the procedure was not an easy one, and I was worried
the four legs wouldn’t sit flat.


Image 7 Image 8
That extra bit
The project now hit another stumbling block. It needed greater visual impact, but I was at a loss to find that extra bit. So it sat, again, awaiting inspiration.
Eventually I settled on creating a textured outer rim with a rotary burr and then painted it black to create visual definition.
This tied the darkened legs and blackened edges to enclose the myrtle bowl quadrants.
A final application of polyurethane wiped on and off highlighted the beautiful grain and colour of the myrtle. After a few more days I added another detail—three fine silver dots applied
to each leg. It seemed to do the trick at the time, but no doubt I’ll be critical in the very near future, as I always am.