Working with plywood
Above: Solid edgings and dominos or dowels make plywood a fast way to build cabinet carcases.
Words and photos: Vic Tesolin
One of the first questions furniture makers ask during the design phase of a piece is: how are we going to build it? Careful consideration of materials comes up as we decide how we will bring the piece to life and with each choice comes a list of follow-up questions. Can it be made from solid wood? If so, what will the joinery be? What about a veneered construction? Would it be helpful to not have to worry about the ever-present movement of wood?
Veneered panels and components are great for some aspects of furniture construction because of the stability of the parts. Not dealing with the swelling or shrinking of components is a powerful draw to this style of building, though it’s not without its challenges. Plywood requires special consideration for joinery, often requiring metal fasteners or connectors.
You may need to know veneering techniques, or another option for some jobs is to use pre-veneered, furniture- grade plywood. Working with this material can be a fantastic option, but keep in mind there are some special considerations.
Cores and plies
Furniture-grade plywood comes in different forms and qualities. I usually aim for the higher quality materials – but what does that mean? Different sheet goods come with different cores, so I typically choose ones that are referred to as veneer core. This is what you would first think of when someone says ‘plywood’. With veneer core, there are a number of thicker veneer sheets laid with the grain running 90° to each other. This creates a core that is typically quite stable.
With this type of material, you generally get what you pay for. Cheap veneer core plywood has all kinds of voids and the plies aren’t always even. This can spell disaster in furniture making because uneven plies can result in thickness differences that are impossible to deal with. If you think you are getting a ‘good deal’ on plywood, take a close look at the edges to see the quality you’re getting for this great price.
The top of the heap are Euro-style plywoods that have many more plies than typical sheets and normally use hardwood instead of softwood. These are much more expensive but are worth it in my mind. Materials are only a small cost in the build of a piece, so it doesn’t pay to skimp on them. I usually avoid things like particle or MDF cores because they are too soft for my preferences and they don’t take fasteners very well – it’s like driving screws into cheese.
Break it down
Cutting up the plywood will be the first order of business and there are some important things to consider here. I like to break down the sheets first using a track saw so that the pieces are more manageable on the tablesaw.
Regardless of the saw you use, the key is to use a sharp, clean blade that is designed for plywood and laminates. These blades make all the difference when working with veneered plywood. Ignoring this advice and using an inappropriate blade will lead to a mess. Gummy dull blades will rip out the veneer and expose the core beneath so be sure to remove any pitch, or send the blade out for sharpening.

1. This type of foam is an excellent sacrificial surface for cutting.
Another practice I use when working with plywood is that I always make sure the cut is backed up. I also do all my cuts on foam insulation sheets (photo 1). Using these sheets as a sacrificial substrate protects the surface of the plywood and backs up the underside to further prevent splintering. With my track saw, I always check that the splinter guard is in place and in good shape.

2. Yet another great use for blue tape in the shop.
Over time the foam will get track saw kerfs all over it, but that’s okay. I have two sides to work with and they are fairly inexpensive to replace. On crosscuts I go even further by taping the cut line with a strip of blue painter’s tape (photo 2).
On the edges

3. Make a few extra edging pieces for those little mishaps.
As with any plywood build, I typically want to hide the plies unless of course the design calls for seeing them. I don’t like using the iron-on variety of edge banding because it’s not thick enough. One knock with a vacuum and the core will show for all to see, and this is not easily repairable. Instead I prefer to use solid wood edging that will take a hit and survive (photo 3).
I like to choose straight grained pieces that are rift sawn so the banding is as clean looking as possible. I also tend to start with stock that is around 50mm thick. This allows me to get two pieces of banding out of each piece of stock.

4. A sharp blade on the saw will make neat and tidy cuts for the edgings.
The process to make the banding is pretty simple and it all starts with some matching hardwood. I start by jointing one surface of the banding stock, then run it through the bandsaw. Then, back to the jointer for another clean surface, and repeat. This technique always ensures one clean face and one sawn face which makes cleaning things up quick and easy. The banding is sawn a bit oversized to allow for cleaning and thicknessing to final dimensions. I typically don’t make banding any thicker than 3mm, so cutting 4mm at the bandsaw is plenty (photo 4).

5. The thickness sander is a real time saver when working with thin pieces of timber.
A thickness sander is a real boon for creating thin pieces like this (photo 5). I use mine any time I have to thickness stock smaller than 6mm because thickness planers tend to destroy thin pieces, and I don’t need that kind of excitement in the shop. The digital gauge on this machine makes it easy to land at a specific thickness and to do it reliably and repeatably. The jointed surface goes down on the table as a reference and the bandsawn surface meets the sanding drum.
Applying edges

6. A few 23g pins will tack things in place without having to fill holes.
Applying the edge banding is also a fairly simple process. I cut the banding to a rough length, slightly longer than the piece I’m banding, then apply glue to the plywood edges. I lay the banding into the glue and centre it so that there is a bit of overhang on either side. The banding is secured with a few 23-gauge pins to prevent it from sliding around (photo 6).

7. This binding tape gets used by many luthiers to secure banding on stringed instruments.
These nail holes all but disappear once the edge has been sanded and finished. I use binding tape (Scotch 233+) to clamp the binding in place (photo 7).

8. A few strokes with a flush cut saw will trim the excess.
Once the glue has set, I trim the extra length off with a flush-cut saw and remove the binding tape (photo 8).

9. The block plane lets you sneak up on flush without damaging the delicate veneer.
I like to use a block plane to flush the banding with the surface of the plywood (photo 9). There are many techniques for doing this but I find the block plane offers me the most control.

10. A sturdy and clean, hardwood cap will hide the plies and protect the edges.
Now I’m left with a clean bit of banding on the edge and I’m ready to repeat the same steps to cover the adjacent plies (photo 10). I typically use butt joints where the two pieces of binding meets, but you can use mitres if you prefer. The amount of endgrain visible does not drive me to go through the hassle of little mitres and their fussiness.

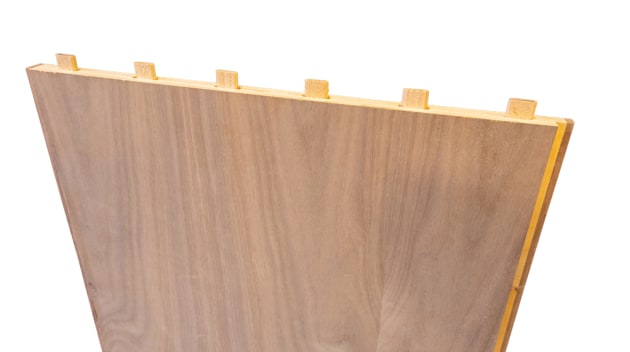
11. These panels are now ready to receive joinery to assemble the piece.
Now that the panels are all banded and prepared, I can move on to joinery. I like using dominos in plywood construction because they are fast, easy, and provide more than enough strength (photo 11). I will also cut in any rebates or dados as the build requires. After this, a quick sand with a random orbital and all the plywood components are ready for finish.
Using furniture grade plywood is a great way to save some time on a project and is great for built-in furniture or stand-alone pieces alike. All you need is a little bit of extra care and attention to have success with this material.
Vic Tesolin is a furniture maker who lives in Burlington, Canada. Learn more at victesolin.com