Variations on a side table

Two of the author’s side table variations, one with parquetry featuring on the top, the other made from Tasmanian blackwood. Photos: Andrew Porfyri
Words: Peter Young
Process photos: Peter Young
Diagrams: Graham Sands
This small side table is one of my favourites and one of my best sellers. It is useful as a bedside table or as an occasional table beside a sofa. Although the design is deceptively simple, there are a large number of design variations which can be used to make it look more traditional or more contemporary.
It can be of solid wood or veneer covered plywood construction and can be made with or without a drawer or shelves. The top can be solid wood or a veneered panel with solid wood edging. The veneered panel could even incorporate marquetry or parquetry designs.
Species and sawn sections
Here I’ll show how to make one in solid Tasmanian blackwood but I’ve also made this design in southern mountain ash, New Guinea rosewood, American ash, Queensland maple and cedar. Other possibilities are cherry and walnut.

Showing two other variations, on the left New Guinea rosewood with sycamore top panel, sides and drawer front; on the right, blackwood with marri top. Photos: Andrew Porfyri
When selecting material remember that you do not want highly figured material for the legs and the aprons. Rather we are looking for rift sawn material for the legs and either rift or quartersawn for the aprons.

1. Choose rift sawn material for the legs, as in the left side of this board. This will provide straight grain down all four sides of the leg. If you use the right hand side of the board you can see that one side of the leg will have straight grain but the adjacent side will have face grain.
When possible I like to buy timber in 50mm thicknesses and 150mm or greater widths. This allows me the best chance to get rift sawn material for the legs (photo 1) with near vertical lines running down each face of the leg. Ripping a 150 x 50mm board on the bandsaw to give 30mm leg blanks allows me to use the remaining material for 16mm thick aprons.
With quartersawn leg material one face will have vertical lines but the adjacent face will have face grain which in some species can be figured and visually distracting. While you could use decorative face grain for the aprons you need to be very careful as it can be extremely distracting and it’s much safer to use straight grain material.
A case can also be made for using straight grain material for the top so the finished piece sits quietly in its place waiting to be discovered. In some locations it is possible to talk to a timber merchant and tell them what you are looking for, but that is becoming increasingly uncommon. I usually make these side tables in pairs so remember to mill enough stock for two tables, and always allow for spare legs and aprons, just in case.

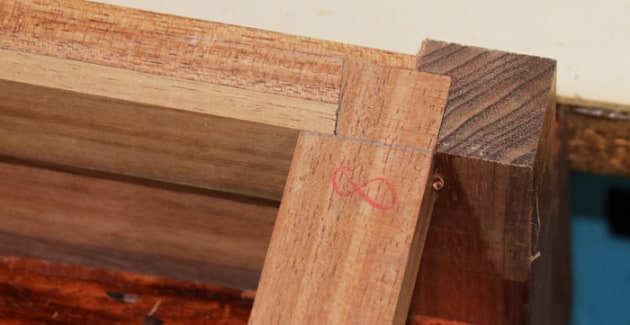
2. To keep track of the orientation of the leg blanks as they are being thicknessed to square, I use a soft red marker on the endgrain.


Dimensions and sizings
The simplest form is without a drawer, so just four legs, four aprons and a top. If there is no drawer then it’s possible to reduce the width of the aprons down to about 70mm. For the drawer version I usually make the aprons about 120mm wide so the drawer is deep enough to be useful.

The final size of the legs is about 30 x 30mm, tapering to about 20mm at the toe, or for a more delicate look you could go as small as 15mm as in the main image. The final length of the legs can vary quite a lot giving further design options. I usually opt for an overall table height of about 625mm which is quite useful for either a bedside table or a table to sit beside a lounge or armchair.
Layout and preparation
The rift sawn parts for the legs are bandsawn and then jointed and thicknessed to final size. To keep track of the orientation of the legs as they go through the thicknesser I mark one end with a soft red marker (photo 2).

3. I mark the top of each leg with a number starting clockwise from the left front. I also mark the outside edge which will not be tapered with an ‘X’.
I then inspect each leg carefully because I want to make sure that any longitudinal grain runout will be towards the outside corner which will not be tapered. I mark this corner with an ‘X’ (photo 3) and use that mark when I’m laying out the joinery and also when I’m cutting the taper.

4. I use a similar numbering system for the aprons so I can tell at a glance which is the outside and top of each apron, and what leg each part fits to.
I find it is useful to number each leg, starting from the left front and going clockwise around to the right front leg. I use a similar numbering system for the aprons/drawer front so I can tell at a glance where each component fits (photo 4).
I now use the soft red marker to indicate on the face of each leg where the mortises will be cut and if the side will receive a side apron or a rear/front apron. This might all seem like overkill but I need to make sure that the layout is Peter-proof to reduce the likelihood of mistakes occurring.
Joinery
The leg-to-apron joinery could be traditional mortise and tenon but I now use the loose tenon domino system. It is quick and easy and quite strong enough for this purpose. Because the mortises are 20mm deep and the legs are 30mm thick it is necessary to offset the positions of the mortises for the side and rear/front aprons.
For 70mm aprons I use two tenons for the side aprons and one central tenon for the rear/front aprons. For 120mm aprons it is possible to use two tenons in all the leg-to-apron joinery.

5. To lay out the position of the leg and apron mortises I use painters tape and a combination square to mark out from the top of each component – this ensures a good fit between the legs and aprons.
To lay out the position of the mortises I use painters tape on both legs and aprons (photo 5) and mark the location using a combination square, always measuring down from the top of either the leg or the apron. For the legs remember that the mark you need is on the face adjacent to where the mortise will be cut. There is an offset between the leg and the apron which can be 4–6mm.
There are two methods to allow for this when cutting the mortises. You could either use a shim or change the settings on the domino. If using a shim the thickness would be the same as the offset, say 5mm. The apron mortises are cut with the shim in place (under the registration plate of the domino) and the leg mortises are cut without the shim.

6. There is an offset between the leg and the apron so for the aprons I use a domino setting of 16 and for the legs a setting of 25 giving me a 4.5mm offset.
The other method is to use the adjustment on the machine. Selecting the 16mm setting will place the centreline of the mortise in the middle of a 16mm thick workpiece, or 8mm from the surface the registration plate is placed on to cut the mortise.
Using the 25mm setting will place the centreline of the mortise 12.5mm from the registration surface. So if we use the 16 setting for the aprons (photo 6) and the 25 setting for the legs the offset will be the difference between the two centrelines. That is 12.5 minus 8 equals 4.5mm.

7. To allow for wood movement I use a wider mortise setting for the lower mortise in the leg. This keeps the top of the leg-to-apron fixed while allowing movement in the lower part of the apron. Shown is a narrow 70mm apron.
For solid wood aprons the other factor to think about is wood movement. You need to allow up to 2% for seasonal movement, so for a 120mm apron the movement could be as much as 2.4mm certainly enough to cause the wood to crack over time. I use a wider mortise setting for the lower mortises in the leg (photo 7) so the apron is fixed at the top but can move over the lower part.

8. To cut the taper on the legs I use a jig on the sliding tablesaw. A similar jig can be used on a bandsaw. For a cabinet saw the leg would need to be positioned on the left hand side of the jig.
With the leg-to-apron joinery completed the legs can now be tapered. I use a simple jig (photo 8) for this on my sliding tablesaw. You could use a similar jig on a bandsaw, but on a cabinet saw the right hand side of the jig runs against the fence so the leg needs to be positioned on the left hand side of the jig. I use a tablesaw because it gives a relatively smooth surface which only needs a small amount of work with a plane or a cabinet scraper to get the surface ready for finishing.

9. To maintain correct orientation of the leg in the jig, I position the outside corner (marked with an X) as shown for the first cut, then rotate the leg anticlockwise for the second cut.
There are two methods to allow for this when cutting the mortises. You could either use a shim or change the settings on the domino. If using a shim the thickness would be the same as the offset, say 5mm. The apron mortises are cut with the shim in place (under the registration plate of the domino) and the leg mortises are cut without the shim.
The other method is to use the adjustment on the machine. Selecting the 16mm setting will place the centreline of the mortise in the middle of a 16mm thick workpiece, or 8mm from the surface the registration plate is placed on to cut the mortise.
Using the 25mm setting will place the centreline of the mortise 12.5mm from the registration surface. So if we use the 16 setting for the aprons (photo 6) and the 25 setting for the legs the offset will be the difference between the two centrelines. That is 12.5 minus 8 equals 4.5mm.
I start the taper about 50mm below where the bottom of the apron meets the leg. Using the jig it is only necessary to lay out the taper lines on one leg and then all the other legs can be cut in the same position. I make sure that the leg is in the correct orientation for the first cut by placing the X mark at top left (photo 9). For the second cut I then rotate the leg anti-clockwise.
Benefits of pre-finishing

10. Before glue-up I like to pre- finish the aprons and the legs. This makes control of excess glue very easy and also means I don’t have to worry about sanding and finishing in corners created by the offset between the legs and aprons.
Before gluing up the leg-side apron assemblies I like to apply finish to the aprons and to the legs (photo 10). simply wipe off the excess glue with a paper towel followed by a damp rag. It also makes finishing so much easier, especially where there is an offset between components. Another benefit is that any missed defects or tear-outs become much more obvious when finish is added and it’s much easier to repair these defects before assembly than after.
There are lots of choices of finishes. I usually use a wash coat of shellac followed by wipe-on polyurethane but recently I have been using Osmo oil-based finish.
Glue up in stages

11. Gluing the leg-apron assembly. By controlling the pressure on the two clamps I can make sure that the legs remain parallel.
I do the glue-up in two stages, the first being the leg-side apron assemblies (photo 11). I place one clamp near the top of the legs and the other clamp in line with the bottom of the apron. I tighten up the top clamp first and then apply pressure to the second clamp so the outside leg to outside leg distance at the bottom of the legs is the same as at the top of the legs thus making sure that the non-tapered outside edge of the legs are parallel.
When the assemblies are dry, I glue in place top and bottom filler pieces which provide the side runners for the drawer. These fillers are about 30mm wide and just a bit thicker than the inside leg to apron offset so they can be planed level with the inside of the leg when the glue is set.
A side table with a drawer is a good option for a bedside table. In a traditional build an upper and a lower rail are used creating two horizontal components above and below the drawer front. The top rail is usually dovetailed into the top of the two front legs while the bottom rail is mortised into the side of the legs.
These horizontal elements provide a very traditional look but can be visually distracting and I now prefer to have the drawer front looking the same as the aprons. You can then to have the drawer front looking the same as the aprons. You can then choose to add a drawer pull or not depending on whether you want to disguise the drawer or not.

12. Completed assembly showing dovetailed top rail, web assembly and kickers. Photo: Andrew Porfyri
I still use a dovetailed top rail but I move it back so the rail actually dovetails into the apron as well as the leg. I incorporate the bottom rail into a rectangular web frame which connects with the side aprons using loose tenons (photo 12).
Because the grain of the side aprons is running horizontally I don’t have to account for wood movement in making this rigid web frame and it becomes a very strong connection between the left and right side of the cabinet as well as providing runners for the drawers. The top rail and the front of the web frame are both covered by the drawer front and act as drawer stops so it’s important that they are vertically aligned.
Making the web frame
The next step is to construct the web frame using loose tenons. I make it a few millimetres oversize and then trim to size on the tablesaw after glue up. It is really important that the side to side dimension of the web frame is exactly the same as the shoulder to shoulder dimension of the rear apron and so I use the rear apron to locate the stop on the cross cut fence before making the final cut.

13. Cutting the lap dovetail shoulders using a crosscut blade.

14. Finishing off on the bandsaw.
Similarly I use the rear apron to locate the shoulders of the top drawer rail half lap dovetail. When it is cut out (photos 13, 14) I mark the location on the top of the leg-apron assembly using a knife.

15. Use painters tape and a knife to lay out the joint which will go into the top of the leg and the adjoining apron.
Using blue painters tape is a good idea as it gives a very good visual layout of the top of the joint (photo 15).
The next step is to remove as much of the waste as possible with a small handheld router. The depth of cut is set from the dovetail.

16. A trim router removes the bulk of the waste. Clamp blocks around the joint to lessen the likelihood of splitting the side grain when chiselling out the rest of the waste.
17. Showing the completed joint.
I use a 6mm bit and carefully remove as much of the waste as possible before using a chisel for the final clean up (photo 16). By placing a chisel in the knife line and cutting downwards it should be possible to get a nice tight fit (photo 17).
Now the rear apron, the web frame and the top rail can be glued into the two leg-to-apron assemblies, checking the top and bottom measurements as before. If you are using buttons to hold down the top it is a good idea to cut the mortises in the inside of the rear apron and the inside of the front rail before assembly. I use the domino at the widest setting and position the centreline of the mortise 10mm below the top of the apron or rail.

18. A spacer block makes sure the kicker is parallel to the runner during glue-up.
I like to wait until everything else is glued up before gluing in the two kickers, using space blocks to make sure that the kickers are parallel with the runners (photo 18). Again, cut the mortises for the buttons before gluing the kickers in place. I could incorporate the top filler piece and the kicker into one component but I would be nervous about ensuring that the kicker was parallel to the runner so I prefer to use this two-step method.
Drawer variations
There are many different ways of making drawers for these side tables and I have used a number of different variations. Currently I am using a tongue and dado method with an applied drawer front but in the past I have used dovetails, mitres and lock mitres. I typically use ply or MDF for the drawer bottom and cover both sides with commercial veneer. The drawer bottom is glued into a full width groove in the drawer sides, cut at the tablesaw. This method gives a lot of strength and rigidity to the drawer assembly.

19. The 25mm thick top with a 40mm overhang is undercut at about 60°, leaving a 6mm square edge.
The final step is to make the top. There are a number of different variations possible here as outlined in the introduction. There are also a number of different edge treatments. I usually make the top about 25mm thick with an overhang of about 40mm and use an undercut of about 60° (photo 19) with a square edge of about 5–6mm. This gives the visual appearance of a light thin top. Another option is to leave the edges square but in this case the top needs to be around 20mm thick otherwise it looks too heavy.
Details add more

20. A 20mm thick square edge top showing how the chamfer on the top and the beading strip on the bottom of the apron can make small visual highlights.
Small details can make a big impact. By making a heavy chamfer on a square edge table you can create a surface which catches the light differently from the rest of the top resulting in an interesting horizontal line along the edge of the top (photo 20). The effect is enhanced if you also add a bead strip to the bottom of the apron, now creating two horizontal lines which catch the light differently from the other surfaces.
With different combinations of timber species, joinery and detailing it’s possible to create an infinite number of variations based on this basic design.
Peter Young is a studio furniture designer and maker who lives in Brisbane. See peteryoungfurniture.com