Turning a hollow Huon pine form

Words and photos: Andrew Potocnik
To me Huon pine is a treasured material. It has wonderful working qualities and it is also a resource that comes from a very rare tree that grows only in south-west Tasmania. The tree needs hundreds of years to grow into a sapling of about 15mm diameter. Compare that to humans, more than a lifetime to grow into a juvenile!
I was given a waxed blank of Huon from someone who had recently visited Tasmania and I wanted to create something special from it and give it back to them as a souvenir that would remind them of their trip.

The blank was partly wet so I rough turned it mounted between my scroll chuck and tailstock centre (photo1), then reversed it to hollow the inside (photo 2). I put it aside to dry out a bit, but before I realised, a couple of weeks had passed, so I placed the wood in a plastic bag, and then months slipped by.
The plastic bag was intended to stabilise moisture content of the wood. Previous experience has taught me that if wood is very wet it will crack easily in a warm environment. One method of reducing moisture loss and preventing cracking is to wrap the wood in a plastic bag. This can lead to other problems, but it is a simple way of keeping wood moist for ‘green’ turning.
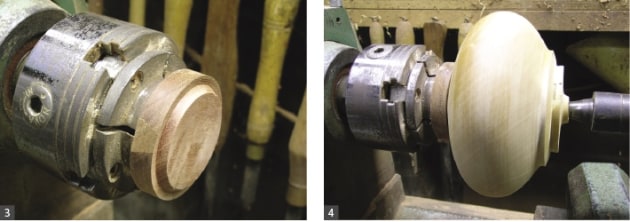
Eventually I got back to working on the piece. To hold the piece I turned a carrier (photo 3) to fit into its opening. This allowed the tailstock to support the other end, effectively wedging the Huon between the carrier and tailstock (photo 4)

I could now turn the wood to its final shape (photo 5) leaving a small spigot so it could be reversed and gripped in my scroll chuck (photo 6).

The top and opening were trued up, and cut with a shear scraper (photo 7), leaving a smooth surface that required minimal sanding. To give the opening definition I used a skew chisel (photo 8) to cut a neat V-line to create a shadow line and form a neat break between the curved surface and the angled ‘collar’ around the opening.

This was also finished with a shear scraper (photo 9). Several specialty hollowing tools from the McNaughton range were used (photo 10). These are fitted into a heavy steel handle that allow you to work a long way over the toolrest and still have plenty of control.
Once the walls were reduced to about 6mm thickness they were sanded through to 320 grit and a wax finish applied. I like wax on Huon as it doesn’t change the subtle light colour of the wood to a strong orangey yellow as oil does even though the wood will eventually darken as most timbers do.

The exterior was sanded with a rotary sander (photo 11) and hand held sandpaper working from 120 grit through to 320 grit. A bit of hand sanding with the grain is necessary along the way to eliminate stray circular scratches until arriving at a smooth surface ready for application of a finish.
I still needed to complete the base of the form so it was reversed once again onto another newly turned carrier made of scrap material gripped in a scroll chuck supported by the tailstock (photos 12, 13).

I marked out four equidistant lines where the feet would go. This was one way I could take the form from just a turned vessel to something a bit more special. I used the indexing holes in the headstock to mark out four equally divided reference points to work to later on, however I hadn’t finished on the lathe just yet!

To create what is, in effect, a ring that protrudes from the outside of the turned form, I needed to take away material and predict the overall sweep or curve that would be left once unwanted material was removed (photo 15). It is possible to use a profile gauge to see exactly how the curves on either side of the raised ring match, but this time I worked by ‘intuition’.

At this stage lathe work was complete and it was time to get the carving tools out and employ some elbow grease. Unwanted material was firstly removed with a microfile (photo 15), then refined with carving gouges and eventually refined with 80 grit sandpaper (photo 16). I retained reference marks for as long as possible to ensure that the points of each foot remained equidistant and that the profile of each foot was consistent before finish sanding the entire base with the grain, eliminating pencil marks and easing all edges to create surfaces that were smooth to the eye and touch (photo 17).

I normally sign my work with a pen or marker, but Huon isn’t keen on ink and likes to absorb it, leaving a smeared outline. In situations like this I have a stylised hallmark that I use which can be carved with a very sharp veining V- shaped carving chisel (photo 18). To create contrast, colour and texture I used my trusty old Ironcore pyrography tool to burn a series of carefully placed ‘u’ shaped marks on the collar (photo 19). A coat of polyurethane wiped on and wiped off the exterior surfaces completed the project.
It’s ironic that the special qualities of this highly prized ancient species have lead to its increasing rarity. I felt privileged to have it in my hands and be able to make something from it. As for the recipient of the piece…he’s a relative, and I’m still waiting for a special occasion when the piece of Huon will be returned to him. Then I’ll know whether he likes what I’ve done.
Learn more about Andrew Potocnik at andrewpotocnik.com