The Craft of Finishing
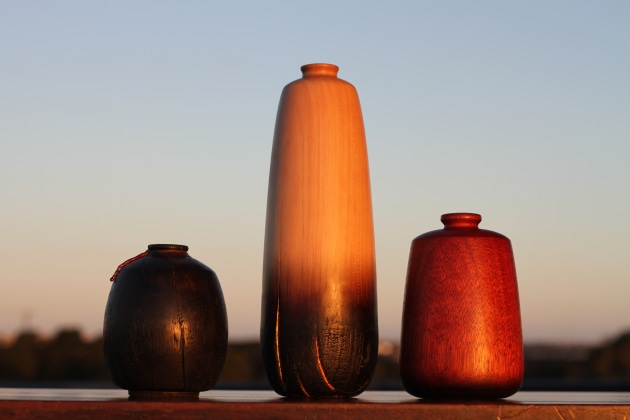
Left to right: Bushfire vases in kauri, Qld maple and spotted gum.
Words and photos: Shane Orion Wiechnik
I am practising my finishing skills. Early on as an aspiring woodworker, finishing was that thing I did at the end after ‘completing’ my piece to make it shiny and to protect it from wear and use. It has become increasingly clear to me that finishing is like sharpening, joinery, and design; it is an equal part of the craft and requires equal attention. It requires focused attention. It requires practice.
Historically, European furniture making separated the finishers from the joiners and the ébénistes (cabinetmakers). This set an education precedent to separate these skills, which certainly has its benefits. A specialist in their field can learn and do so much more than a jack of all trades. These days, the modern designer maker along with the home craftsperson needs to be all of these things.
There has been a project in the back of my mind for a while that was perfect for exploring and practising finishes. It was something that required a creative visual approach. The techniques themselves will only briefly be covered in this article. Instead, I aim to clarify how in a lot of ways finishing is just like any other part of the craft.
Plan finishes at the start
The brief I set myself was to bring the aesthetic of bushfire regrowth to woodworking. Since first moving to Australia, my partner and I have found a unique beauty in the way new life bursts from recently burned bushland. Whenever there has been a fire, we like to hike through the land and observe new bright green growth bursting from the deepest black.
The unprecedented bushfires were devastating this past fire season, but fire has been an important part of the Australian ecosystem for millennia. Certain plants don’t even propagate unless their seed pods reach a certain temperature.

Bushfires at the end of 2019 and early 2020 were devastating in terms of wildlife and forests lost.
As a woodworker, I wondered many times how I might bring this aesthetic into a design. Marquetry illustration was considered. Sculptural pieces could be made to resemble leaves growing from burned bark. In the end I decided to take inspiration from the aesthetic without literally translating the subject matter. To get that aesthetic, I spent a lot of time thinking about different finishing techniques I could use.
I will often lay out the characteristics of my desired aesthetic or design needs against a set of known decorative techniques. From here, I can settle on what goes well together, and what I think best helps me reach my goal.
More than one
Whatever your project or theme, your finishing should also be considered. This goes beyond the functionality
of ‘durable’ or ‘food safe’. It also goes beyond just settling on one finish for every component. There are important practical considerations regarding object use as well as environmental concerns, but there are aesthetic considerations as well.
Shiny or matt? Contrast or simple homogeneity? Maybe one part could be open-pored while another is close- pored in order to highlight a duality? Understanding finishing techniques and their potential can help you achieve and embellish your design. They are another tool in your design tool belt. Do not ignore them.

The turned vases before their thematic finishes were applied.
The bushfire vases
After many design iterations, I settled on making three small decorative vases with simple but organic shapes. The serenity of their shaping would reflect the calm of a recently burned landscape, and not the violence and danger of an uncontrolled blaze.
I decided to burn the bottoms of the vases for colour, texture and thematic reasons. Bushfires often burn just at ground level.
My starting point for planning the finishes for the Bushfire Vases was:
Blackened burnt areas: shou sugi ban (scorched), ‘Japanning’ with black polish, ebonising with iron and vinegar, paint
Amber tones of dried leaves: bare timber, pigmented finishes, ammonia, reddish resins
Texture of burnt leaves and earth: intense shou sugi ban, carving, open grain finish
Stillness after the fire: smooth soap finish, wax only finish, full grain finish, matt finishes
Embers and flame: gilding without and with a reddish wash as a top coat
Regrowth: green pigmented polish, paint, gilding with green foil

The smallest vase has a small red glass ‘dribble’ that represents the response of bloodwood gum after bushfire damage.
The smallest vase
On the smallest vase, I kept it simple. After burning the lower half until cracks began to form, I cleaned it off and polished it with shellac using a cloth rubber. I used the rubber to pull the loose black carbon from the burned areas into the cracks and pores of the upper half of the vase until the whole piece was dark.

The upper half is more heavily polished and smooth with a low sheen, while the lower half remains more matt and textured. To finish it off, I made a small red glass dribble to resemble bloodwood gum, which often comes out of the tree after it has been damaged. The glass piece was shaped and then glued onto the surface with an epoxy. This also helped ensure a red element across all three pieces.
Practice and experimentation
Turning is a great aid for practising finishing techniques, because the ability to quickly produce finish- able products reduces concern about stuffing up projects at a late stage. The more complicated the technique, the more practice it will require. The more techniques you practice, the easier it will be to include them in your design.

Gilding is not complicated but requires practice. A flat brush called a tip is used to float the gold onto the surface.
Gilding and French polishing are great examples – if you’ve never tried them, you probably won’t think of them in the design phase. It won’t take someone long to explain to you how to gild or French polish, but getting the feel of these materials takes experience.

The cracks in the maple vase were prepared with a red acrylic and then gold size before the gold leaf was applied.
The Qld maple vase
I had tried some of the techniques used here but not fully practised them. In order to darken the Qld maple vase but not blacken it I used ammonia and then Australian grasstree (Xanthorrhoea) resin.
I wiped on the cloudy ammonia (an ammonia and water mixture) and after five minutes washed away as much as I could with water. When dry, the surface had pleasantly darkened and muted the brighter pink tones in the timber.

Ammonia was first brushed on then washed off the tallest maple vase.
Ammonia needs to evenly touch every part of the piece, or else you’ll be left with splotches of colour. I wiped it
on wet with one cloth first, then used a dry rag to pull back evenly. One of the benefits of fuming with ammonia (putting the piece in a small tent with liquid ammonia) is the assurance of an even surface.
After a few days I polished the surface with Xanthorrhoea resin dissolved in alcohol using a cotton rubber. A small amount of pumice powder was added to the pad to partially fill the grain.
I held the piece in my hand rather than putting it on the lathe in order to work the resin in a more controlled way, and also to practise my polishing technique.
Practising on an odd shape is an added challenge. I used a larger rubber for the broad surface, but switched to a smaller rubber to reach around the corners and into the mouth, polishing solidly for about ten minutes. I wasn’t aiming for a big built-up finish, so this was easily done in one session. What I had when I finished was a nice brown/amber piece with a hint of reddish glow and a black base.
Accidents may happen
Did you know that Xanthorrhoea resin gets redder with UV light? I knew it was a natural waterproof resin that dissolved in alcohol similar to shellac. I had never worked with it before, but knew it had a reddish hue like dragon’s blood (another resin). The polished maple vase sat in my living room, and after a few days the half facing the morning light was a much deeper red than the other half. I rotated the vase 180° and two days later the two sides were equally red.
This is the absolute dread of every woodworker. You don’t want to put something on your piece, a piece you potentially spent hundreds of hours on, and find out it changes colour, or breaks down, or otherwise does something unexpected. Dovetails are easy in this regard: if they fit, they fit. Your process improving is very visual and immediate. Other aspects of a project, such as structure, longevity, and finishing, are less immediate.

The kauri vase
I struggled the most with the third vase. The burning was very successful, and easily sealed in with a few brush coats of shellac. However, with this piece I had planned to use a wax finish but wasn’t happy with the result.
The yellow/amber tone of the wood after the application of wax was spot-on the colour of fire-affected leaves, but despite meeting the brief and the design perfectly, it didn’t feel right. You can plan things but in the end they may not work. The extra thought and time put into finishing can make that difference.
What I didn’t like was that the tone was too aggressive and pushed against the calmness I had desired in the piece. I pulled the wax off with turps and steel wool before returning to my chart. I tested a few more finish options and in the end used a soap finish to keep it soft in tone. The soap was warmed slowly on an electric burner and applied like a wax but with much more force.

The cracks in the maple vase were prepared with a red acrylic and then gold size before the gold was applied.
The cracks in the bottom were oil gilded with 23 carat gold leaf and a one-hour Japan gold size. The surface in the cracks was prepared with a red acrylic. After applying the size, you wait until there is a certain level of tackiness where the gold will adhere and have the best shine. If you run your finger across the surface, it should squeak. Then the gold leaf is carefully cut, and a flat brush called a tip is used to float the gold onto the surface. It was quite difficult to get the gold into the cracks, and I did end up having to go over it a few times.
The gilded areas were coated with the grasstree resin brushed on to resemble the red glow of embers.
Don’t dwell, reflect
I am happy with these pieces. They will sit in my home on display for some time while I see how they age. In their making I was able to test a few finishes and decorative techniques using multiple application methods. It is important not to dwell on the mistakes, but to note them down and understand them. That said, never forget to also note down and understand what went well.
It is my belief that part of what makes a craft so special is the way we slowly build them over time and through practice. In every attempt we learn a little bit more consciously and tacitly. For some people, finishing may seem like a science. I assure you, it’s a craft.
Shane Orion Wiechnik is a furniture restorer/conservator living and working in Sydney, Australia. He studied the conservation of furniture and related objects at West Dean College in England and works with International Conservation Services and Renaissance Conservation. Learn more at www.craftsandconservation.com