Roy Schack's ‘not so simple cabinet’
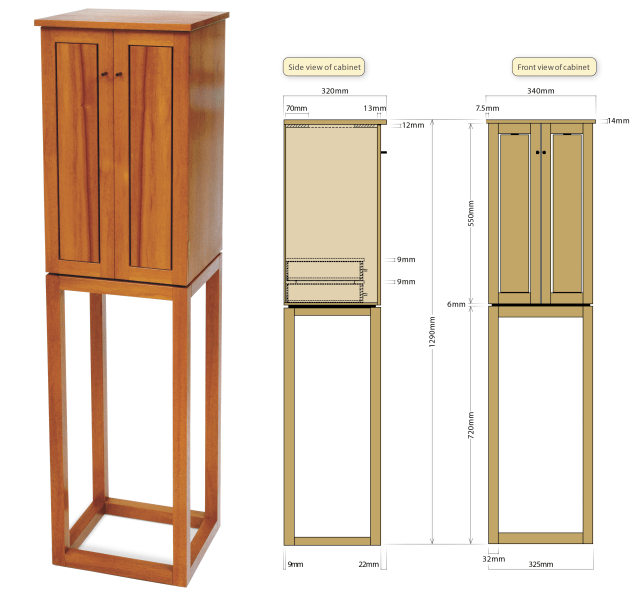
Above: Roy Schack's cabinet on stand, made from NSW scented rosewood (Dysoxylum fraseranum), along with side and front view diagrams.
Words and process photos: Roy Schack
You know when you’re flat out, anything seems possible. I tend to get swept away in the moment, forgetting that the more I start, the more there is to finish. This cabinet was one of those ‘fun’, speculative projects that snuck in there during a couple of commissions — I was certain it could be knocked over in 2–3 weeks. Anyway, that was four years ago, and it was only during some quiet time this year that I was able to complete it.
After making a flying start four years ago, I managed to get the carcase to dry assembly stage. The unfinished piece and all associated off-cuts have been haunting my workshop ever since, gathering dust and coffee stains, being shifted from one corner to the other in the futile hope that the workshop fairies would come in the middle of the night and finish it for me. I’m still waiting for them to change my jointer blades, tidy the timber rack, change the dust bags…
I find it difficult to sit down and diligently draw scaled, detail plans of furniture I want to make. I couldn’t do it at high school, nor at wood school. I just found it mind numbingly tedious. However, I am in awe of those makers that can do it. It’s just that if I spend too long at the drawing board, then the thrill of the chase is gone. I like the little surprises that come up when I’m working off a mudmap. The back of an envelope or a scrap piece of paper, anything like that and I’m happy.

As with most of my work, the piece looks almost insultingly non-descript. I enjoy simple lines in furniture, much more than organic curves. I find minimalist design challenging, as the slightest blemish can scream out ‘look at me’. I like to keep it quiet, and I think with this piece, I’ve accomplished that.
I try to get a ‘crisp’ look with my work by not over-sanding. Each component is dealt with separately; careful attention being paid to planing, sanding and final arrising, and then a dry assembly carried out to see how it relates to its mating pieces. Whilst my approach to plans may seem aloof, I never take any part of the making process for granted. I’m constantly asking myself what the ramifications of my actions will be, because it’s that one small slip of concentration that can make or break a piece. Unlike organically curved work, this style of furniture can be completely unforgiving if the maker strays—there is little hope of rectifying a problem by sanding it out.
The design process
When I initially designed this cabinet I was limited to the amount of material available. The slab contained a bit of rot and ‘natural feature’ that I couldn’t use. I like my life to be kept simple, so rather than cut veneers, I chose to lighten up the elements. The design plays with verticality and simple planes. It was important to me to keep the under-structure elements and the door stiles the same dimension to provide continuity between top and bottom. I love using breaks between cabinets and their bases, usually seen in the form of a shadow line. I also enjoy the dynamics of long narrow doors.
Overall, the piece stands at 1290mm tall, 340mm wide and 320mm deep. I had a fairly clear picture in my mind as to the impact the piece would have in a room, and decided that it should house bottles and associated paraphernalia. Of course, the dimensions can be changed to suit, and I’ve already thought of the shape of the next generation.
The construction order
I recommend the cabinet be constructed first, the internals fitted out, doors and back fitted, and finally the base built to the footprint dimensions of the cabinet. I like to have the carcase completely finished before the base is constructed because it affords me a bit of latitude if I feel I need to vary the design. But I also find it really difficult focussing on more than one thing at a time.
The carcase

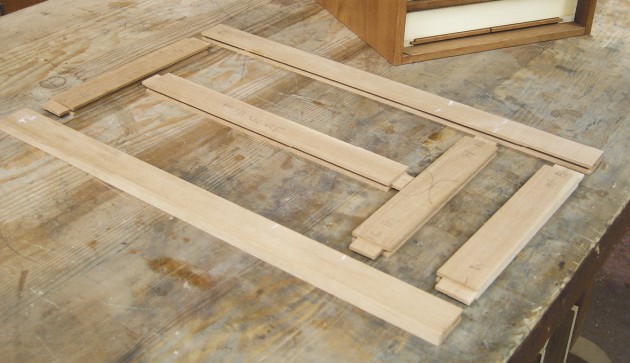
Above: Components laid out prior to glue up. I always finish the interior of a carcase before glue-up. Cabinet scrapers come into their own here. Care is taken to stay away from joints.
The external dimensions of the carcase (excluding the top) are 550mm height, 325mm width and 295mm depth. Material is milled to form the two sides, base, two top rails (with connecting rails), a shelf and two drawer rails (with runners). After the glued panels have dried, plane flat and dimension to finished size. I don’t allow for any ‘fat’ in the dimensioning process—if a mistake is made, I put it down to a design variation.
The thickness of the sides is 12mm, not that you notice this with the doors closed as they are overlaid. The internal components (rails and shelves) are finer still at 9mm.The base of the carcase is biscuited into the sides, whilst the top front and back rails are dovetailed. These rails are 70mm wide and 12mm thick. I’ve allowed for these rails to be 18mm longer than the base to include 9mm dovetails.
Front and back drawer rails are mortised out to house drawer runners. These are only glued in at the front to allow wood movement.
The top rear rail is set in from the back edge 10mm, allowing for a 9mm frame and panel back. Be sure to mark the tenon shoulders on the drawer rails at the same time as the dovetail shoulders on the top rails, as these have the same shoulder to shoulder length. Mark and cut the mortises into the cabinet side for the stub tenons on the drawer rails. I’ve included two evenly spaced stubs at 6 x 6mm in each drawer rail.

A gap is left at the back of the drawer runner frame to take up movement in the carcase.
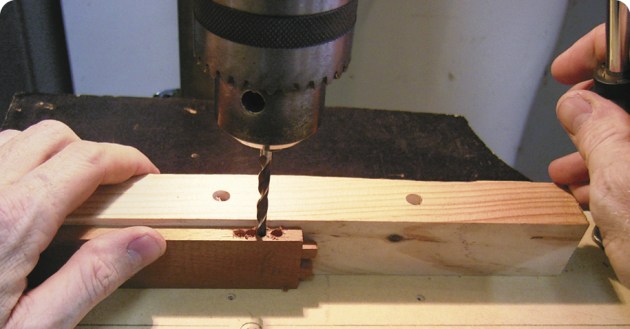
The measuring and marking is crucial at this stage. To mark the stub mortises (and also the position of the shelf), I bring the two cabinet sides together and nick the position of the mortise and shelf on the front edge. The sides are then separated and these marks transferred across by way of a square and straight edge. The marking is completed for the mortises by mortise gauge. The mortises are drilled to a depth of 8mm and pared out. The stub tenons should then be trimmed back to 8mm in length.
As with the top rail, the rear drawer rail is set in from the back by 10mm. I almost always allow for floating runners between my drawer rails. The runner that the drawer glides on is tenoned and glued into a mortise in the front rail, but not glued in the back rail. With the aid of a fence, cut biscuit slots (I used size 0) into the sides for the shelf.

Check the diagonals during the dry clamping stage and again when gluing up. The clamping cauls in the centre of the cabinet
are slightly convex to force pressure in the middle of the shelf.
A clean up and final dry assembly is completed which allows me to sort out clamp positions, clamping blocks and gluing strategy. I also check the diagonals at this stage. Once satisfied, the exterior surfaces are planed and lightly sanded to 240 grit, and the carcase is glued. I always try to make this the last thing I do in the day so that when I arrive in the morning, I’m faced the fresh challenge of having to fill the gaps with doors and drawers.
The doors
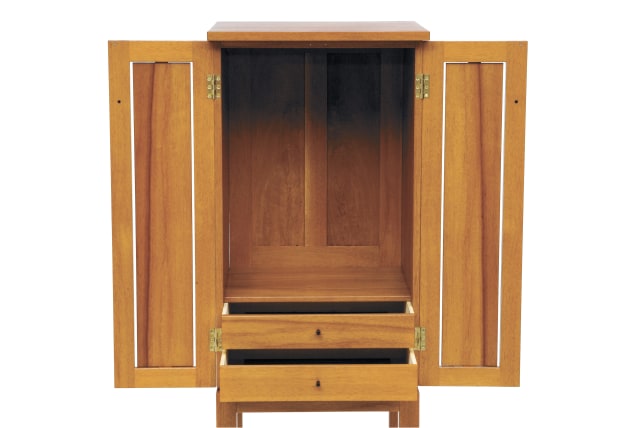
The width of the door stiles is 32mm. The 13mm thick doors are mortised and tenoned, allowing 2mm top and bottom for protection during the construction stage. I have to admit, it did take some time working out what kind of panel I wanted in these doors, and it was a happy accident that led to the final decision. Part of the mocking-up stage involved placing some scrap up against the door frame that wasn’t quite the right width. I actually liked the fact that it was narrower than the opening and decided to run with it. The decision then had to be made as to orientation of the book-matched panels.

The door frames are laid out prior to glue up, just to be sure of the fit and grain orientation.
The gap on the sides is 4mm whilst the top and bottom gaps are 2mm each. The only thing holding the panel in is a tongue 20mm wide and 8mm long, housed into a 3mm groove in the top and bottom rails. With a bit of luck, these panels should move a bit with seasonal changes.

Gluing doors is a relatively simple process. The clean up is done pretty much straight away to avoid staining the timber. Water, toothbrush, small rule and cloth are used.
The frame components are arrised, stopping just short of the junction. I come back after the glue up and finish the arris off with a sharp chisel, creating a tiny masons mitre in the corner. The size of the arris can affect the aesthetics of the piece dramatically. Play with a piece of scrap to determine your own preference. I tend to go fine. When all the preparatory work is completed, glue the doors ensuring there is no wind or twist.
The drawers

Whilst waiting for the doors to dry, begin preparing for the drawers. Drawer sides are always cut first, the thickness being dependent on the size of the drawer. Being a small piece, I’ve made the drawer sides 6mm.The depth is 0.5mm bigger than the opening, and the length is cut to finished size (in this case 220mm).
I tend to treat myself like a two year old and make very clear marks on the outside of the sides depicting front, out, left, right etc, so that there is absolutely no ambiguity when I’m marking dovetails or gluing. The sides are then planed to fit. I only plane the top edge enough to have the side fit tightly. The drawer front and back are cut to length at the same time and should fit tightly in the opening. The drawer back is narrower than the front by about 15mm. This allows for the drawer bottom and also top clearance. The back is dovetailed into the sides, up 10mm from the bottom edge which allows for the runners (10mm thick).

The drawer slips fit into a groove in the drawer front and are grooved to house the bottom tongue.
Mark and cut the dovetails. When all of these have been cut, fitted and glued its time to consider the drawer bottoms. I always glue a substantial drawer slip onto the sides to help disperse the weight of the drawers on the frame runners. These slips are milled to 25mm width and 11mm thickness, allowing 1mm to be planed down flush with the lower edge of the side after the glue has cured.

The drawer slips are glued in with the bottom in place. The bottom itself should not be glued in as it is solid wood and needs to be able to move.
The slips house the bottom by way of a 3mm groove. The solid bottom panel must be allowed to move freely in the groove, so if necessary, clean the tongue with a shoulder plane. Fit the bottom and slip ensemble to the inside of the drawer as one unit. It must be snug so that little effort is needed to clamp. Clamping is carried out using sticks cut slightly oversize, wedging the slip and bottom ensemble to the sides. When dry, the drawers are ready to be hand fitted to the cabinet.
Fitting the hinges

A file, small square and a block of wood with 240 grit are the tools used to ‘dress’ or ‘tune’ the brass butt hinges.
A clean up with 400 grit and steel wool adds lustre.
Place the doors in their correct orientation on the cabinet and mark the position of the hinges. I’ve resigned myself to the fact that the hinges I buy almost always have to be dressed—they need to be made flat, square and parallel. It can take a bit of time, but it’s worth getting them consistent with each other for accurate setting.

Careful marking and set out is crucial for accurate hinge work. Here the centre of the pin is marked.
The hinges in this piece started off at 12.5 x 38mm, and after dressing came down to 12 x 37mm. When cutting the hinges into the front edge of the cabinet, I clamp a block onto the inside face to support the material. The cabinet sides are only 12mm thick, leaving barely 1.5mm when the hinge is set.

This mark is then transferred to the carcase edge.
Hang the doors carefully, and check for any inaccuracies in the closing. It’s at this stage that the doors should be de-horned, finish sanded and arrised. I only use a couple of screws per hinge if I know there’ll be a lot of test fitting.
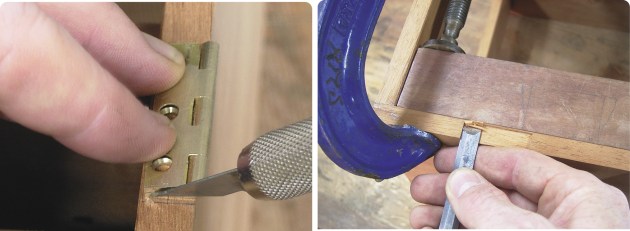
Above left: The hinge ends are scribe with a scalpel. Right: I love paring with a sharp chisel, and the tighter the tolerance the better. A block has been used to support the remaining material in the hinge mortise.

Just enough glue to keep the handle in. Try to avoid squeeze-out if possible. If it is a tight fit, a final tap with a hammer should drive the shoulder home.
The handles I’ve used here are my stock in trade. I simply love their austerity. They are dowels of wenge, 35mm long and 7mm in diameter. Ten millimetres of the handle is turned down to a 5mm diameter to allow for a shoulder at the junction. I encourage you to design your own handle and have a bit of a play with the shape. They can really bring a piece of furniture to life.
I started using rare earth magnets a few years ago in preference to ball catches. They’re clean and incredibly easy to install. But don’t call me if you reverse the poles. It’s a nightmare to fix.
The top and back
The back was laid out prior to dry clamping. The grooves are saw kerf thick, and instead of doing tiny mortises I’ve run the saw kerf all around at 15mm.
The 14mm thick top overhangs the sides by 7.5mm, the front by 14mm, and the back by 2mm. I was running desperately low on materials by this stage and realised that the top would have to be made from three pieces of timber, slip matched and edge glued.

The back is the final part to be made, and I usually spend just as much time on this part as on any other. This allows any of my pieces to be displayed in the centre of a room, but it also instills confidence in the client that the piece has been lovingly crafted.
The back is a standard floating frame and panel, with the panels grooved in all of the way around. It’s worthwhile positioning the horizontal rail so that when you open the doors you see the full rail from the inside. I’d lay money on the fact that if you didn’t pay attention to this detail, the client would probably notice it. The back is slipped into place with a 4g screw in the top at each corner and one through the bottom underneath.
The base

The base has a riser attached to allow a shadow line between the carcase and understructure. This also allows the housing of traditional timber buttons.
The base is a simple prism structure consisting of 32 x 32mm members, with twin tenon joinery. It stands 720mm tall and is built so that it is exactly the same dimensions as the footprint of the carcase. All tenon work is done on the tablesaw with final paring done by hand.
The internal tenons are mitred to allow the joints to come together. After all the finishing work is done, including arrising, the piece is glued and the diagonals checked. Particular attention is paid to the clean up process as the base is such an open, visible structure. If using PVA a toothbrush and water helps. When the base is completed, a riser is made to connect the base and the cabinet with a 6mm shadow line. It is mitred and glued into position, with a slot cut to allow for traditional hold down buttons.
The finish
Because most of the finishing work is carried out along the way, there is very little to do before giving this piece its first oiling. I usually go over everything lightly with 400 grit paper. Inevitably, battle scars will have appeared along the way, but a hot iron and damp cloth easily steam these out. Prior to oiling I burnish the whole piece with steel wool (0000).
I’m not precious when it comes to using a wipe on/wipe off type oil. I usually don’t ensure I have a spotless environment, knowing that the oil I slap on will be wiped off immediately. I always apply two coats in the first oiling. Then it’s basically two coats per day for three days and a final coat a week later. What does help though is having a dry, clean cloth for buffing between coats. This ensures that excess oil is being removed and not just smeared over. I never tolerate a dusty environment when I’m using tung-based oils that have to sit after they’ve been applied. I usually have a bit of a clean up when I’m using these.
This story first appeared in Australian Wood Review #52. Roy Schack is a furniture designer maker and woodwork teacher in Brisbane, see www.royschack.com