Project: Small Branch Forms

A lidded bowl turned by the author from a small branch of pearwood.
Words and photos: Andrew Potocnik
If you’ve found yourself with branches of a tree or a trunk that are too narrow to cut into slabs but too good to send to the firewood pile, this could be the project for you.
I’m the sort of person who, when offered free wood, cannot say no, even without knowing what I’ll use it for. That’s the position I found myself in recently when offered some pear wood, but this time I knew exactly, so it was simply a case of getting started.
Fortunately both ends of the 400mm long piece of wood had been sealed with wax some twenty or more years prior to being put aside to dry, so by the time it landed in my lap it had seasoned perfectly and was ready for me to begin.

1. Trim the ends of branches to remove cracks and ascertain the amount of workable timber.
Trimming the ends to establish how much usable timber I had exposed some external cracking which I needed to take into account in orienting wood for this project (photo 1).
Cracks develop as wood shrinks, especially if it is kept as a round log or branch. Cells that make up wood fibres wood collapse as they lose moisture and shrink, doing so at a far greater rate around the circumference of a log than along its length and even more at the ends of wood. Sealing ends slows the escape of moisture and allows for more controlled shrinkage throughout the log reducing the likelihood of cracks.

2. Create tenons at each end and establish where the parting cut will be made.
Measuring across the diameter of each end from several angles gave me an indication of the true centre of the blank; however, when mounted between centres I could still move it until even proportions of wood would form the outer edge of this box.
Tenons cut with a parting tool at each end of the blank are needed for future holding of the lid and base, followed by a parting cut to separate the two segments (photo 2).
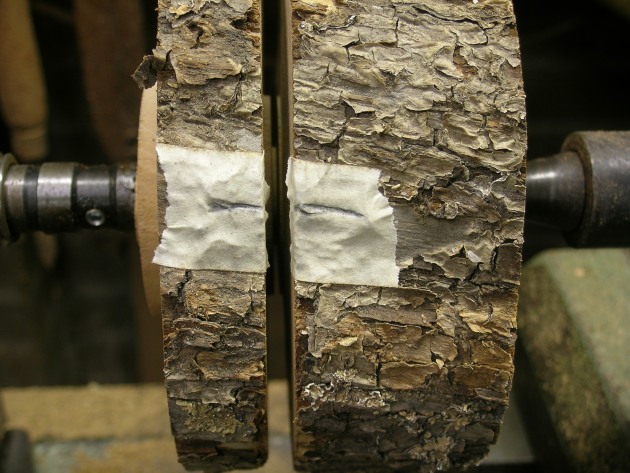
3. Tape and a pencil mark show where lid and base should align.
Masking tape and a pencil mark create a registration point for future reference and alignment of top and base (photo 3) before separating the parts, in this case using a Japanese pull saw (photo 4).
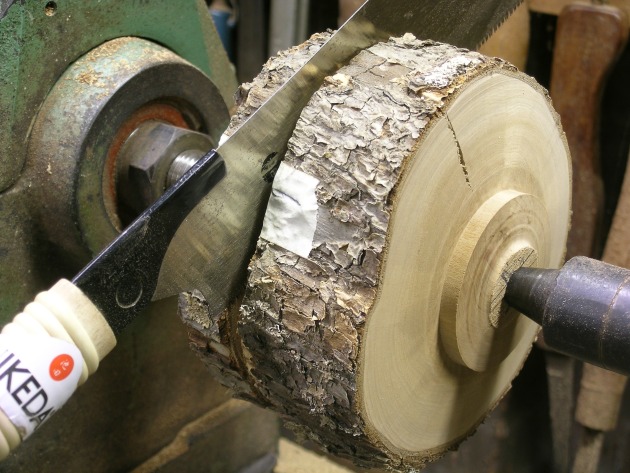
4. A fine Japanese pullsaw was used to separate lid and base.
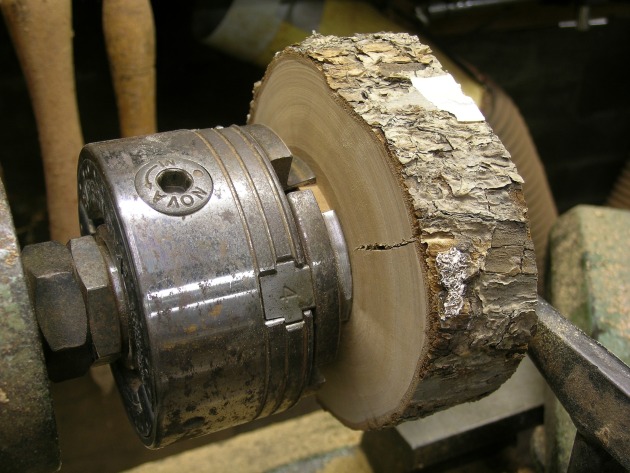
5. Using a scroll chuck to hold the base tenon.
Tenons cut previously now allowed for the wood to be gripped in a scroll chuck (photo 5). It’s important to hold work firmly so it can be shaped effectively, but you also need to think ahead so evidence of how the work was held can be disguised or eliminated in the finished piece. You can see the crack I would need to eliminate later as the base of the box was shaped.

6. A skew lined up with the shoulder cut a fine V where it met the lip for the lid.
I cut a lip on which the lid would sit to achieve maximum volume in the box’s interior. To do so I cut a shoulder that sits proud of the natural edged surface that is a key part of this design.
A scraper was used to smooth this slightly curved surface, while a skew lined up with the shoulder cut a fine V where the two surfaces intersect (photo 6). This ensured I could sand right up to the inner edge of the curved surface without touching the shoulder, which should not be sanded. This can distort the surface and prevent the lid from fitting neatly later on.

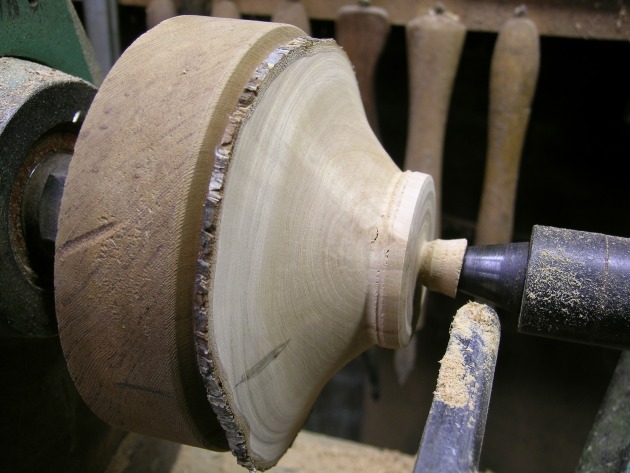
7. Leaving a 4mm collar of the branch exterior, the base was shaped to a sweeping curve.
The underside of the box was trimmed down to a narrow outer edge of about 4mm sweeping down toward the base, which would later be refined to eliminate evidence of how the base was held during the turning process (photo 7). You’ll notice the crack was removed, along with unwanted material.

8. Showing the interior hollowed. The walls are about 2mm thick.
Knowing how thin the walls could be, I hollowed the interior to a sweeping curve with a minimum thickness of about 2mm (photo 8), ready for sanding and a finish of polyurethane. Prior to ‘finishing’, I soften sharp intersecting edges with 320 grit sandpaper, which takes away tactile sharpness but retains visual clarity.

9. A jam or friction fit chuck cut fitted into the faceplate held the reversed base to complete it.
A jam fit, or friction chuck was cut into a scrap of softwood fitted to a faceplate so the base of the box could be reversed and the base completed, eliminating evidence of how it was held in the making process (photo 9).
10. It’s a good idea to also use the tailstock for support.
It is imperative that this type of chuck is tight enough to hold wood firmly, but it is best to use the tailstock for extra support while the bulk of unwanted material is removed (photo 10), before final shaping of the base is completed and sanded (photo 11).

11. The finished base is sanded while of the lathe.
You will notice a shadow line between the base of the box and the outer form. This is a small V incision made with the long point of a parting tool so the intersection of surfaces stays neat as they are sanded.

12. Using calipers to measure the recess that slides on top of the base.
Wood for the lid was held in a chuck by means of the previ- ously cut tenon and trimmed to a smooth flowing gentle curve in preparation for an opening that would sit over the protruding lip of the base. Calipers were used to measure an accurately cut recess that would slide on top of the base (photo 12).

13. A small V is cut to separate the meeting surfaces.
The lid interior was hollowed and sanded through to 320 grit, and again, a slight V incision was cut to separate the meeting surfaces (photo 13).

14. The lid exterior is shaped to a sweeping curve.
Reversed onto the expanded jaws of a scroll chuck, the top of the lid was trimmed to a sweeping curve before being sanded smooth (photo 14). When sanding uneven edged forms it is important to keep fingers away from rough outer edges.
When it comes to finishes, I like one that is simple to apply, foolproof and doesn’t create a thick surface coating, hence my preference for a wipe on, wipe off polyurethane.
I prefer to work on one section at a time, wiping on liberally with a cloth and then removing excess material with another dry cloth. In case the finish becomes sticky and difficult to wipe off, simply wipe on more polyurethane to dissolve the sticky material before wiping back to a clean surface.

15. A selection of lidded boxes turned from branches of varying species and sizes.
Whilst developing this concept I’ve experimented with several timbers of varying sizes, finding that results vary, partly due to col- ours found in cross sections of wood, contrasts between sapwood and heartwood, and the overall outer shape of the trunk or branch you’re working with (photo 15). It really comes down to what nature offers you, and I’m now on the lookout for a fairly round burl of suitable size to see whether this design works with a highly figured piece of wood.
Andrew Potocnik is a wood artist and woodwork teacher who lives in Melbourne.
