Project: Making a round table

Words and photos: Raf Nathan
Most people like round tables – without corners or ends they offer equality of seating positions, and they focus energy to the centre. The table pictured above uses Victorian ash for the base and silky oak on top. Theoretically almost any timber could be used to make this table as the base structure is inherently rigid in design, and does not depend on the strength of the timber. The diameter of the top can of course be varied, as long as you correspondingly enlarge the base, though I wouldn’t recommend going larger than 1400mm in diameter
The base
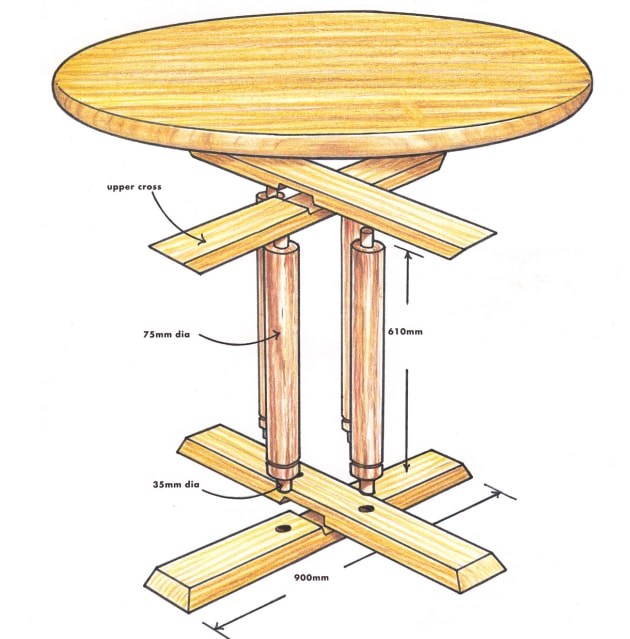
Two crosses, upper and lower, are connected by four posts. The lower cross is made from 140 x 42mm (6" x 2") timber. The upper cross is made from 90 x 32mm (4" x 1-1/2"). The crosses are 900mm long and joined with a half lap at the middle.
The first step is to machine all the timbers to accurate dimensions and then crosscut the pieces to required length. The half lap joint was cut on a tablesaw, however any means is acceptable so long as the resulting joint is tight — you can use a handsaw and chisel, or a router if you choose. I also added some screws which aid the gluing-up process and add mechanical strength.
Cutting the bevels
You will note in the photo and drawing that the base cross has a bevel cut all the way around. This is a little tricky to achieve, and requires a bit of forethought. I cut the half lap joint in the sections first, then took the individual pieces to the tablesaw. Tilt the blade to the desired 30°angle, pass the timber through the blade and saw the bevel up as near to the half lap joint as possible; obviously not all the way through.
Another method to saw the bevel is to glue the cross up and then support it on a sliding table while you saw in the angles. Either way, the corner where the angles meet will still need to be cut in with a hand saw and cleaned up with a chisel and plane. The upper cross only requires a 30° bevel cut on the end.
Drilling the spigots
The four turned posts which connect the crosses are 75mm diameter and have spigots on each end. Holes are drilled in the crosses to accommodate the spigots. This is a simple yet extremely strong method of joining, however the spigots must be wedged for longevity. In this instance, the posts are 610mm long plus the length of the spigots, which should protrude slightly beyond the thickness of the timber crosses through which they are inserted (they are trimmed back later after the glue-up).

The spigots shown here were for a rectangular table, however the joinery is the same as for the round table shown.
The spigot diameter is normally around 35mm and I use a Forstner bit to drill the holes first. The posts with spigots are then turned and the spigot matched to the hole must be a good tight fit. You may choose to stain the posts darker than the other timber. If this is the case, as it was for the round table pictured, you will need to do this before assembling (I stained them dark brown).
The upper and lower crosses are assembled and these and the posts fine sanded and stained if required. As mentioned, the spigots need to be wedged. You can saw all the way down the spigot with a handsaw or bandsaw. A small hole is drilled at the bottom of the saw cut to prevent splitting. Small wedges (as shown in the photo above) are made which at glue-up will be driven into this saw cut. Apply glue to the spigots and post shoulders, and then bring the upper and lower crosses together on the posts. Four clamps should be enough to bring the structure together. The little wedges are now coated with glue and driven home into the spigots. Check the structure for square and twist and adjust if necessary.
The top
The diameter of the silky oak top is 1100mm. Basically, the idea is to glue up a square, and then cut a circle from that. For this I glued up six lengths of timber, each 190mm wide, which easily gave the required size.
I often use biscuits in tabletops, as they are of immense help in achieving a level surface. Once the glue has dried I give both sides an initial sand to flatten the surface, and then remove any drips of glue. You are now ready to cut the circle — this can be achieved in a number of ways. A bandsaw, jigsaw or a router are all options, in this case I used the router.
I mount the router with screws through the base onto a piece of wood, MDF or plywood 12mm thick, as wide as the router base and about 700mm long. I drill a large hole where the router bit can protrude and insert a straight bit in the router. Measure along the board a distance from the inside of the straight bit equivalent to the radius of the tabletop (in this case 550mm). Drive a nail through at this point with the point heading the same direction as the router bit and protruding a couple of millimetres.
Flip the tabletop onto a bench or stands with the face down. Working then on the the underneath of the tabletop find the centre of the table top and drive in the nail point about 12mm. Then plunge down the router and cut the circle. This will usually take three or four passes to go through the thickness of the timber. Using the router is noisy and dusty but you’ll get a perfect circle. I find that this router-cut edge still needs to be sanded and I also round over upper and lower edges with a rounding over bit in the router. I then fine sand the underneath of the tabletop. I always finish the top surface of the table last.
The top next needs to be joined to the base. I find table clips are the best for this. You may make your own or buy ready made steel clips from specialist cabinetware suppliers. The clips are fitted into a groove cut with a biscuit joiner and then screwed into the tabletop.
Inlay
At this stage you could leave the top surface, particularly if there is highly figured grain showing. I decided to insert a small square of dark figured blackwood into the middle. Rather than use veneer and set that in the top, my skills are stronger using a piece of thick solid timber. I prepared a square of figured blackwood, placed it in position on the tabletop and marked around it with a knife. Using the router with a straight bit I removed the wood within the knife cut down to 3mm, cleaning up the corners and line with a straight chisel. The piece of blackwood was then glued and tapped into place. I weighted this down while the glue dried and then planed and sanded the square flush with the surface.
Finishing
With everything now fully assembled all that remains is to sand the top surface and polish the table. I started off with a belt sander using 80 and 100 grit paper and then moved on to a random orbit sander fitted with 120 grit. After that it’s elbow grease all the way up to 320 grit. The table pictured was sprayed with nitro-cellulose lacquer but you can use the finish you prefer. My current preference is for an oil finish and I precede this by fine sanding the piece till I’m happy with the surface, 320 grit is the minimum. I then seal the surface with shellac, giving it preferably two coats. When it’s dry I give it another sand with 320 or 400 grit and then oil the piece, allowing at least a day between coats. The underside of the table needs to sealed in the same way. A final buff should bring it to a lustrous finish.
First published in AWR#28. Raf Nathan is Brisbane based woodworker and author of innumerable articles and reviews for Australian Wood Review.