

Paul Barton: "Moved by wood"

Paul Barton’s large open bowl forms are turned green and warp as the wood dries. He them embellishes them with textured and coloured surfaces. This one is made from American pin oak.
Words and photos: Paul Barton
Call me crazy, but the logs that shrink, crack and open up quickly are the ones I’m after for some of my work. I have been developing large coloured, carved and textured bowls like the one shown here over many years.
Originally, I was drawn to the movement created as timber goes through the drying process, and this led me down a rabbit hole trying to find timber that was more and more volatile. I found that timbers with high shrinkage rates often have the most dramatic movements when drying.
Shrinkage rates are usually only available for commercially grown species, which is a bit limited, so for me it came down to trial and error. Once again, it’s the woods that crack dramatically when left in log form that are usually the ones I use for these pieces.

Paul Barton with one of his signature vessels-in-a-vessel.
A few of my go-to timbers

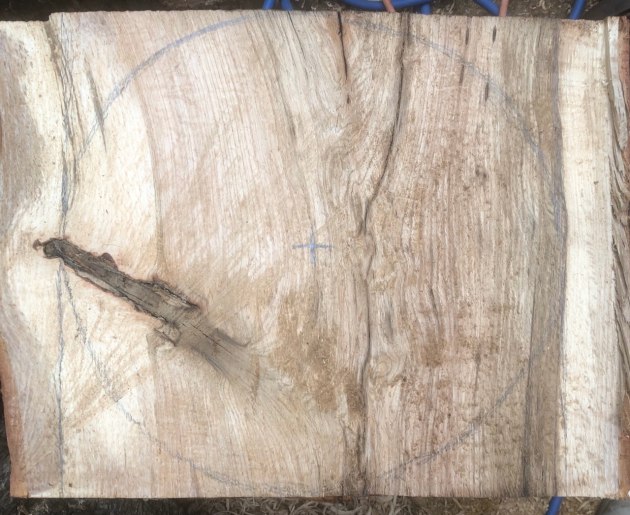
1, 2. The chosen log is around 400mm dia and sectioned through the centre before excess is trimmed with the chainsaw.
Fig (the edible one) is the most amazing I have found so far. It moves in the most incredible way. It’s just hard to get here in Australia and large pieces are even harder to find. Peppercorn, stringybarks and the Northern hemisphere oaks also display really nice movement when turned green.
I am using American pin oak for this piece. Quite common in Victoria, it is grown as street trees and in many suburban gardens. The log I have chosen is about 400mm diameter cut through the middle (photos 1, 2).
Turning a log into a blank

3. Showing how the rim of the bowl will line up with the centre of the log.
Usually I first remove as much material as possible with the chainsaw to reduce the weight. Some of my larger pieces are 700–900mm in diameter and can weigh in excess of 150kg when they are ready to go on the lathe.
The blank is mounted on the lathe using a faceplate – I find this is the safest way. Photo 3 shows the orientation of the bowl with the log. The rim of the bowl lines up with the centre of the sawn log because I find this provides the most movement.
Turning the bowl form
Once the blank is on the lathe the turning can begin. The outside of the bowl is shaped with my 1/2-inch and 1/4-inch bowl gouges. Most of the heavy cuts are done with the 1/2-inch and the finishing cuts with the 1/4-inch.
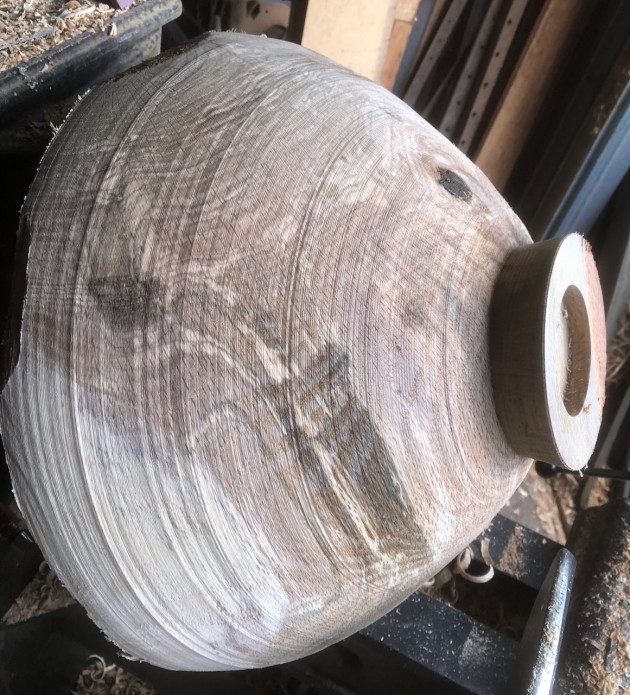
4. Reversing the blank, a recess for the chuck is turned. Later, the recess is carved into the bowl’s three feet.
These bowls have three feet carved on the base. This will allow them to stand when finished no matter how much they have moved. Photo 4 shows the recess turned in the base ready for the chuck, this recess will be used later to carve the feet.

5. Use the tailstock to aid stability when hollowing the interior of the still heavy blank.
With the bowl now mounted in the chuck it is time to remove material from the inside. I will always bring the tailstock in when hollowing the interior to aid with stability when the weight is still high (photo 5).
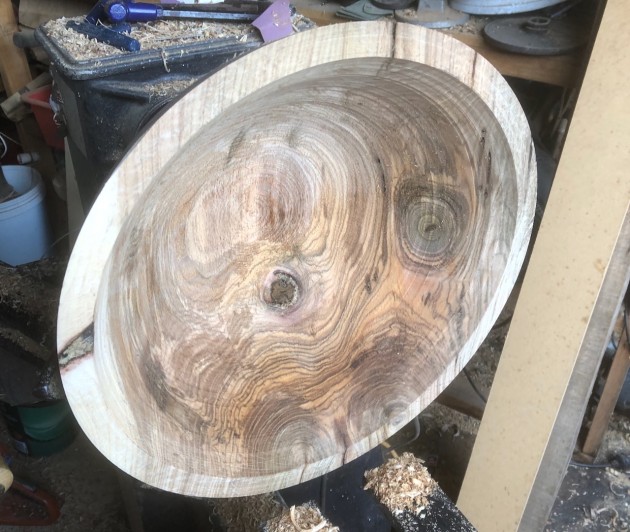
6. The walls are initially shaped to 25–30mm thickness.
The turning is really done in four stages Firstly the outside, then the inside which is initially hollowed to a wall thickness of approximately 25–30mm (photo 6).
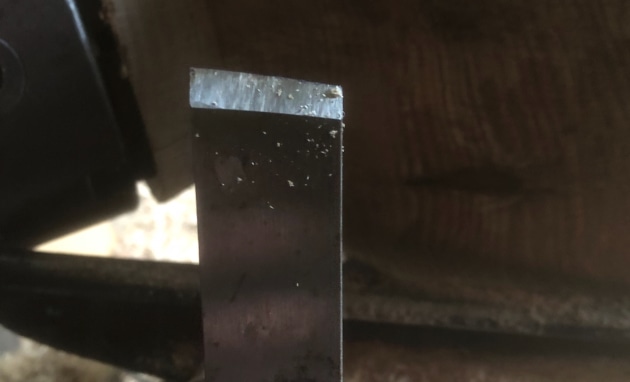
7. A skew chisel works as a negative rake scraper for the final cuts.
The outside is re-turned to remove any of the wobble that may have occurred while doing the first internal hollowing I use my 1/4-inch gauge to do the first finishing cuts and then come in with my skew which I use as a negative rake scraper to do the final cuts photo 7.
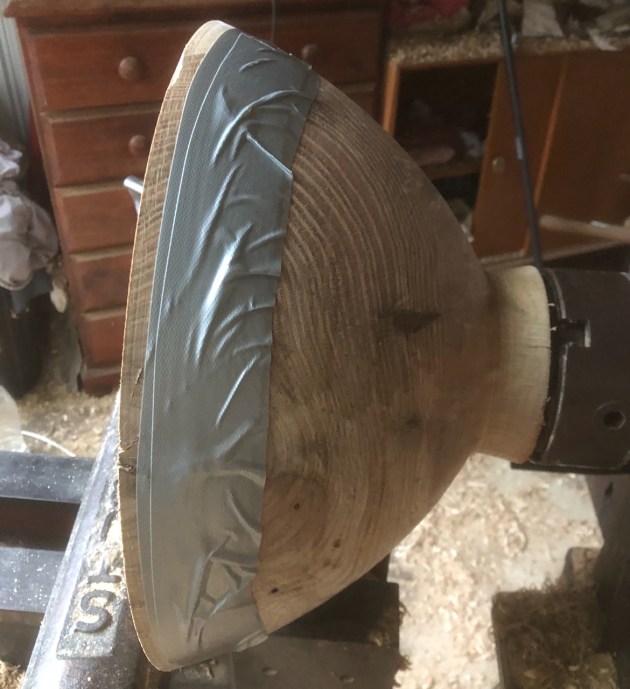
8. Duct tape is used to hold any crack or defects in place while finishing off the interior.
Before the last stage of the turning is done, I will wrap the bowl in duct tape (photo 8). This helps hold any cracks or defects in place while finishing the inside.
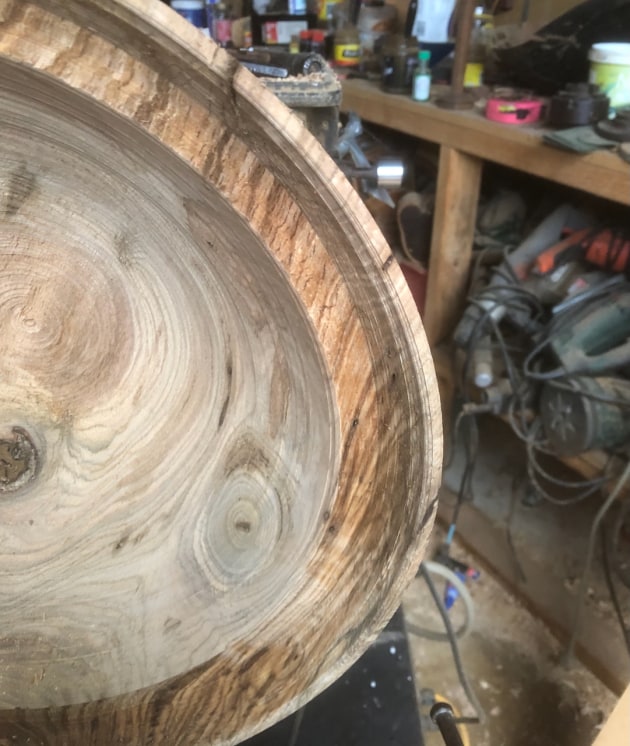
9. A bowl gauge is set to 3mm and inside material removed in 50mm stages.
All the inside work apart from the very bottom is done with the 1/4-inch bowl gauge. The inside is done in 50mm stages starting from the top. With the bowl gauge, I set my wall thickness at 3mm and remove material in 50mm steps (photo 9). This reduces vibration and allows me to get to the bottom without having to deal with the wood movement.
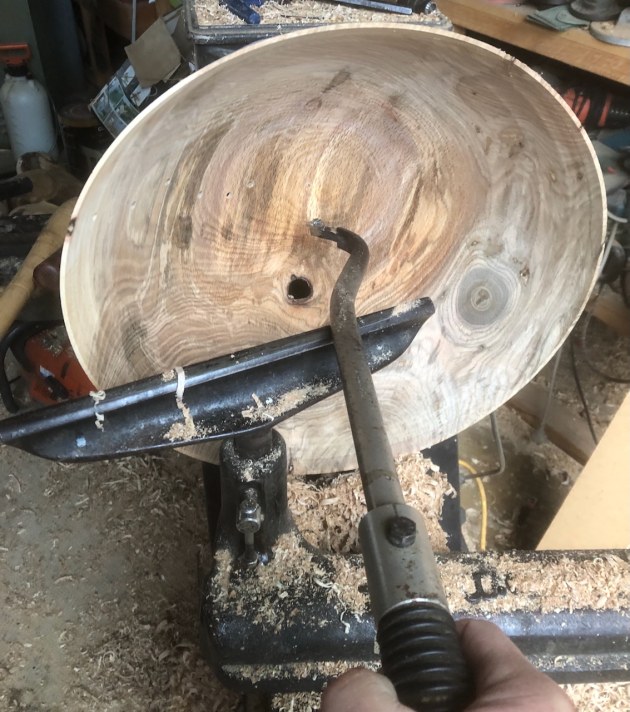
10. Finishing cuts on the interior with a scraping tool.
A lot of these pieces move while being turned because the walls are thin and the wood is wet. When the pressure within the log is released, they start to distort.
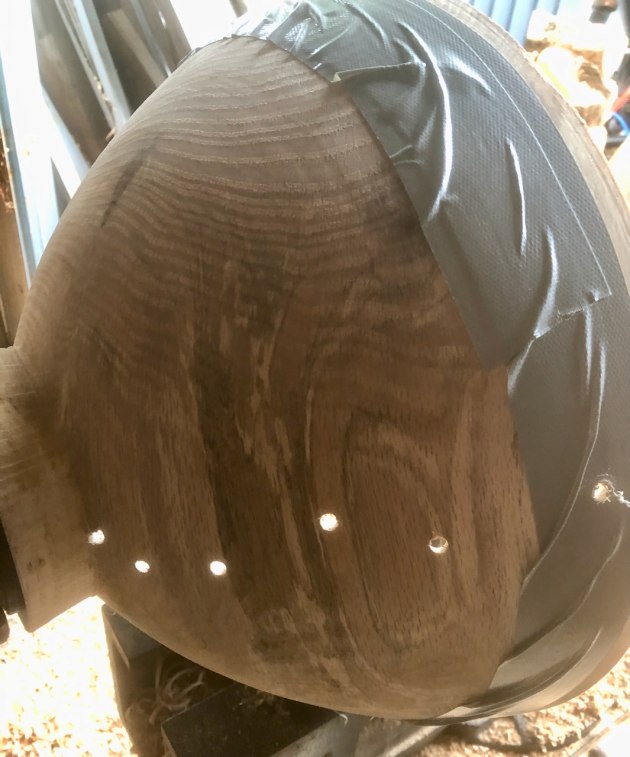
11. Sometimes the author drills a few holes to gauge wall thickness – these are later removed or modified during the carving process.
Once I get to bottom with the bowl gauge, I do a few finishing cuts with a scraper (photo 10). Often, I drill small holes down the side of the bowl to help me gauge wall thickness.
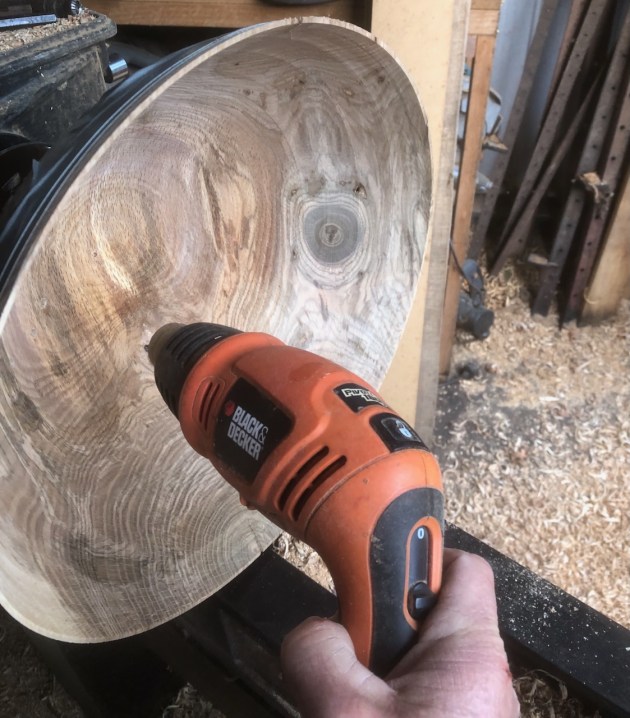
12. Using a heat gun can help prevent the sandpaper from clogging.
These can be removed later on in the carving process (photo 11). Once this is done, the inside can be sanded. I often use a heat gun to dry the timber surface to help prevent the sandpaper clogging (photos 12, 13).
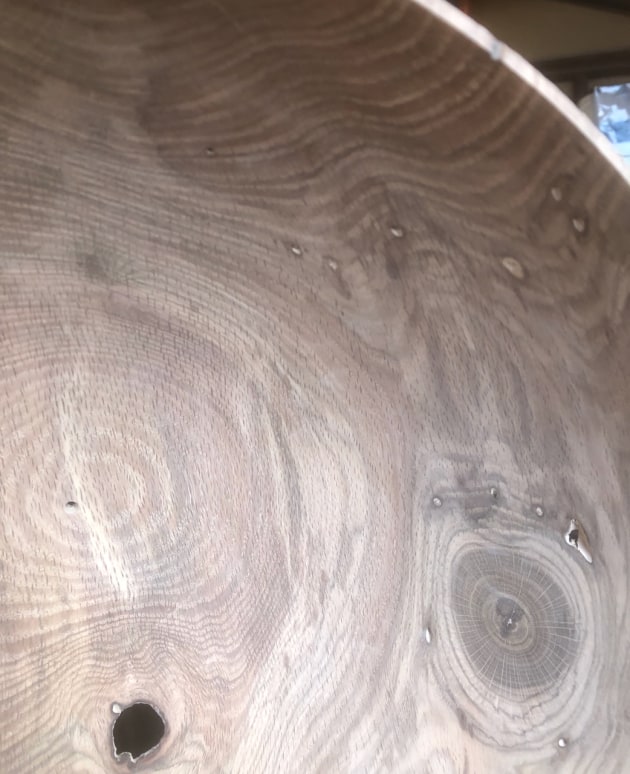
13. The interior has now been finish sanded.
With the inside finished the bowl is reverse chucked so the base can be shaped ready to carve the feet. For this I use a dolly shaped with a similar profile to the internal bowl which is held in the chuck. It is then as simple as jamming the bowl against the dolly with the tailstock (photo 14). I always put a little mark in the base of the bowl when I’m turning the recess to mark my centre as it makes it a lot easier when reversing the bowl.
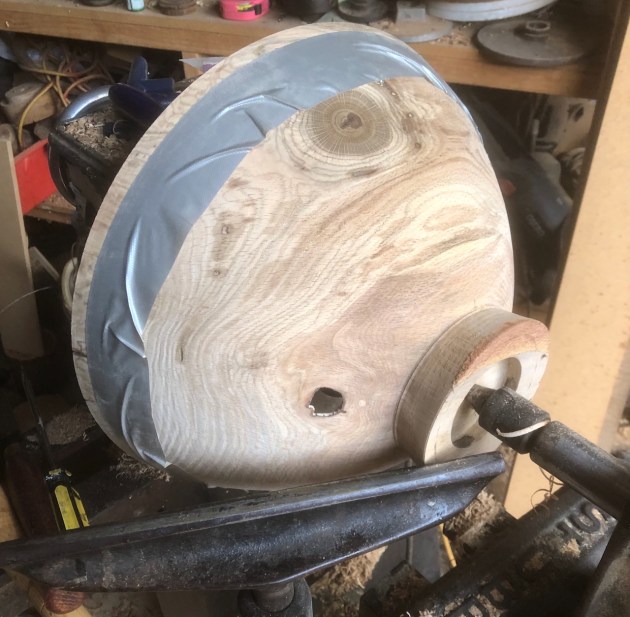
14. The bowl is now reverse chucked to shape the feet.
Carving the feet
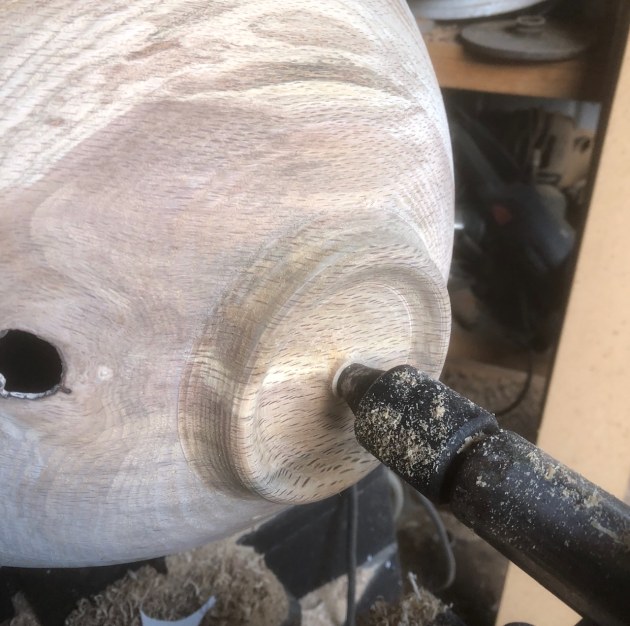
15. First, round off the edges of the recess walls with a 1/4-inch bowl gauge.
Once the bowl is reversed, round off the edges of the recess walls with a 1/4-inch bowl gauge (photo 15).
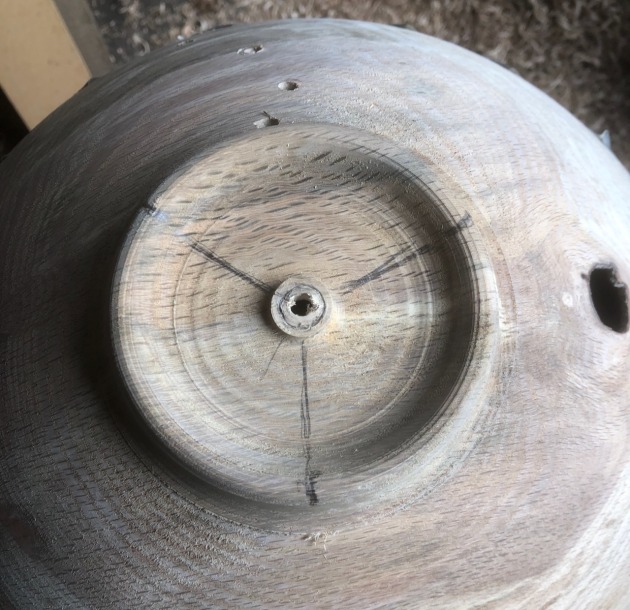
16. To carve the feet, mark one-third segments.
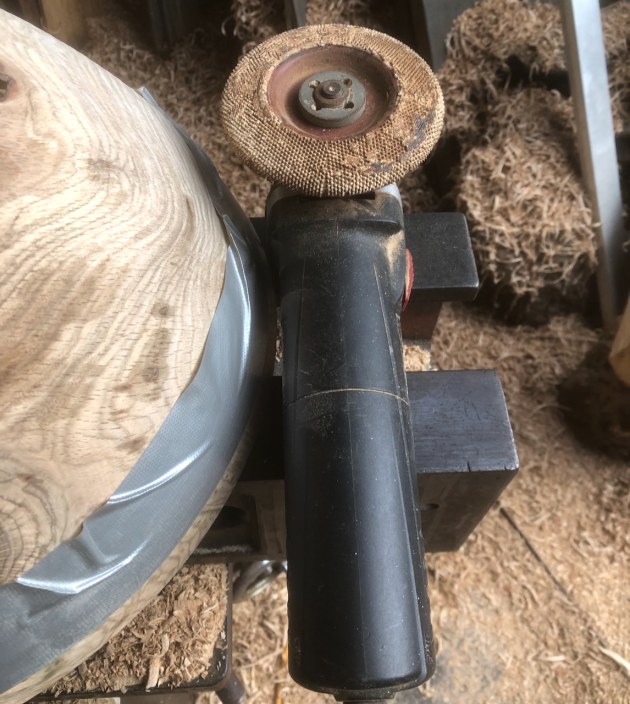
17. The author uses a powercarver to shape the feet of the bowl.
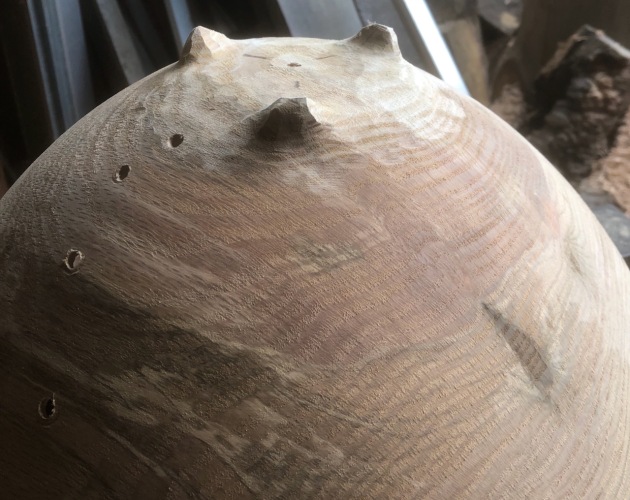
18. Showing the completed carved feet.
The feet are now ready to be carved. I roughly mark one-third segments with a pencil (photo 16) and then use a powercarver (or hand tools) to remove material around the marks to create the feet (photos 17, 18).
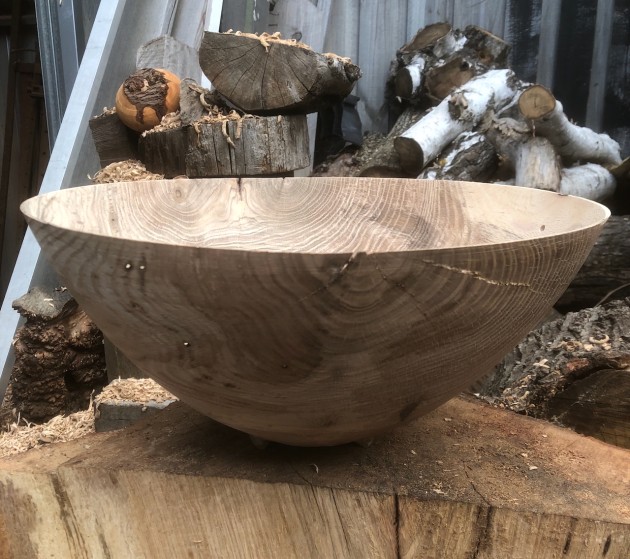
19. The turning stage is now completed. Showing the outer view…
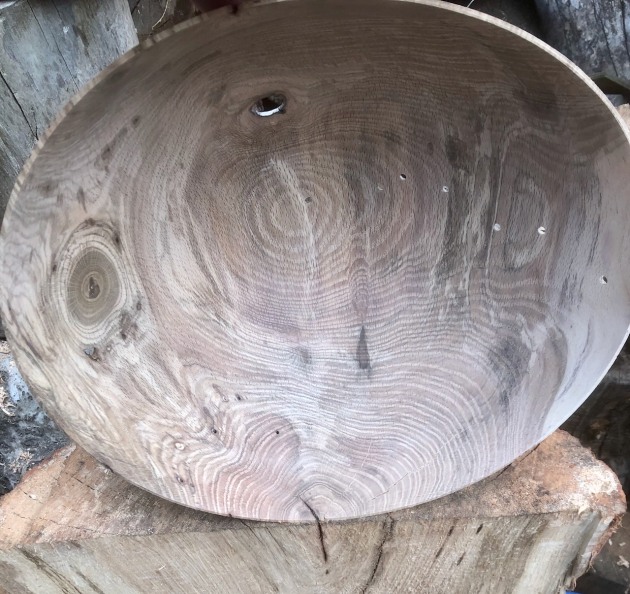
20. …and the interior.
That's the turning completed (photos 19, 20). The bowl can be set aside to dry – this usually only takes a couple of days. Once the bowl is dry, I then sand the feet.
The decorative markings
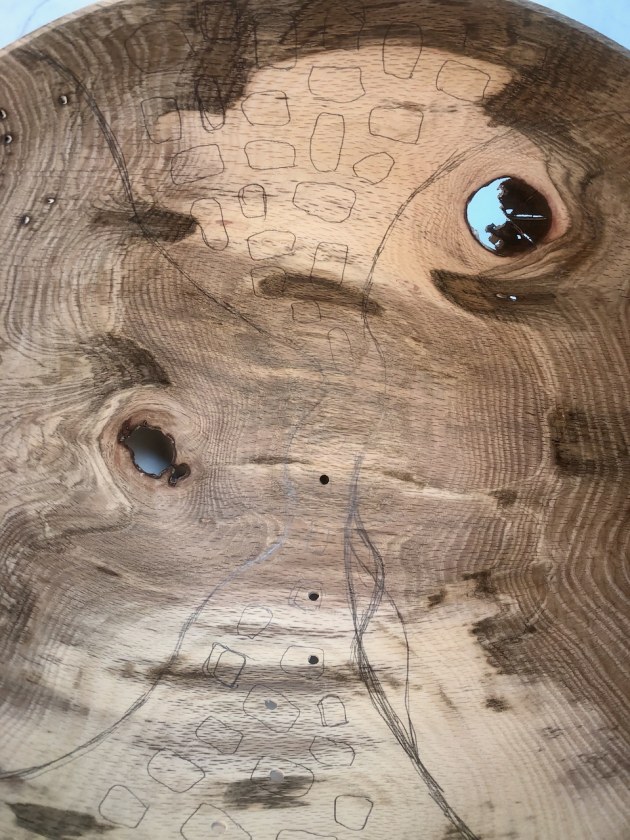
21. The decorative carving is marked out with a pencil.
The next stage of the process is the decoration. I start by using a pencil to draw the internal area I want to carved. This allows me to visualise what the piece will potentially look like finished (photo 21).
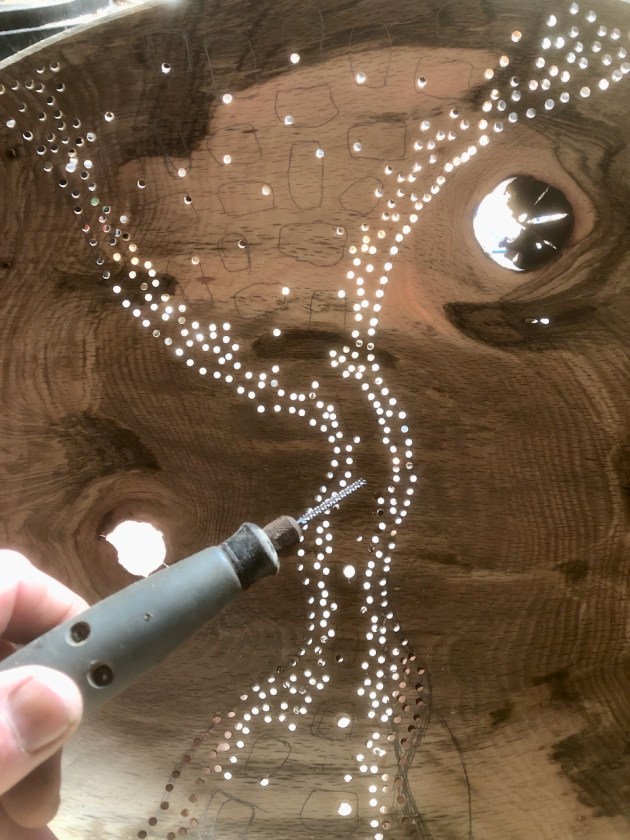
22. Holes are first drilled along the border of the marked area and randomly throughout.
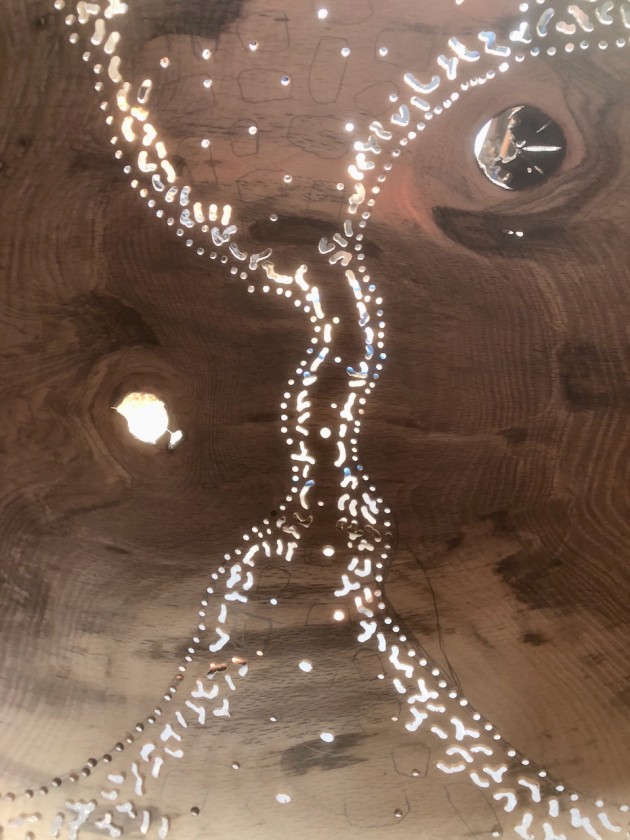
23. The holes are lengthened and shaped as desired. A tungsten tile cutter is used to remover the waste.
With the design drawn it is now ready to carve with a high-speed rotary tool. Firstly, using an 1/8-inch drill bit, I drill holes along the border of the area to be carved and then randomly throughout the entire area that doesn’t have the larger voids (photo 22). I usually drill a single hole in each of the voids which will next help me remove the waste (photo 23).
To remove the waste from the voids a tungsten tile cutter is used. This allows me to start in the predrilled hole and simply run around the outline removing the waste as a single piece. With practice you can pretty much draw anything you like and simply cut it out.
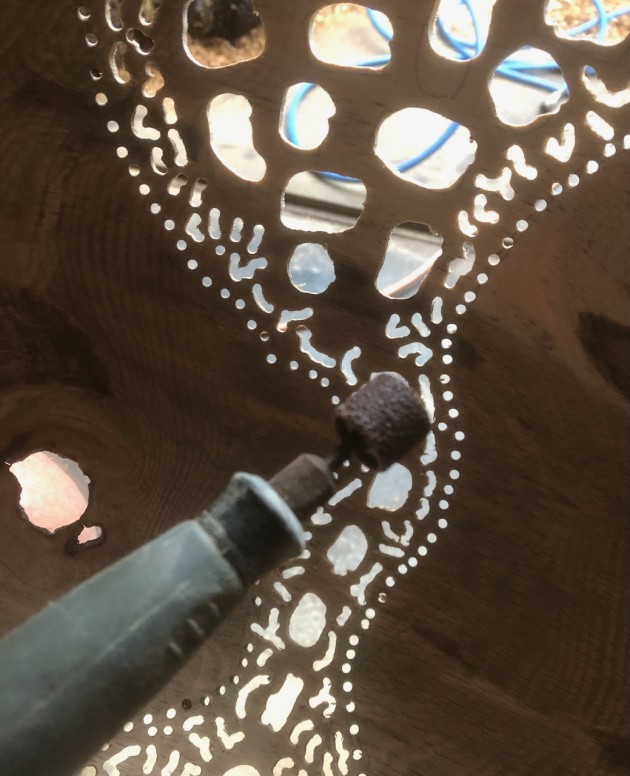
24. A small drum sander or a sanding bit in the rotary tool is used to clean up the finished carved surface.
After removing the voids, the interior surface of the bowl is cleaned up with a small drum sanding bit set up in the rotary tool (photo 24). Final shaping of any of the voids can also be done at this stage with the drum sander. Photo 25 shows the carving complete.
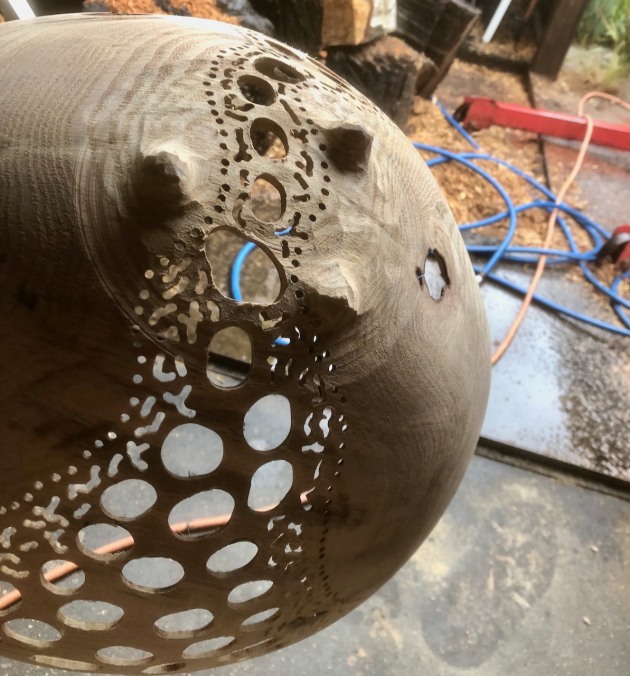
25. Showing the completed carving from the outside.
Texturing outer and inner surfaces
Texturing the outside of the bowl and the internal carved section is next and takes longer than the other processes – often I spread this out over a week or two. The texturing is done with a custom-built pyrography tool running a 2mm wire. I have several shapes but the one I use most is one that is just twisted into a couple of circles.
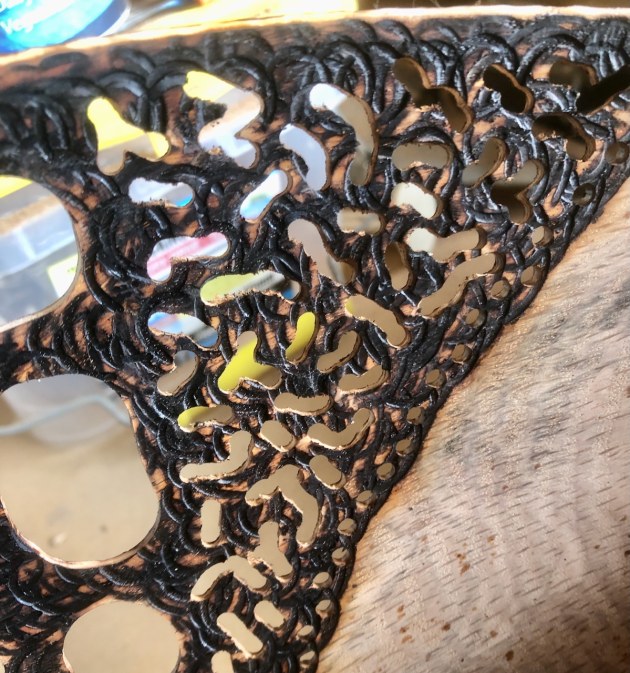
26. Circular burn marks are created with a custom-built pyrography tool. Brushed-on black stain is used to blacken the areas that can’t be burnt.
Starting at the rim of the bowl, this is as simple as pressing the hot wire against the bowl and moving around the rim one mark after another until the whole outside of the bowl is covered. It’s quite a long and tedious process, hence the one to two week time line.
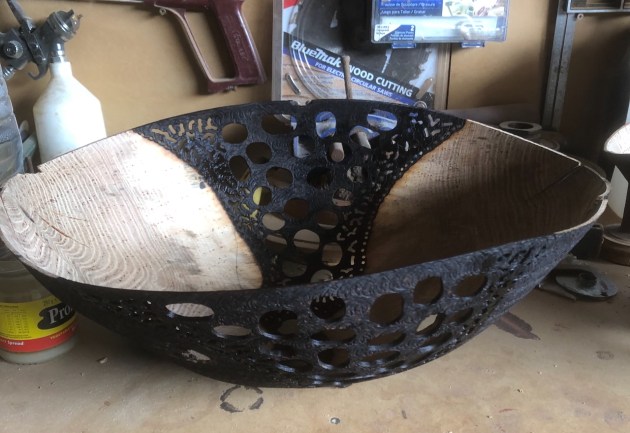
27. The inner and outer burning texture is now complete. You see how the bowl walls have moved during the drying process.
The burning not only leaves the impression of the wire but also blackens the whole piece. Continued with this technique over the inside carved area starting from the top working your way down until you come to the other side (photos 26, 27).
It is worth noting if the wall thickness of the bowl is less than 3mm you will get slight burn through from the outside to the inside and this is more prevalent in the sap wood. Also, all timbers behave differently, so there has been quite a lot of trial and error over the years.
Colouring the bowl
The final stage of the process is the colouring. The carved area is stained first because it is not possible to burn the internal areas that have been carved with the pyrography tool, I use a black mineral stain with a small brush to colour this bit.
Once this is dry the larger internal sections are coloured with food dye. Food dyes are my go-to option, there is a larger range of colours compared to standard wood dyes and they are considerably cheaper. Most good cake decorating places will have a reasonable supply.
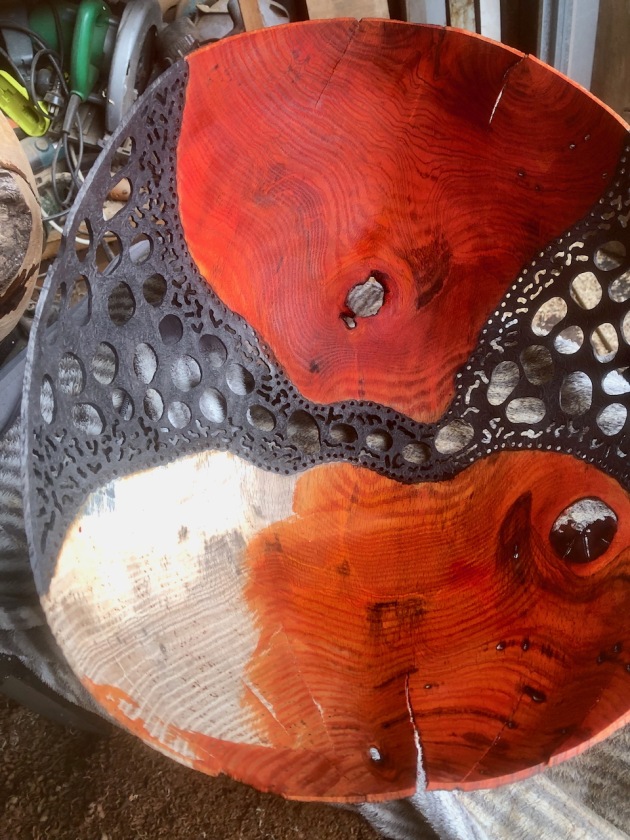
28. The unburnt areas have now been coloured using food dye.
The food dye is just brushed on and the excess wiped off with a rag and then left to dry (photo 28). The entire piece is then sprayed with several coats of lacquer.
My favourite part of making these pieces is the time that elapses between finishing the turning and allowing the piece to dry. You never really know what you are going to get, a piece like this can take on a life of its own once the wood has moved and dried.
First published in Australian Wood Review, issue 131, June 2026
Paul Barton @paulbarton_ woodartist lives and works on the Bellarine Peninsula, Victoria. He has exhibited his work throughout Australia and was awarded the Tasmanian Premier’s Award for Excellence in Craft in 2023. His philosophy is simple, respect the material you work with. He highlights the natural defects that exist in all trees to varying degrees which give his pieces a natural organic look. He turns wood as it is part of his life, and he does not see that ever changing.