Mortise and tenons, types and methods

Words and photos: Neil Erasmus
Much has been written about dovetail joints and the wide range of techniques used to produce them, while the equally if not more important mortise and tenon joint gets little mention. So popular is the dovetail that countless machine and power tool jigs have flooded the woodworking market, often confusing buyers with the wide range of possibilities on offer.
The irrepressible mystique that surrounds this simple joint is unfortunately not shared with the mortise and tenon joint. Perhaps this has a lot to do with the fact that the dovetail joint is a very visible demonstration of the maker’s skills, while the mortise and tenon is mostly hidden from view. As a result of this, it seems that this essential means of joining is often overlooked in favour of a speedy solution, sometimes resulting in the use of the ubiquitous biscuit jointer in areas where the more appropriate joint really should be the tried and proven mortise and tenon. The biscuit jointer’s functions are primarily face-to-face alignment, edge-to-edge joining and the joining of multi-directional grained board components.
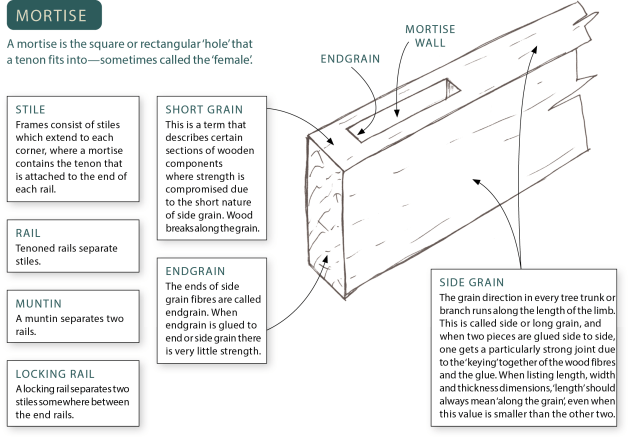
The layout of the mortise and tenon joint is designed by the maker to provide maximum side-to-side grain surface area, that once glued, becomes almost indestructible under normal use. A wooden chair, for example, undergoes enormous stresses, especially when the sitter ‘swings’ on it. No other wood joint is able to resist these kinds of stresses as well as the mortise and tenon.
In recent years a number of jigs and power tools suitable for creating these joints have surfaced on the market. Amongst these, both the Leigh FMT jig and the Multi-Router machine cut an integrated, round tenon and matching mortise with the help of a router, while the new Festool Domino power tool cuts a pair of matching mortises that are brought together with a loose tenon. The latter is a very clever innovation that effectively bridges the gap between the traditional, integrated joint and the biscuit, and is a breeze to set up and use.
While all three machines and the many industrial machines available are ideal for mortise and tenon production, not everyone has the luxury of owning such equipment. Of course, the occasional hand cut mortise and tenon provides the maker very satisfying work and, with a little practice, can be done quickly to a high standard. Here are some of the ways it can be made with standard equipment.
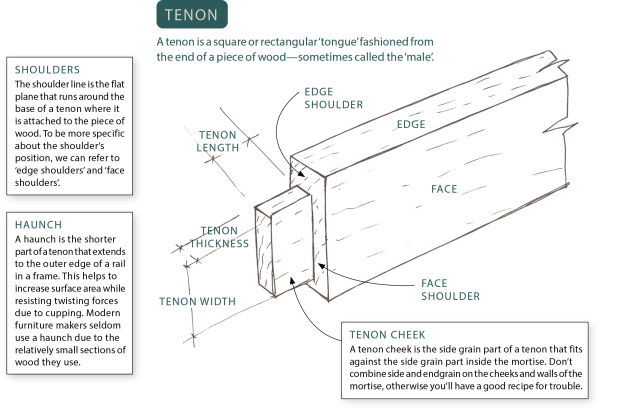
Design guidelines

Photo 1: Marking out for mortises.
Both the mortise and tenon are carefully marked out with a cutting gauge and marking knife (photo 1). When the maker designs a mortise and tenon joint layout there are a number of rules that should be carefully considered:
• The joint must be arranged to maximise side-to-side (or long-to-long) grain surface area, while minimising end-to-end or end-to-side grain. Edge shoulders are not always necessary, and are mainly used when a rail is placed at the end of a stile, where one edge shoulder is placed on the outer edge. The size of this shoulder must be very carefully considered—if too small, the very short grain at the end of the stile can break out, while if it is too large, you will lose valuable side-to-side surface area and raise the risk of movement on the shoulder line.

Photo 2: Angled tenons, note the short grain.
• When a tenon is angled, such as a chair side rail, don’t exceed an angle of about 10°, or its effective side-to-side grain area is diminished due to short grain. If the angle is greater, then the mortise must be angled (photo 2).
• On blind mortises, the mortise depth should be 1mm deeper than the tenon is long.

Photo 3: More than one mortise can prevent cupping on wider stock.
• When setting out a joint on thicker material or end-to-face work (photo 3), two or more tenons may be necessary. This practice also helps to prevent cupping.
• Design the joint layout to ensure that enough material remains on both components once the waste has been removed. Keeping a balance ensures that the structure of the joint is not compromised. The ‘thirds’ rule, which says that a tenon of, say, 10mm thickness must have two shoulders of 10mm each is a good starting point, but does not always apply.

Photo 4: A selection of finger joints.
• Special consideration applies to corner joints where two small sections of wood meet. The best way to ensure good side-to-side grain surface area is to cut a finger joint whose tenons run from edge to edge, and whose length extends to the outer edge of its counterpart (photo 4).

Photo 5: Wedged through mortise and tenon joint.
• Wedged, through mortise and tenon joints (photo 5) may be necessary in areas where extreme stresses may occur such as the side rail/back leg joint on a chair, especially when the design of the chair doesn’t allow any triangulation to support the joint. These visually attractive joints combine the extraordinary mechanical strength of the dovetail with that of the mortise and tenon. More on these intriguing joints next issue.

Photo 6: Long-and-short cheek mortise and tenon joints
• Long-and-short cheek mortise and tenon joints (photo 6) can be used in frame and panel construction, especially frames that house panels that need to be removed such as glass. Both stiles and rails are rebated and the shoulder line on the rail tenons drops down on one cheek to accommodate the ‘tongue’ next to the mortise. An applied strip keeps the panel in the rebate.

Photo 7: Mitred, through mortise and tenon joints
• Mitred, through mortise and tenon joints (photo 7) may be used on fine work for aesthetic reasons.
Machining M&T joints
Aside from dedicated machines, tenons can be cut with a number of machines such as a saw-bench, router table, bandsaw and spindle moulder, or a combination of these, while mortises can be machined with a hollow chisel machine for square edged mortises, or a slot mortising machine for round edged mortises. I have made my own highly efficient slot mortise machine using a horizontally mounted router and XYZ clamping table that has been removed from a combination machine. A hand held plunging router and workshop made jig is another good method. Some methods for machining tenons are as follows:
• Sawbench. Shoulder lines are best cut by placing a rail’s edge against the saw’s crosscut fence, and its end against the ripping fence to reference the tenon length while the blade’s height is set to the shoulder width. Ideally a flat topped sawblade will ensure a smooth surface, especially when the entire cheek is cut this way with multiple cuts.
Tenon cheeks can also be cut by holding the rail vertically on the circular saw with the use of a propriety or workshop built tenoning jig that clamps the rail securely while being pushed over the blade. Don’t attempt this without a robust jig, as it can be very dangerous.
• Router table. Tenons can be cut either by pushing the rail over a cutter vertically or horizontally. A sacrificial ‘fence’ behind the piece helps to keep it tracking straight. Pre-cutting the shoulders on the saw is advisable but not essential.
• Bandsaw. Once the shoulders have been cut on the saw, the cheeks can be cut on the bandsaw with an accurately set up fence. A re-saw such as the Hitachi CB 75 is able to perform this sort of ripping very accurately and efficiently.
• Spindle moulder. With the appropriate tooling and a sliding carriage to clamp the work to, the spindle makes a very efficient tenoner, cutting cheeks and shoulders in one pass. The spindle fitted with several identical blades correctly spaced is also the preferred machine for finger jointing.
Glues and assembly
The one question I’m asked more than any other is what glue I use—as if I have found the one, ultimate, ‘use-it-on-anything’ adhesive. How nice it would be if there was such a thing!
Depending on a number of factors, I use either plain, high solids PVA or paste epoxy glue on mortise and tenon joints. Other glue types may be used in different circumstances. Wherever I have a stepped, or non flush joint, PVA glue is normally my choice as any ‘cold creep’ is not visible. PVA is an excellent glue under almost all circumstances, except for flush-faced joints where the plastic nature of the glue becomes obvious due to wood movement.
Epoxy and urea formaldehyde, on the other hand, are regarded as structural glues that don’t allow the wood to move on the joint. The latter is very brittle and, I believe, not very suitable for mortise and tenon joints due to the possibility of a sudden failure, while the former is a lot tougher. Epoxy glue is a very tenacious adhesive that is almost indestructible in a mortise and tenon joint, even if the joint is sloppy. In fact, it is probably better that it is a loose fit, as the glue is meant to ‘bridge’ two components when used as a glue. In addition to these advantages, epoxy also allows a longer ‘open’ time and the uncured glue provides ideal lubrication to assemble the joint. PVA glue, on the other hand, will tend to ‘bite’ if not assembled quickly. You have no more than a minute or two to get such a joint in clamps.
The perfect fit
The tightness of the joint is yet another important factor that needs attention in order to ensure success. As just mentioned, if the joint is too loose, the only truly successful gap filling glue is epoxy, while if too tight, the tenon risks breaking the ‘walls’ of the mortise.
As with dovetails, the fit of a mortise and tenon can vary according to the hardness of the wood. Softer woods compress more than harder ones, and therefore can afford to be a tighter fit, but either way, the joint should be loose enough to require only several firm taps with the side of a clenched fist, not heavy blows with a mallet or hammer.
First published in Australian Wood Review, issue 58. Neil Erasmus is a furniture designer/maker in Perth, WA