Making a wooden grooving plane

Words and photos: Vic Tesolin
Diagram: Graham Sands
When I was a student at Rosewood Studio, one of the most memorable weeks for me was when we were introduced to toolmaking. There is something quite powerful about making tools that you can then use to make objects out of wood. All of a sudden, you can make custom tools to do special tasks in your shop and they can be made to suit your own personal methods of work.
That is the case with this wooden grooving plane. I’ve realised over the years that I cut many 6mm grooves, 6mm deep and 6mm from the edge of a board. Most often, this is seen in a drawer, box or in small cabinet construction. So I decided to build a single task plane that will do exactly what I need it to do.
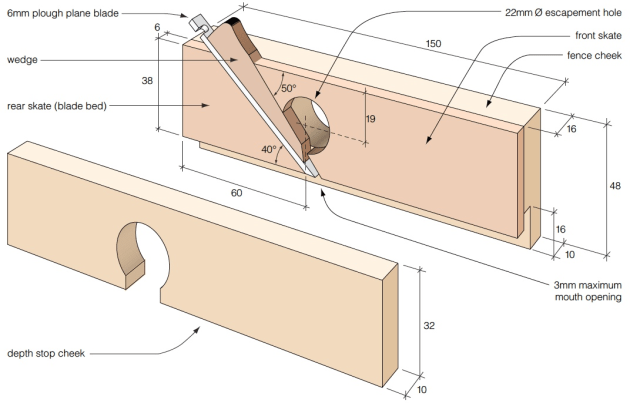
Fig.1: Dimensions in mm
This plane was inspired by Japanese woodworking tools in that it is designed to work on the pull stroke. I find pulling joinery planes easier because now I only need a stop to work against instead of having to clamp the workpiece to my bench. Now I can use my dominant hand to pull the plane, while my off-hand holds the work on the bench.
I made this plane out of white oak (Quercus alba) for the body components and Indian rosewood (Dalbergia sissoo) for the skate. However, you can make the plane out of any hard, long-wearing timber – if you can locate any down under...

1. Stout hardwoods are great for this plane.
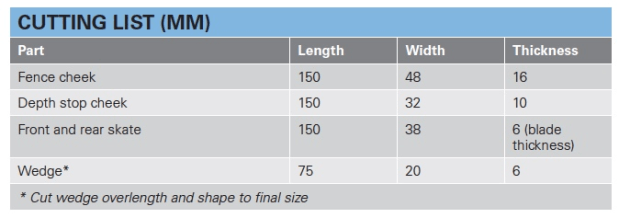
Start by taking a good look at the drawing and cutting list for this project. Being able to visualise what you are making will help you keep track of the parts. Begin by breaking out the timber according to the list (photo 1).

2. Have the blade in hand before getting started.
It is essential that the skate material be exactly the same thickness as the blade so be sure to have the blade in hand before you start. I’m using a 6mm plough plane blade made by Veritas (photo 2). I found these components a bit small to safely send through machines so I started with double the length on all the parts. I ended up making two planes and giving one away to a friend. Although, you could also make a left and right plane for yourself.

3. The rebate creates the fence for the plane.
Cut a 6mm deep x 16mm wide rebate into the lower edge of the fence cheek. There are more ways to cut a rebate than a beach has sand, so I will leave it up to you to choose your method of choice (photo 3).

4. Yet another use for blue tape.
Now move on to the skate material. I chose a fairly dark hardwood so I layed a piece of blue tape down so that I could see my layout lines easier (photo 4). Mark the bed angle at 40° and the wedge angle at 50° according to the positions specified in the drawing.

5. The knife and the high contrast tape make the cutting easier.
Follow up with a knife to score the tape and cut lightly into the material. Once you remove the tape, it is quite clear as to where you are meant to cut (photo 5).

6. I nailed a square nail to my bench hook to help hold the angle.
Use a wide chisel to create a small knife wall to give your handsaw a good start. Once you have cut the two angles, you can clean up the cuts with a shooting or block plane (photo 6).

7. Flip your plane over in a vice to handle small parts easily.
Move on to the wedge. You may have noticed that the wedge material is cut longer than the finished size. This is done intentionally to make it easier to fit. Lay out the 10° angle for the wedge and cut to the line. You can refine the cut with a few hand plane passes (photo 7).

8. Double check that all is good with the rear skate.
The glue-up for this plane is a multi-step affair that takes some patience, but I assure you it will be worth it in the end. Start by gluing the rear skate (blade bed) to the fence cheek using the top of the plane as a reference surface (photo 8). Place a couple of spring clamps on this assembly and let it set for about 30 minutes. Don’t go overboard with the clamping for this project. A little light pressure should give you glue squeeze-out if your surfaces are flat and clean.

9. Use the blade and wedge to help place the front skate.
Remove the clamps and then lay the blade and wedge in place, then bring the front skate into position against the wedge. You can move the wedge up and down to change the mouth opening. You should shoot for approximately 3mm as a maximum mouth opening. Once the front skate is in place, put a few spring clamps on to hold it in place and let it set for another 30 minutes (photo 9).

10. Fine tune the wedge to get a gap-free fit.
Now you can remove the clamps and do a final check on the fit of the wedge. It’s much easier to do this now than once the plane is fully assembled. A bit of sandpaper on your bench should be fine to tune up the wedge (photo 10).

11. This marks the final glue-up for this plane.
Now you can shorten the wedge so that it is approximately 12mm from the tip of the blade. You can also trim the top of the wedge so it is about 5mm from the end of the blade. Glue the depth stop cheek to the rest of the plane, again using the top of the plane as a reference point (photo 11).

12. Simple is always better when it comes to wedge shapes.
While the glue is drying, you can start the final shaping of the wedge. The shape on the top of the wedge is ideal for removing it and you have a bit of leeway here as to its shape (photo 12). Just be certain not to shape it so the portion of the wedge that lives in the plane is affected.
Finally, sand the sides of the wedge a little to make it a bit narrower than the skates and lightly remove the arrises so that it slides easily in and out of the plane.

13. Don’t try to hand-hold this one – work safely.
Almost there. Locate the escapement hole on the fence cheek then remove the waste with a 22mm forstner bit (photo 13). Go slowly as you drill through the multiple layers of this plane. Connect the escapement hole with the skate using a fine saw (photo 14).

14. Use the smallest saw you have for these delicate cuts.
To finish off this build I hand plane all the outside surfaces then put a light chamfer on all of the corners and soften the arrises with a bit of 220 grit sandpaper. I don’t like heavy finishes on my tools so a bit of soft wax is all I use. You could also use a coat of tung or linseed if you prefer.
All that’s left is to give your new tool a go. Start the cut at the end of the board closest to you and incrementally start the plane further with each pass until you are at the far end of the board. Then, continue making passes until the depth stop cheek contacts the wood and you’re done. This groovy little plane will be your new favourite, not only because it works well, but because you made it yourself.
Vic Tesolin is a Canadian furniture maker and teaches online woodworking classes. Learn more at victesolinwoodworks.com