Making a Pencil Gauge

The author’s completed pencil gauge in Burmese padauk.
Words and photos: Theo Cook
Diagram: Graham Sands
The pencil gauge is often overlooked, but for me, it’s an essential part of the woodworking toolkit. I use it for marking out almost all my woodworking joints prior to using the marking gauge or a scalpel.
I’m a teacher at Robinson House Studio furniture school and students often ask to use my pencil gauges, so we decided to teach them how to make their own.

You could buy a new or secondhand marking gauge and modify it, but for me it’s all about the satisfaction of making your own. An extra advantage is that you can choose your own timber. For my pencil gauge I used Burmese padauk as it’s very hard and looks great too. When choosing the timber I recommend a hard wood in a dark colour – lighter coloured woods tend to get dirty with handling.

Below, the numbered photos and steps will show you how to make one for yourself.
Step by step

1. Cut out and plane your wood until it is flat and square. I’m making three gauges here as you can’t have too many tools!
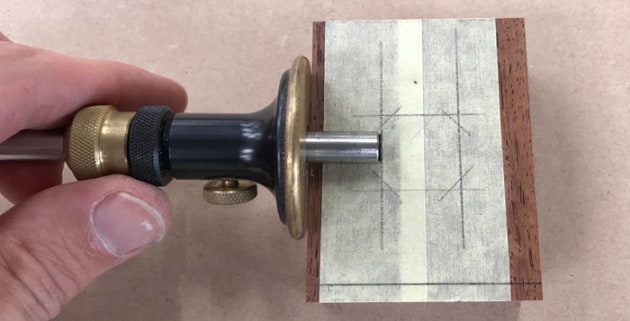
2. Mark out an 18 x 18mm size hole with 45° corners on the stock. Using masking tape is very useful on dark timbers to ensure the lines are clear. Use a marking gauge to score the parallel lines. Make sure not to cut right into the corners as this needs to be at 45°.

3. Use a combination square and scalpel to score the lines to be chiselled to later.
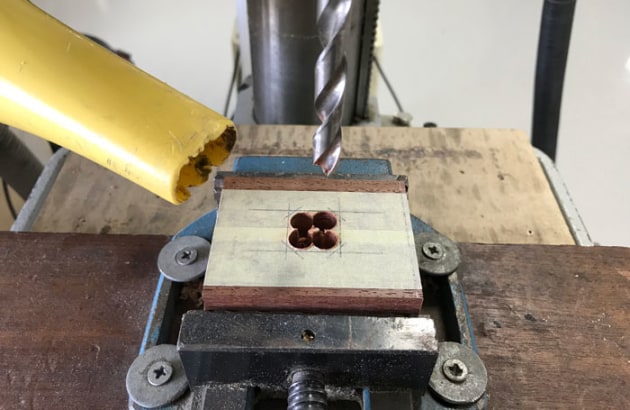
4. Drill out the waste in the hole, making sure to only drill down halfway to prevent break-out from drilling all the way through. I used a 7.5mm drill bit.

5. To speed things up, I used a router to clean out the remainder of the waste, but you could do this by hand using a chisel on both sides.

6. Chisel to the lines you made using the marking gauge and scalpel. Make sure the hole is 90° all the way through.

7. Plane the beam on a shooting board to match the hole at 90°, then use a 45° jig on the shooting board to get an accurate fit. This is the reason you have made the beam 18.2mm and the hole at 18mm – so you have material to plane down to fit.

8. Test the fit of the beam through the stock to make sure you haven’t got any high spots.

9. Mark out where you need to drill for your hardware – on the stock and the beam.

10. Measure your hardware so you know what holes you need to drill and which drill bit size to use.

11. To reduce the risk of drilling the wrong size hole, make a note of the drill bit size and depth of hole that is required. This image shows the beam.

12. In this photo you can see how the hole should look on the stock after drilling.

13. Mark out where to drill the hole for the pencil. Make sure you measure your pencil to find the correct size for the hole. The hole should be exactly the same size as your pencil. I would use a spur centre wood drill bit for this hole, and the same for the other holes.

14. Mark out and cut the slot in the end of the beam. This can be cut on the bandsaw or by hand. This gap will allow the pencil to be gripped tightly.

15. Put a piece of sandpaper around a ruler to sand inside the cut you just made. This will make for a smoother surface.

16. Sand the beam all over, but be very careful not to over-sand it, as then it won’t fit in the stock very well.

17. Find yourself an M6 tap to cut the thread in the beam.

18. Cut the thread and then test the fit.

19. A recess needs to be chiseled out from both sides to create a step.

20. The recess is required so the washer sits flush. The washer will ensure the thumbscrew doesn’t wind into the side of your beam when you’re using it.

21. Mark out the two curves on the top and bottom of the stock.

22. I sanded these curves on the disk sander.

23. Your stock should now look like this.

24. Mark out and chisel the half-round slot for the pencil on one side of the stock. This allows the pencil to get closer.

25. Mark out where you need to put the 45° chamfers on the stock. These should be 2mm and can be seen on fig.1. You can use a spokeshave or a block plane to do this. Sand the stock.

26. It’s time to put the finish on. I used Osmo oil satin clear 3032. I usually apply two to three coats.
The processes described here are simple, however it’s the care and accuracy you undertake them with which will reward you with a tool that will in turn help you get good results with your woodworking.
Theo is senior tutor and vice-principle at Robinson House Studio Furniture School, London, UK, see www.robinsonhousestudio.co.uk