Making a Coopered Vase

Photo: Frank Pronesti
Words: Damion Fauser
Coopering is a way of creating a curved surface by edge jointing boards that have beveled edges. Most people associate coopering with wooden wine barrels but you can use this technique for so much more.
A while back, when I lived for a few years in the USA, I had the privilege of spending some time with prominent Japanese designer/maker Yuri Kobayashi (yurikobayashi.com) and coopering is one of her most oft-used techniques. these simple vases are the result of an experiment after my discussions with her. they are an example of closed-form coopering.
There is one fundamental premise behind all closed-form coopering. You divide the circumference of a circle (i.e. 360°) by the number of staves you wish to use and then halve that number to get your bevel angle. I chose 12 staves; 12 into 360° makes 30, therefore my bevel angle is 15°.
Does the conical profile of these vases impact the bevel angle? the beauty of this technique is that, no, it doesn’t, the angle remains at 15°. Imagine taking a horizontal cross- section of my vases at any height. You are still forming a total of 360° by joining 12 staves.
Design and stock preparation
The first step is to roughly determine the height and circumference of the piece you’d like to make as well as the number of staves. To calculate the width of your staves, first draw a circle of your approximate final circumference onto a sheet of paper. Draw a diameter through the circle. Divide up the remainder of the circle into segments by placing tick marks every 30° on the circumference. Join the tick marks with a straightedge. this is the final width of the outer face of your staves (photo 1).

Photo 1: Determine stave width, in this case the length of the line ‘X’. Measure the amount the staves will overlap the beveled edge of the jigs
You could at this point leave it at that and make a cylindrical vase. to taper it, you’ll need to repeat the above process to determine the stave width at the bottom.
Mill your stock down to your desired thickness. I chose 7.5mm as an arbitrary figure, to give some refinement to the piece. cross-cut your stave blanks to length, then rip the blanks to a width that is 10–15mm wider than the final width of your staves. concurrently mill some test pieces down.
Making the jigs
The jigs are very simple to make from scraps of MDF or ply as the base and offcuts of solid wood. to make a conical vase you will use three jigs and end up with 12 identical staves.
Cut two pieces that are slightly longer than the length of your staves and wider than the widest part of the staves by about 50mm. the first jig cuts the bevel angle and taper on the first edge of your staves, the second jig cuts the opposite edge.
Set your tablesaw blade at the appropriate angle and rip both of your jig pieces at the same time. the wide face becomes the top face of your jig. Glue a small scrap at one end of each of your jig bases. this will act as a stop block for you to register your staves against.
Now, at the stop block end of the first jig, measure in from the beveled edge and mark a line a few millimetres less than the width of the bottom end of the staves. call this Distance 1 (D1). At the other end of the jig base, mark a line a few millimetres less than the final width of the top end of the staves. call this D2. Draw a straight line between the two marks and glue a small scrap (which must be thicker than the stave stock) down that runs along this line. Mark this Jig 3 and put a bold marking at the stop block end of this jig.
At the end opposite the stop block of the second base, measure in from the beveled edge D2 and mark a line. Subtract D1 from D2 and add this figure to D2. call this D3. Measure D3 in from the stop block end and mark a line. Again, glue down a scrap along the line formed by your two marks.

Photo 2: Completed jigs 2 and 3. The bold markings show the bottom end of each stave.
Mark this Jig 3 and put a bold marking at the end opposite the stop block end (photo 2). The bold markings will remind you which end to register the base of each stave on each jig. (Note that I have described and imaged jigs made for a left-tilt sawblade.)
Testing the jigs
Take your test staves and boldly mark one end of each piece, indicating the base end. take some double-sided tape and apply it to the working face of your jigs to provide some grip to the staves as they go through the saw. place a stave in Jig 2 and run the cut. remove the stave from the jig, turn it end for end and place it back down on your saw table with the same face down. If you’re happy with your set-up, run the remaining 11 staves through. put Jig 2 aside and repeat the process with Jig 3. You should now have staves that are beveled on each edge and tapered along their length so they are equilateral triangles.

Photo 3: Blue tape applied under tension across each edge joint.
Go to the bench and lay your staves out side by side with the narrow faces down. Apply a small piece of blue painter’s tape to the first stave, hold firmly and stretch it across the first joint onto the second stave (photo 3).
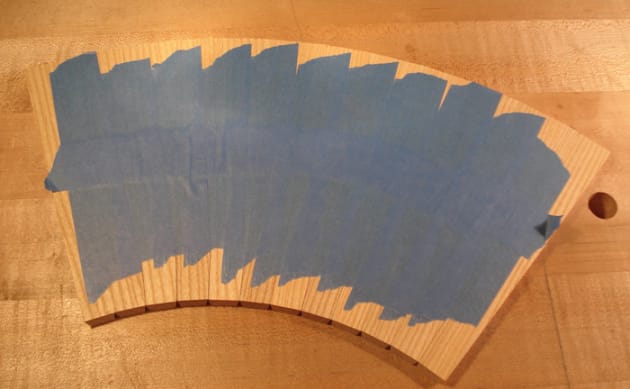
Photo 4: Staves taped up ready for rolling together.
Continue this process across all joints. Now tape along the length of each joint (photo 4).

Photo 5: Freestanding vase trial fitted.
Flip this assembly over, roll it up and tape the final joint. You should have a conical form that can stand freely (photo 5).
This process will test the angle setting on your sawblade. Even a tiny error will be multiplied by the number of beveled edges you have cut. Minor inaccuracies can be fixed by making an angled ramp for your shooting board but for major discrepancies you’ll need to adjust your blade angle and make another set of test staves.
Making a full set of test staves will also determine the angle of the staves relative to the base. Cutting a bevel on each stave end at this angle will ensure the vase sits flat. This is also the angle you will need to cut grooves in the staves to house the base.

Photo 6: Measure the angle between the table surface and the vase.

Photo 7: Record angle settings for future use.
Determine this angle with a sliding bevel and record it on a piece of MDF or ply (photos 6, 7).
The final jig
Now you can make Jig 1. If you’re wondering — I’ve numbered the jigs in the order they’ll be used. Grab another scrap of MDF or ply. Cut it so it’s slightly wider than the length of your stave blanks. Now cut it to length so it is slightly longer than it is wide. This is because you will be running this jig between the fence and the blade and this will reduce your risk of kickback.
Mark a reference edge to run against the fence. Take a thin piece of scrap and joint a straightedge on it. Glue this scrap to your jig base so the straightedge is perpendicular to the reference edge of the base. Now glue a small stop block along the reference edge at the end of the first piece you glued down. Glue a final scrap along the far edge of the base to hold the jig together once you’ve made the grooves for the base.
Set your tablesaw blade using the vase-to-base angle and adjust the rip fence so the first cut will establish a beveled edge on the jig base. The distance between the inside edge of your small stop block and the blade should be the finished length of your staves. Note: for left-tilting blades, the fence needs to be on the left hand side of your blade.
Place another test stave (one that is still square all round) in Jig 1 and run a test cut. The resulting beveled end is the base end. Now shift the fence in and lower the blade so the next kerf severs the base but only by enough to cut a groove across the inside face of the base of each stave to hold the bottom piece of your vase. Mark this Jig 1 and put a bold marking at the end closest to where the blade will pass.
Making the project
Take your project stave blanks, decide which is to be the bottom end of the outside face and put a small piece
of blue tape there to act as your reference through the whole process.

Photo 8: Cutting beveled ends on the staves using Jig 1.
Set your sawblade to the base angle setting and the fence and run each piece through, cutting the bevel angle on the end (photo 8).

Photo 9: Cutting grooves to house the bottom piece.
Reset the fence and the blade height to cut the grooves for the bottom and again run the pieces through (photo 9). Put Jig 1 aside, takeJig 2 and adjust the fence (now back on the right side of the blade for left- tilt blades).

Photo 10: Beveling and tapering the first side of each stave using Jig 2. Blue tape lines up to the marking on the jig.

Photo 11: . Using Jig 3 to cut the opposite side of each stave.

Photo 12: Each stave is an equilateral triangle with long edges tapered and beveled at the bottom.
Run your cuts, turn the staves end-for-end and repeat in Jig 3 (photos 10, 11, 12).
Making the base
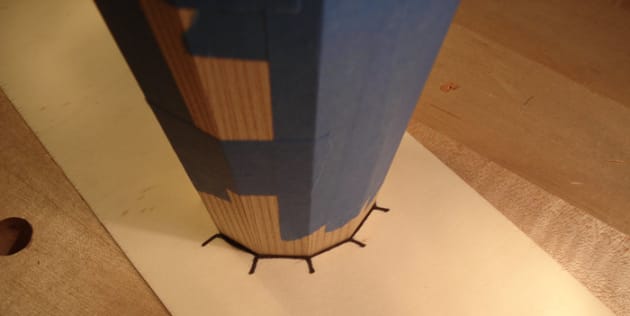
13. Marking out the base.

14. The base cut out.
Tape the assembly together as before and stand it on your base stock. Place a tick mark at each joint and trace around the staves (photos 13, 14). Bandsaw this shape. Now you can measure the thickness of the wall at the bottom of your grooves and remove slightly more For my bases I used 3.2mm ply, which I then lightly sanded down in thickness and veneered in white ash to match my staves. You could also use solid wood, just allow some wiggle room to allow for seasonal expansion.
Gluing up and finishing
Pre-finish the inside of the staves and base before gluing up. Any machine marks can be removed with a smoothing plane before appling a couple of coats of shellac.
Tape the staves together as before, flip them over and lay the first edge joint over the edge of your bench so the first stave tips over the edge. This opens up the joint to allow for easier application of glue. Repeat this until all joints are glued, roll the staves together with the bottom inside and tape the final joint. Once the glue has cured, remove the tape and inspect your work. If you’d also removed the machine marks from the outside faces prior to glue-up you will likely just have a little cleaning up and sanding to do at the outside of each joint.
The top edge can be faired off and the edges softened with a block plane, spokeshave or some abrasives and then you can apply your desired finish.
The next step
Have a go at this basic form and then you can take it to the next level. Use two matching sets of staves of different dimensions, just make a second set of Jigs 2 and 3. Or, try taking each alternate stave and flip it upside down, so you have the odd-numbered staves tapered top-to-bottom and the even-numbered staves tapered bottom-to-top.
Just remember, the width of the staves can be arbitrary, as can be the amount of taper on the edges of the staves. What makes this technique work is the bevel angles, which just have to add up to 360. The jigs lend themselves to production work, so if you have the stock on hand and the patience, make a batch of them. Now you have the basic technique for closed-form coopering, the rest is up to you.
Damion Fauser is a furniture designer and maker who lives in Brisbane and also teaches woodworking classes. Contact him via damionfauser.com