Krenov catches: how to make them

Words and photos: Scott Horsburgh
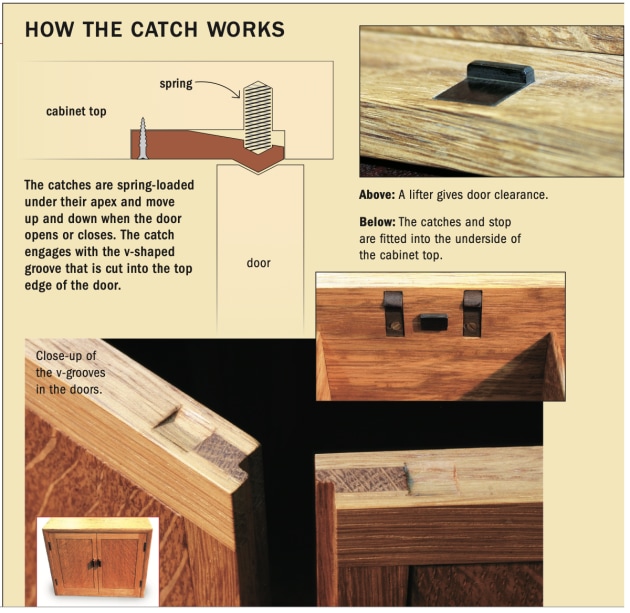
Handmade door catches, door stops and door lifters add a lot of character to a cabinet. Not only do they look good, but they are also very functional and give a crisp wooden sound when the doors are opened and closed.
Any furniture maker who has read some of James Krenov’s inspirational books will know that he uses handmade cabinet hardware and regards these small com- ponents as intrinsic features of his work. I’m a great admirer of Krenov’s work and therefore also make my own cabinet hardware. His catch incorporates the door stop but I prefer to make the catch and stop as separate components.
The techniques used to make the catches can easily be used to make the stops and lifters. All these fittings need to be made and fitted before gluing up the cabinet. The housings need to be cut before glue- up, otherwise fitting will be difficult.
Materials
I like to use African blackwood (Dalbergia melanoxylon) for these items as the rich dark colour always contrasts beautifully with other timbers. Most importantly though, this wood is very hard and therefore suitable for making small compo- nents that are strong and durable.
African blackwood will blunt tools very quickly and planing it is extremely difficult. I have used a shoulder plane to tidy up the routed edges, but with the blade reversed so as to use it as a scraper plane. Alternatively you can use a block and sandpaper, making sure the edges are kept crisp.
The only other things you will require are a screw and a small spring for each catch. The springs can be taken from a biro or pen.
1. Preparing the wood
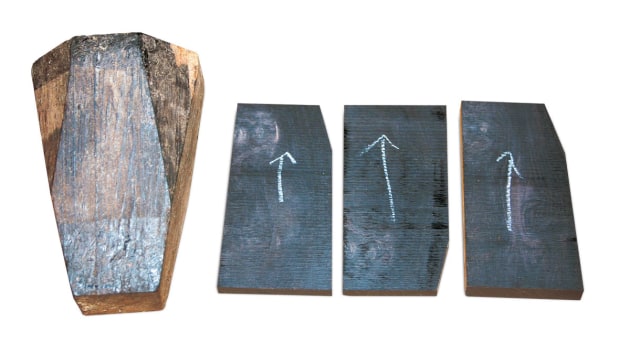
I had a chunk of African blackwood around 120mm high and 80mm across the wide base. I bandsawed the angles off three sides and then carefully squared the edges on my planing machine. The key here is to go with the grain and take off minute shavings. If you try to take too much off at a time, the timber will jump and tear.
Once I had three square edges I cut two 6.5mm thick slices on the bandsaw. Set up a fence so you can cut these pieces accurately. I was left with two pieces that were 120 long x 55 wide x 6.5mm thick—the extra piece is 10mm thick and will be used for door stops and lifters.
2. Machining small pieces

When making small components it’s important to keep the workpiece as large as possible for as long as possible. Once you have shaped the piece, you can cut it to size. If you are going to the trouble of making your own cabinet hardware, don’t just make two or three, make many – I made ten.
Before shaping the blackwood needs to be flat and clean cut, but if I put these small pieces through my thicknesser all hell will break loose – they are far too short to thickness.
A simple jig like the one shown above will fix this problem. Two pieces of wood are glued to a larger base with the gap between the two up- per pieces being the length of the two pieces of blackwood.
Fix the two pieces of blackwood to the jig with double-sided tape and feed the unit through the thicknesser. The first upper part of the jig takes the shock of the rollers and blades and the cut- ting blades follow straight onto the blackwood. Make sure all pieces have the grain going in the same direction to avoid tear-out.
When the top surfaces are clean cut, turn them over, fix them again with double-sided tape and do the bottom side, ensuring the grain is running in the right direction. After thicknessing the blackwood pieces were about 5mm thick.
3. Shaping the catches

A. Basic shaping was done on a router table. First cuts: creep up to the final shape slowly, taking small cuts. This avoids chipping and tear-out, and is also a safety precaution. By taking small cuts you will retain control of the piece. If you try to take too much off with one cut there is a danger of the piece biting.

B. Second cut: using the same V-shaped router bit, raise the height of the router bit very slightly and take another cut. Continue to raise the router bit slightly and cut until you are happy with the shape.

C. A thin piece of jarrah that I clamped to the router table enabled me to cut at a slight angle. The router bit is set to a flat cut to give a slight taper.

D.The catches after routing. Note that the wood is still full length. Use a shoulder plane with the blade reversed to clean the edges up or sand them. If sanding, use a block to keep the edges crisp.
4. Finishing cuts

The catches can now be cut to size. I use a docking saw to cut the entire shaped area off the main block. Mark the width of the catches and cut these on the bandsaw. I don’t use a docking saw to cut the catches as they are so small they may get caught or fly off after cutting. On the bandsaw I have control when cutting and can use pushsticks to carefully hold both sides. Each piece yielded five catches.
The sides and ends are cleaned up with a handplane on its side against my workshop-made shooting board. With small pieces like catches, ensure that your fingers push the piece into the back of the shooting board and keep it firmly placed against the plane. Don’t push the plane too hard, firm and steady is the way to go here.
5. Drill screw and spring holes

All that is left now is to drill a clearance hole for the screw that holds the catches in place and a small hole to house the end of the spring. The catches are screwed into a routed housing in the carcase and this housing also has a small hole to hold the other end
of the spring so it can’t slip or slide. The clearance hole for the screw is countersunk to make the screw head flush with the bottom of the catch.
6. Placement

The thickness of the cabinet doors determines the placement of the catches, stops and lifters. When setting the door stop and door lifter allow the front edge (i.e. the edge that will make contact with the inside of the door) to protrude about half a millimetre further out than you want. When the doors are fitted you can shoot that edge flush.
7. Fitting the catches
Installing the catches is very easy. They are placed at the top of the carcase and are held in the routed housing. The housing has a tapping hole for the screw and a hole to hold the spring in place and prevent it from sliding. The screw allows you to adjust how far the catches will protrude, and therefore control the amount of bite they have on the doors.

When you have made and fitted the cabinet doors you are ready to cut a small concave V-cut in the top of the door which will match the convex v-shape of the catches. The idea is that the doors are pulled into the carcase by the catches and rest against the door stops. Take care to position the V-cuts accurately.
The door lifter protrudes a fraction of a millimetre above the carcase base and prevents the doors from rubbing on the polished surface should there be too much downward pressure from the catches.

The final dimension of the catches was 26mm long x 9mm wide x 5mm thick. These catches really do work beautifully and the sound of them closing is brilliant.
Scott Horsburgh makes furniture in Yallingup, WA. Learn more at www.scotthorsburgh.com
First published in Australian Wood Review, issue 57