How to make tambour doors
Words and photos: Richard Vaughan
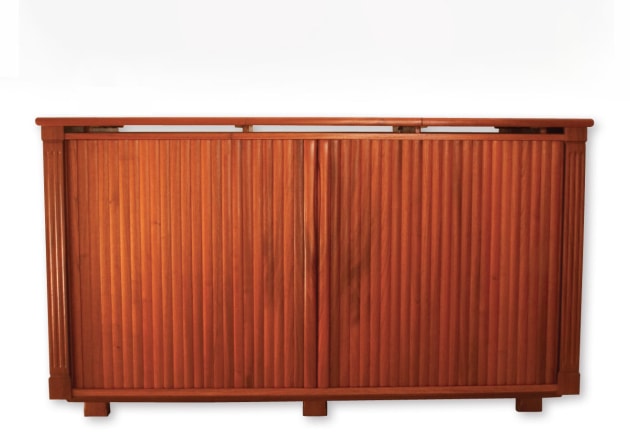
The way wood seems to fold away with tambour doors has a constant wow factor, and gives scope for interesting variations. Tambours don’t demand extra space the way doors do and are well worth the effort and time involved in making them. In this article I want to share the methods and helpful tips i have developed over years of making use of them.
A recent commission was for an audiophile preparing for retirement and wanting to fully indulge his passion. Limited space in his music listening room made a cabinet with a tambour door an obvious choice. Dark old Australian red cedar was chosen to fit in with panelling of the old house.
There would be compartments for equipment and drawers for CDs and LPs. I started by making scale cardboard cut-outs of the various components and arranging them on a scaled outline of the available space. The 1:5 scale drawings then became full size drawings on 3mm MDF.

The underlying concept for this cabinet was of curtains in front of the music being performed. To express this idea the tambours have rounded faces to suggest the folds of heavy theatre curtains. The full size drawing showed they needed to be 12mm thick to allow for curved faces and still keep the track concealed. The drawing also showed the tambours looked right for this cabinet at 30mm wide. The columns at the ends of the stage cover the withdrawn curtains with as little gap and loss of space as possible (fig.1).
I settled on a 33mm radius and then made a test piece to be sure it would run smoothly. Obviously the tighter the track radius, the smaller the foot on each individual tambour needs to be, so a test run is an excellent plan.
Track material
Track dimensions need to be decided at this stage too. Over time the tambour endgrain of even a durable species would wear in a track which is simply a slot into wood. Teflon rod has worked well in previous cabinets but i was unable to source this and so settled on high density polyethylene (HDPE).

Along with milk containers and plastic bags HDPE is also used as a bearing surface for industrial conveyer belts. It is really tough stuff and can be sourced from plastics suppliers. I bought a strip of 4.5mm thick material and sanded it to 4mm. I made the bottom track 10mm deep and 7 mm wide (fig.2). The top track doesn’t require lining so it only needed to be 7mm deep. The HDPE was ripped into strips on the tablesaw and one face was then rounded on the router table to offer even less rubbing surface.
Machining the slats
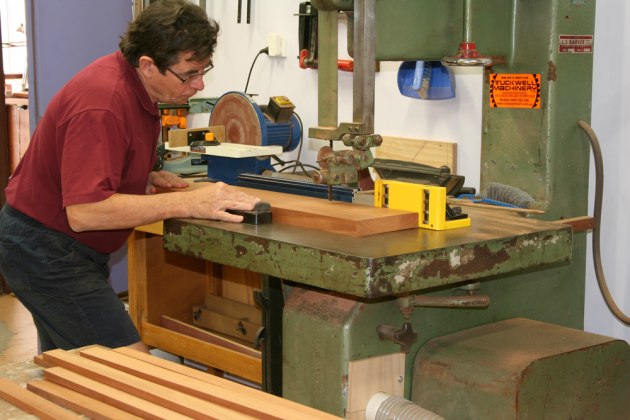
The slats are relatively long and slender and you want them to stay straight so aim for them to be quartersawn. Photo 1 shows the backsawn boards about 50mm overlength and dressed to 35mm thick, having 15mm strips being bandsawn from them. The final dimension is 30 x 12mm and the allowance was for strips that needed to spring or bow when released from the part of the tree they’d grown up in. In the photo the strip being cut is showing signs of spring as it lifts the edge of the board from the table.

After sawing a strip from each edge of the board it was dressed to be sure of a true edge for the next two strips (photo 2).
I usually make about ten extra slats. Despite a generous size allowance there are usually several which won’t be tamed, or perhaps have splits or other flaws that may be revealed or even happen during machining, or some may be a difficult colour match. The next stage is to re-joint and then thickness the slats to final dimensions. You need a very light touch when jointing these slender components or you will simply follow any bend in the wood rather than flatten it. If you have one, using a drum sander for final thicknessing will reduce the risk of nice figure giving a torn surface which will have to be sanded out, or perhaps discarded.


Photos 3 and 4 show the router table being used to put the radius on the face of the slats. All the slats were pre-sorted and stacked ready to feed so the grain direction was sympathetic for cutting. The benefit of using a router to cut one side at a time rather than a cutter which rounded the surface in a single pass was that both edges could be machined with the grain.

Photo 5 shows how some 6mm ply was bandsawn with a profile of the slat and clamped to the bench to hold the slats as they were sanded. With good music on, a fan behind to keep dust and breathing separated, and the lamp above to highlight what needed attention I settled into using a sponge/scourer pad as a block for 180 and 240 grit abrasive cloth.

The next stage was to dock all to final length and then make the jig shown in photo 6. I used some ply which was the final thickness of tambours.

If you decide on less convenient sizes you will need to machine extra timber when thicknessing the tambour slats in order to make this jig. The frame is fixed to the chipboard so the ends of the slats are a snug fit against the jig sides. They are then locked in place by the wedges in the foreground. A test cut on some scrap gives you the distance the fence will need to be from the edge of the intended rebate (photo 7).

Router bases are rarely exactly concentric so pay attention to where on the base it will be contacting the fence and remember to maintain that for all cuts so you end up with a truly straight line. The jig is raised above the benchtop on stands so the fence can be easily clamped to it (photo 8).

The edges of the fence have been sealed with shellac and then rubbed with paraffin wax to give a smooth bearing surface for the router. This method of cutting the feet ensures they are identical, and is quicker than doing them individually. I have a sandpaper-faced ply jig clamped to my tablesaw sliding table to make sure the tambours can’t slip when cutting the shoulders (photo 9). The fence is set to their length.

The feet were rounded to make their movement smoother, particularly as they get pushed around the corners (photo 10).

The tambours were then clamped in the jig, flat face to flat face, so the edges could be oiled (photo 11). This makes finishing easier and prevents them getting stuck together when the backing fabric is glued on.

Rather than attaching handles I maintained the theme by making the last two slats thicker to allude to the drape at the ends of the curtains (photo 12). I trialled shapes on pine before going for the real thing of course. In the background are the two test tambours, flat and rounded, which I used to check the appearance and to test the radius of the track corner.

This process of arranging for best colour and figure transition also identified any slats that had veered away from the straight and narrow (photo 13). Having enough spares means less compromising.

To economise on space inside the cabinet there is no covering board to hide the back of the tambour when it is open. Calico was glued on to make the lack of a cover less obvious (photo 14).
The jig was used to clamp the individual tambours tightly against one another to prevent glue getting in between. The surface to be glued was masked off about 15mm from the edge, then the PVA was applied with a roller and the fabric pressed to it. Although the vacuum bag is visible in the photo I found that I didn’t need to use it as the cloth clung to the glue with no need for further pressure. The two handle slats were too thick for this jig so a flap of fabric was left for attaching them later. The edges of the fabric were cleaned up with a straightedge and sharp knife just inside the glue line so they won’t fray.
Cedar is relatively soft so to increase its durability I carefully painted all the feet with polyurethane making sure to soak it into the endgrain. The tambours were then oiled using a satin finish to at last reveal their lush colours.

Finally, with the tambours covered, the feet were sprayed with silicone to increase their slipperiness (photo 15). Once the cabinet was oiled the track too was sprayed with silicone.
Making tracks

Photo 16 shows setting up to rout one of the track corners. Test cuts gave the distance from the edge the template needed to be and the two spacers seen in the photo were made to ensure accuracy. And, as with the use of the edge of the router base as mentioned above, don’t assume the template follower to be exactly concentric so make note where it will contact the fence for all cuts.

The tambour will be fed in from the back of the cabinet so you need to make entry tracks (photo 17). Use of spacers makes the junction between the corner template and the full length straightedge invisible.

At this stage you need to be extra sure you are ‘in the zone’ before you start the router as you venture into the extreme sport aspect of woodwork (photo 18).

Because any sag at all in the base will jam the tambour I used 30 x 6mm steel angle to stiffen it (photo 19). A spray can of anti-rust primer that happened to be an excellent colour match will reduce the chance of corrosion over time.

I tested the base for sag by standing on it when supported only at the ends. Although it was fine for my weight I decided to add a middle pair of legs just to be really sure. A piece of the HDPE was screwed onto the track at the backs to stop the tambour to give clearance for the flap and the drawers, and to prevent it sliding inside the cavity beyond reach. A similar stop was fixed inside the top track in front so that the tambours stopped at the centre (photo 20).

Tambours are a sleek way to finish a cabinet. Good results will be achieved if you plan well, select your stock carefully and pay attention to accurate machining.
First published in Australian Wood Review issue #80, 2013.
Richard Vaughan is a furniture designer maker in Brisbane who also teaches weekly woodwork classes.