How to make and use winding sticks
Words and photos: Charles Mak
A wind* is a twist in a board. To test for twist, winding sticks or strips are commonly used. But any two pieces of material that have parallel edges can also be used to diagnose a twisted board or assembly. I have seen, for example, journeyman levels, extruded angle aluminium, steel rules or even framing squares used as winding sticks.
Many craftspeople, however, take great pride in making their own winding sticks from choice hardwood. My first pair of winding sticks – two straight, parallel battens cut on the tablesaw – has seen its fair share of use as I moved to dress more of my own wood in recent years. I decided to design and make new, more eye-catching winding sticks, this time mostly by hand.
Choosing the inlay design
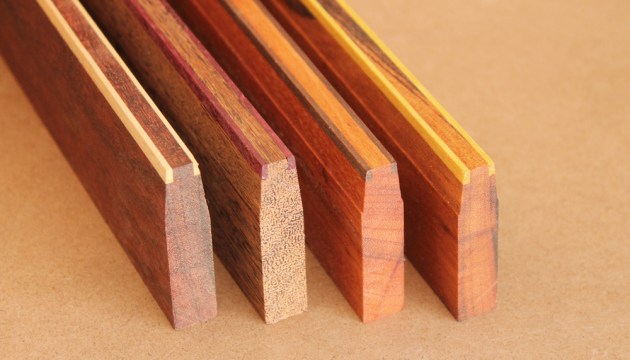
To make the twist stand out, strips of contrasting wood are often inlaid on the sticks. Some find it easier to see the twist with two short blocks of inlays instead of one continuous strip of inlay. However, I personally have found no difference in the gauging of twists between the two inlay approaches.
It does seem to be quicker to run a long inlay strip rather than add two separate inlay sections. My design therefore adopted the inlay strip approach. In addition, unlike the usual one-sided inlay, I put inlays on both faces of the sticks, making both sides suitable for sighting. Lastly, the sticks are bevelled on the upper part to make them bottom heavy.
Winding sticks are designed to locate the twist with exaggeration. How much? The exaggeration is a factor of the length of the sticks to the width of the board. So, a pair of 300mm long sticks used on a 150mm wide board would amplify the actual twist two times. Knowing this helps you determine what length of sticks to make or use. I made mine 15 x 60 x 350mm and 15 x 55 x 550mm.
Which wood to use?
Any dimensionally stable wood can be used, and my choice was tigerwood – scrap wood from a previous hardwood flooring project. For contrast, I used maple, purpleheart and walnut scraps to make the inlay strips.
Cutting the tongues

1. Make a slight cut on the stock with the plough to verify the fence setting.
I planed and cut the stock to final sizes, removing the grooves and tongues in the process. The quickest way to cut the rebates on both sides of the sticks is to cut them at the same time, that is, as tongues.

2. Keep the fence tight against the workpiece as you push.
I installed a tongue cutter in my plough plane (photo 1) and started from the far end, working backwards (photo 2). I found it more precise to set the plough fence with a hammer. You can cut tongues with a shoulder plane, but it’s a lot slower. Clamp a batten in place on the workpiece and cut the rebate – one at a time on each face – to depth with the shoulder plane.
Cutting the inlay strips

Many woodworkers tend to approach the ripping of thin strips with a measure of uneasiness. One simple and safe option is to rip the strips so they fall to the waste side of the blade. If you prefer to rip strips in such a manner without resetting the fence, you can use a shopmade notched pushblock that is designed to be cut into (see fig.1).

3. Set the blade just proud of the thickness of the stock to make machining safer.
I have a Grrr-ipper pushpad which combines a blade guard and pushblock to handle challenging cuts, like angled ripping, resawing or strip ripping. I used it to cut out the inlays (photo 3).
Checking the sticks

4. Gluing the inlay strips in place.
After I glued the inlay strips in place (photo 4), I planed them flush on all sides (photo 5).

5. A high angle plane or cabinet scraper will deal with wild grain.
The accuracy of any winding sticks depends on how parallel they are. I checked that before I bevelled the sticks with these steps: 1. Hold the two top edges together and look for any gap. 2. Place both sticks on a flat surface and run a finger or two along the two top edges to feel for any difference. Our sense of touch is more acute than many realise: fingertips can feel ridges as small as 13 nanometers. (A sheet of paper is about 100,000 nanometers thick!)

6. The sticks were carefully planed to be identical in width.
However, for machinists-turned woodworkers or folks who demand visual precision, a caliper may be more reassuring (photo 6).
Shaping and finishing the sticks

7. Turn a skew rabbet plane into a shaping plane with the use of an angle fence.
To bevel the faces, I turned to my skew rebate plane. The shorter pair has a less acute bevel than the long one, as
I used two different angle fences to create their profiles (photos 7, 8).

8. A rubber finger cushioned my thumb from the hard surface as I gripped the fence.

9. Press down on the front of the file as you push forward, but lift it up when you pull back.
After bevelling the faces (use shims to stop them rocking), I angle-cut the ends and drilled the centre holes for the aluminium rods (photos 9). Finally, I broke all the sharp edges except the crisp top edges, and applied a few coats of oil finish to bring out the contrast.
Using the winding sticks
Winding sticks can be used to test twist in more than just boards. For example, they are essential when making a dead-flat assembly table or platform to build, say, flat torsion boxes. Another little known application is that one can clamp the winding sticks to the wheels of a bandsaw to check if the wheels are twisted out of alignment.

10. If the top edges of the sticks do not line up, the board is in wind.
Regardless of what they are used on, the procedures are similar. First, place the winding sticks at opposite ends of a board. Centre the sticks on the surface and sight across the top edges of the sticks. Lower your head to see if the top edges are parallel; any wind will show up as misalignment of the top edges of the sticks (photo 10).

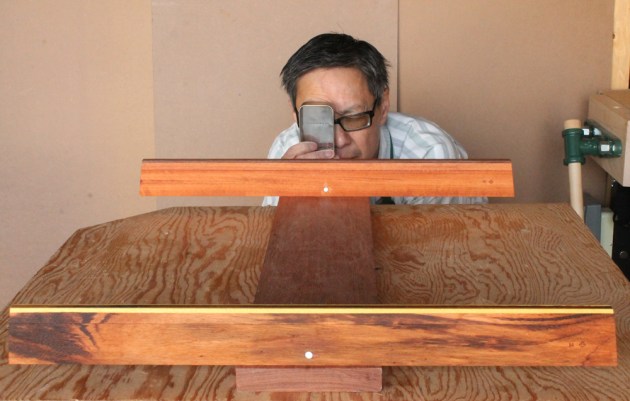
For some people, even with the contrasting edges, they may still find it hard to see the line-up in focus. American woodworker and writer Rob Porcaro, an optometrist himself, came up with the visual solution shown above using the aid shown below.

Pick a contrasting background and sight at about an arm’s length from the rear stick. The row of pin holes allows you to sight the full length of the sticks without moving your head. Rob wrote that the use of a single pin hole would not improve the vision result when sighting across the winding sticks. A small pin hole forces you to move your head to sight the full length of the sticks and the head movement affects the accuracy of sighting.
Reposition the far-end stick on the board to check for any other twists, while keeping the aft stick in the same position. This will ensure that your sightings and readings are all based off the same plane.
Bespoke winding sticks like these deserve to be properly cared for: try to keep them in a place not subject to wild swings of humidity. As they say, your own handcrafted stylish tool will be a joy to hold and a pleasure to use.
* In this case, ‘wind’ is pronounced as wind meaning twist or turn.
Charles Mak lives in Alberta, Canada and enjoys writing articles, teaching workshops, and woodworking in his shop.
Charles Mak
Charles Mak