How to make a mid-century dining table

Words and photos: Charles Mak
Diagrams: Graham Sands
I find some of George Nakashima’s mid-century splayed leg table designs inspiring and decided to adopt the same line of simplicity with the new dining table I recently built.
Walnut has always been one of my favourite hardwoods. It is easy to work with, and most importantly, it can, depending on the lighting, appear dark or glowing gold with its depth and wild pattern. With the proper finish, it can maintain its character and grace as it ages.
While the style of the table is important, its size is crucial. I followed the standard dining table dimensions as shown in the cutting list. The tabletop is a straightforward build, but the angled rail- to-leg joinery adds complexity. In this joint, the splayed, tapered legs are also sloping while they are joined to the rails at an angle. At first glance, the execution of the angled joinery seems to be quite a challenge for a domino joiner. Once broken down, it is in fact no more than a mitre joint.


Start with the panel glue-up
To glue up a panel, I usually ignore the textbook advice of alternating the boards as for me, colour and grain pattern matter more. I can handle wood movement or reverse grains with various proven techniques, such as using well-acclimatised timber or planing with a high angle plane.
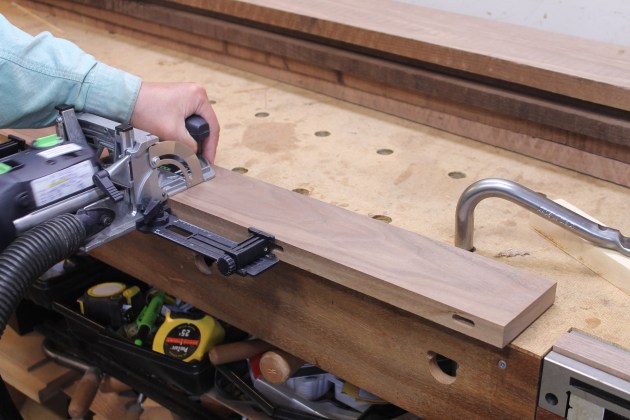
After sorting out the dressed boards, I cut domino mortises on the edges with the aid of a cross stop, which eliminates pencil lines and alignment by sight (photo 1).

I split the glue-up into two sub-assemblies, and let the glue cure before cleaning up the edges (photo 2).

To join the two sub-panels, I picked a flat spot on the shop floor for assembly (photo 3). If you don’t have a large assembly table or a flat floor, you can lay a full- size thick plywood sheet (20mm thick) on the floor as a platform to do the glue-up. Place clamps on both sides of the panel to distribute pressure evenly.
After the glue-up cured, I planed away any high spots before chamfering the edges and sanding the top. Using a higher grit on the edges can reduce the finishing contrast between the edges and the top.
Demystify the angled joinery
The base for the table is composed of sloping, tapered legs and rails. Unlike a typical rail-to-leg joinery, the rails are not joined to the legs at a right angle, but at 45°, due to the angling of the legs (fig. 1). The sloping and angling give the legs a stylish look.
For this joinery design, we are working with three types of angles: the sloping angle (the angle of the legs relative to the floor), the rail angle (angle of the rails relative to the legs, which is a mitre), and the taper on the legs.
When Tage Frid worked with complex designs and builds for the first time, such as his skill-demanding mahogany cabinet, he built a mock-up to establish his procedures. The best way to figure out the sloping and taper angles, and understanding how such joinery can be executed for this table, therefore, is to experiment on the design with a mock-up.
Do a mock-up

Start with two rectangular pieces, and mitre their ends to form the mock-up rails. Mark out and cut two mortises on the mitres with the domino joiner (photo 4). For a stronger joint, cut the bevel mortises as deep as stock thickness allows.

Transfer the pencil lines on the mitre to the leg to mark out the intersecting placement lines (photo 5).

Place the mitred rail on the leg to mark the second intersecting pencil line to complete the layout of the mating mortises (photo 6).

To cut the twin angled mortises on the leg, I followed the same intersecting-lines technique that was explained in my Step by Step Stool article in AWR#101 and is shown in photo 7.

To find the desired sloping angle of the mock-up leg, cross- cut the top and bottom of the leg to a chosen angle and stand the leg on the bench or floor to check (photo 8). After a couple of trials, the sloping angle I liked came out to be 100°.
Prepare the legs


With the marking and mortising steps sorted out, cut the sloping legs from the dressed stock, and machine the twin mortises (photos 9, 10). I tapered the legs using a modified tablesaw jointer jig, or you can taper them on a bandsaw, and remove the saw marks with a plane.

To make room for the corner braces, trim off part of the inside edge of the leg’s top portion (photo 11).

In the last step, ease all the edges, and mark out the leg locations on the underside of the tabletop (photo 12).
Make the rails

Rip the long and short rails to length and mitre their ends (photo 13). Use stop blocks so the rails are bevelled to identical lengths.

To cut mortises on the mitres, set the joiner fence such that the mortises are cut close to the inside corner for maximum strength (photo 14).

After mortising, ease the sharp edges, and dry fit the rails to the legs using standard size dominos (photo 15).
Cut some cabinetmaker’s buttons
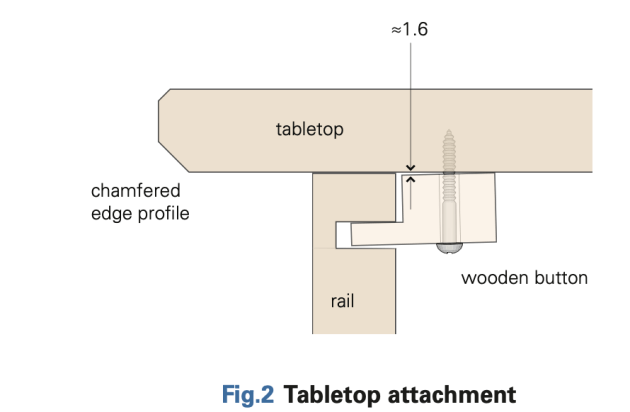
The end-to-end grain direction on the top means wood movement will be side-to-side. The tabletop can be fastened to the rails with various methods such as screws in pockets or ledger strips that allow seasonal movement. Cabinetmaker’s buttons are chosen for this table (fig. 2), and are easy to make in bulk.

For strength, the buttons, if made of hardwood, should be made with the grain on the tongue running perpendicular to the rails. I rebated a strip of plywood and cross-cut it into cleats (photo 16). These buttons are used with slotted holes cut with the domino joiner on the inside face of the aprons.
Make the long tenons
The combined mortise depth of a rail-to-leg mortise is 64mm, while the longest dominos available for the standard DF500 domino joiner are 50mm. To make longer dominos, I ripped some scrap beech stock to size (22 x 8mm), rounded its edges on the router table and cross-cut them to length. You could also shorten some of the 80 x 22 x 8mm dominos that are available for the larger DF700.
Apply the finish
Polyurethane is my usual choice of finish for tables, but I have heard enthusiastic praise for the Osmo oil products, and decided to try the Polyx oil out. After sanding everything to 150 grit, I applied two thin coats (10 hours apart) with a cloth before the final assembly.
Assemble the legs and aprons
Let the oil finish dry to touch in about a day, then clamp the aprons to the legs, working with one joint at a time.

Assemble the frame and measure diagonally to check for square. When working with a large or complex glue-up, my secret to a less stressful experience is the use of a reliable assistant. I briefed my helper beforehand so she knew how to handle her tasks (photo 17).

To increase a table’s rigidity, corner braces such as metal brackets or corner blocks are usually used. I made some wooden braces and screwed them in to bridge the corners from rail to rail (photo 18).
Attach the top
In the final step, position the top on the base, and install the buttons. Allow the finish on the top to cure (about two weeks), and your heirloom dining piece is ready for a celebration meal!
Building a dining table can be a challenging undertaking. There are more design factors to look into such as reach and seating clearance than just the style and size that I have mentioned here. ‘Make furniture that people can be comfortable living with’, Sam Maloof said. His advice is as sound for tables as it is for chairs. And that’s what you should keep in mind when you design a dining table!
Charles Mak enjoys writing articles, authoring tricks of the trade, teaching workshops, and woodworking in his shop. Charles has just published a collecton of his tips and techniques: Woodworking Tips and Tricks is available from Lee Valley.