How to Make a Japanese Puzzle
Words, photos and diagrams: Iain Green
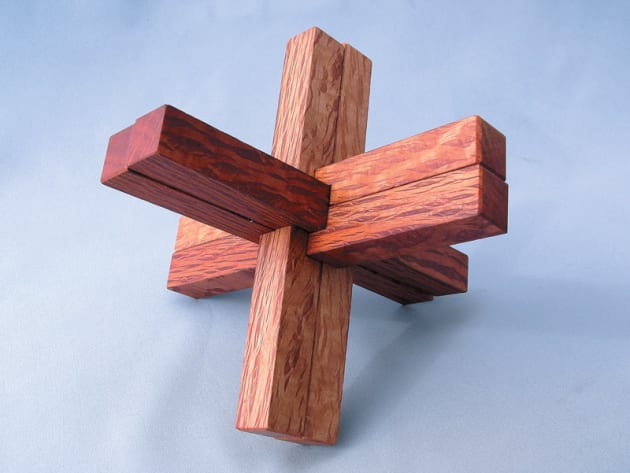
This little puzzle is a training exercise from Shukokai, the traditional Japanese woodworking group that I joined in Tokyo a couple of years ago. It is a great way to build skills in using planes, saws and chisels to prepare stock accurately to size and to cut tight, neat joints. As well, it makes an excellent gift or an interesting conversation starter for the coffee table. It’s reasonably difficult to work out how to un-do it (if the joints are tight) and I have yet to find somebody who can reassemble it reasonably quickly without the instructions.
A wide range of timber should work for this project. Select a straight grained timber that you can plane to a good finish without too much trouble. I used rock oak (Allocasuarina huegeliana). This can grow to 8–15 metres in height across the south-west corner of WA and displays the medullary rays of other oak-like timbers. While it is quite hard, it was reasonable to work with. This piece came from a re-growth tree in a fire break, so I suspect it has had a pretty hard life.

Fig.1
The puzzle requires six rods sized to 15 x 15 x 150mm. I usually lay out the pieces in this order when I am assembling the puzzle, so I have used A-F in fig.1 to identify the individual pieces. The numbers at the top indicate the order in which they are inserted into the puzzle as you assemble it.
Preparing the rods
The six rods need flat sides that are square to each other and of uniform thickness so the puzzle fits well.
1. The first step is to thickness your board to 15mm. Then plane one side flat and check with a straightedge.
2. Use a marking gauge to set the thickness for the second side.
3. Plane down to this line. As you get to the top of the marking gauge line a fine shaving will be raised along the edge (see photo below). Check this second face is flat and the board thickness is uniform.

4. Plane one edge of the board so that it is flat and square to the other two sides. A shooting board helps to square the edge.
5. Use your marking gauge at the same setting as above to mark the fourth side. Saw about 1–2mm outside this line. Return to the previous step to cut the next rod.
6. Plane each rod down to the marked lines. It helps to plane two rods at a time as the greater width gives better stability. As you get close to the final thickness, check that the fourth side remains flat and square to the adjacent sides.
7. Check that rods are square and of uniform thickness by holding them together on a flat surface and feeling for variations. Put a small chamfer on each edge.

Cutting the joints
The best approach is to cut joints in the sequence in which the puzzle is assembled (see fig.1 and above) so you can check the fit as you go. In addition, it is a good idea to mark the width of cuts using the actual pieces that will fit into those cuts. This means that you don’t measure the joints and you automatically accommodate any variations in the thickness of rods. Note that all cuts for these joints are a multiple of half the thickness of the rods.
As these are particularly simple joints, there are several options for cutting them. You can mark, cut on the line and remove waste; or mark, cut inside the line, remove waste and use a chisel with a guide to cut back to the line. However, I want to offer an alternative that gives greater assurance of fit and sharper edges:
1. Mark the first edge with a marking blade and reinforce it by placing a sharp chisel along this line and giving it a tap. Mark the opposite edge with pencil. Remove a shaving between these marks so that the edge at the initial mark is exposed.

2. Use a small square to press the rod (or rods) that will fit into this joint against the first edge. Remove the rod/s and mark the second edge. Use a pencil to mark the mid-point of the sides below the ends of these two edges.

3. Use a marking gauge set to half the thickness of the rods, to mark the bottom edges of the joint.

4. Extend the marks for the top edges, down the sides to the halfway point. Wherever possible, use the marking gauge and marking blade with bevel side to the waste side of the cut. Reinforce the marks for the top and side edges with a tap on a sharp chisel.
5. Take a small cut into each of these edges, to expose a clean edge.

6. Saw down these cuts to the mid-point as close to the edge as is comfortable.

7. Clear the waste down to the midpoint, cutting from both sides as you go—finer shavings are safer and lead to a better finish. A chisel guide set to half the thickness of the rods can help as you get close to the line.

8. Where the back half of the rod has already been removed for the other side of the joint, insert some waste into the back so that the chisel doesn’t splinter the middle of the joint.

9. Test-fit the joints as you go. Usually some adjustment to the cheeks left by the saw cuts will be required. However, there should be the flexibility to adjust for a firm fit without compromising the sharp edges.

10. It all comes together with the last piece and if it is firm, it will lock the rods together. It is quite likely though, that there will be some small obstructions as you try to insert the last piece. Consider alternatives for relieving these obstructions to make sure that you don’t open up gaps in the joints. If you’ve left the rods over-length (as I did) trim them to even lengths and shoot the ends.
Assembling the Puzzle

Iain Green studied traditional Japanese woodworking techniques in Japan with Shukokai, a group of woodworkers who meet regularly in Tokyo. Email Iain at: iainbgreen@gmail.com
* Rock oak supplied by The Timber Bloke