How-to: Machining basics
Words and photos: Raf Nathan
Machining rough sawn timber requires some understanding of how to handle the variations that timber will present. Internal stresses within the wood will always mean that there is some cupping across the face and bowing along the length.
Straight means truly straight, close enough is never going to be good enough—the better wood is machined or dressed, the better results you can expect when making furniture or doing other woodwork.
To machine or dress wood properly the wood needs to be passed over the jointer (or buzzer) first. This will straighten the board. The face is machined first, then one edge. After this the wood can be fed through the thicknesser to give parallel and evenly dimensioned wood.
It is best to keep flipping the board during the thicknessing process. This is to try and take off similar amounts of wood from each face in an attempt to keep the board balanced. The deeper you go into a board the more chance there is of the internal moisture content being different to the rough sawn surface. A balanced board is more likely to remain stable after machining
Using the jointer and thicknesser

1. Using the jointer—note the cutterguard is in place and the leading hand applies downward pressure whilst the rear hand pushes forward.

2. The leading hand applies downward and forward pressure. The pushstick applies pressure to the end of the board. If you slip only the pushstick can be damaged, not your fingers.

3. Feed the board into the thicknesser with your hands on top to avoid having them pinched between the machine table and the wood. Remain vigilant to also keep your hands from getting caught in the guards. As the machine grabs the wood release your grip. The machine will feed in the wood. You can then walk to the outfeed end and support the wood as it exits the machine.
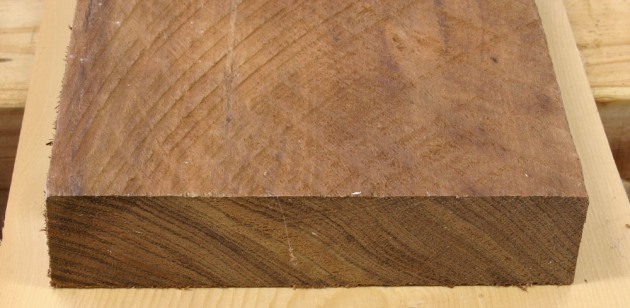
Before you start: check the grain
Checking the endgrain will help you determine which face should be planed first. The endgrain shown in the image up top is almost quartersawn resulting in the board showing no cupping across its width. Either face can be run over the jointer to begin the dressing process, unless the board is bowed along its length.
Steps with quartersawn endgrain

Steps with backsawn endgrain

Raf Nathan is a Brisbane based woodworker who has written many stories for Australian Wood Review.