How to carve a drinking mug
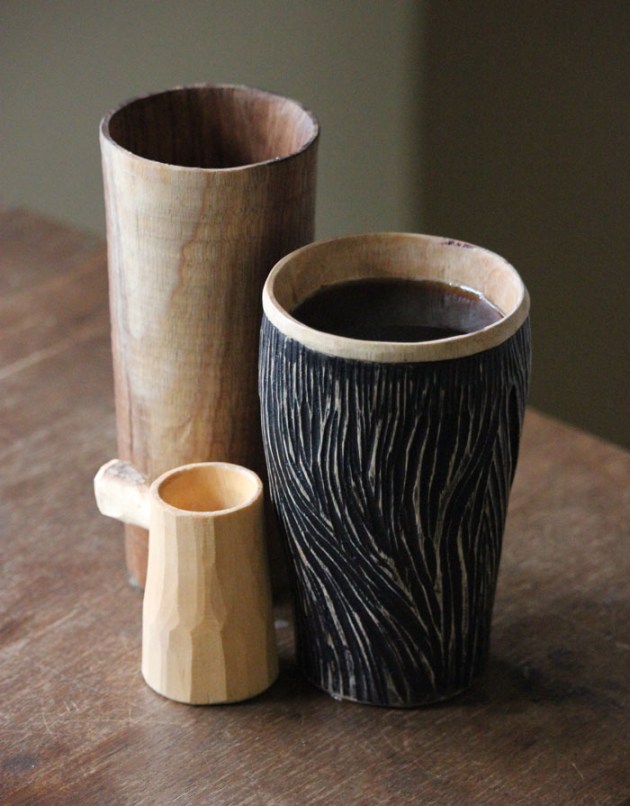
Above: Bloodwood mug with blackwood cup and box elder milk pourer, all made by the author.
Words: Jeff Donne
Photos: Robin Munn
Morning rituals are set in stone. Between us, we have many: some normal, some not, some we probably shouldn’t talk about in a woodworking magazine. But there is a ritual that most of us do, or need, to stoke the fires for a fresh new day. Coffee. Some have it black, or with milk, and others insist on a morning cuppa strong enough to wake Jimmy Possum from his grave.
This ritual often involves a favourite mug: a little chipped, a lot stained, and with words or a picture on the outside that makes you smile. It’s your mug, and nobody else is allowed, or wants, to use it.
Well now it’s time for a second favourite. A companion for the tried and trusted. Once carved and supplying you with your morning hit, this new mug will age with grace. It’ll stain to a fathomless black on the inside, develop a glorious grubbiness and patina from your hands, and it will always be warm, even when empty.
So drink up from that old china mug and set it aside to enjoy its well-earned rest. Let’s make a tree mug!

1. Hollowing with a hook knife.
To the garden we go
When you’re starting out making a mug from wood, by all rights you should slump into despair. Wood is peppered with holes! Any hope you have of drinking liquid ambrosia from these vessels should, in theory, dry up. To make things worse, endgrain mugs provide a superhighway from the inside of your mug to the puddle at your feet via a network of a gazillion pores running straight out the bottom. Right now, if that old china mug could smirk, it would.

2. Endgrain – full of pores and opportunity.
First, choose the right wood. Fruitwoods, like apple and cherry, or weeds like sycamore are great for endgrain cups, whereas weak-celled species with large pores, like Australian red cedar, aren’t so good. That said, if you’re already half way out the back door with a saw in your hand, and you’re eyeing up that eucalypt branch leaning over the greenhouse, you make do with what you can get. Sure it may crack, but it’ll be a blast to make and I’ll cover some tips on how to avoid empty mugs and coffee-stained socks in a page or two.

3. Sitting on my workhorse to hold it steady while I shape the outside.
In fact, I’m going to join you in your quest to eke out a fine-looking mug from a less-than-fine-looking log. I’m working here with a chunk of red bloodwood, Corymbia gummifera, a eucalypt (but not a eucalyptus; confusing I know) that’s not as tough as many in its tribe, but is nonetheless intimidating.

4. Sawing off the tongue.
The no-lathe mug
I’m starting with a round, green log that’s about 100mm in diameter when derobed of its bark. The first thing I’m going to do is saw my log to length. You want something that’s a little taller than your favourite china mug to accommodate a slightly thicker underside, and then you want to add an extra 100mm or so on the bottom to allow for a flattened ‘tongue’ you will use to clamp the mug in place while hollowing out.
With an axe, remove all the bark down to the sapwood. Bloodwood bark is very soft and the axe makes light work of this. The next step is to make the tongue for clamping.

5. Marking the bottom of the mug with a compass.
Measure about 100mm up from the narrowest end of the log, draw a line around the circumference and on this line, cut about a third of the way in from two opposing sides. Now place the log on its widest end, and with an axe and club, carefully chip off the wood from the two opposing sides to make a thick tongue with parallel sides. Clamp this end into a holding device.

6. Use a hook knife and start carving the rim of the drilled hole.
The long hollow
Now reach for an electric drill because we are going to kick-start the hollowing process. If you’re going for the true cordless approach, a t-bar auger will do the trick, but be warned of the devastating effect of a slow-turning wide auger on a small piece of endgrain. All it takes is for one little catch on a stubborn piece of grain and your mug-to-be will be hopelessly split.
6. Use a hook knife and start carving the rim of the drilled hole.
Before drilling, I mark the rim by drawing one circle inside another with a compass onto the endgrain. The use of a compass is useful here because it marks the centre of the cup and the exact place where I am going to drill.
A good quality 25mm spade bit deals adequately with drilling through endgrain. Depending on what’s lurking inside the log, drilling endgrain can be tough, so hold on and keep in mind to include the drill bit spur in any measurements you make.

7. Carve across the grain in semi circular arcs.

8. A modified Morakniv 164 with a long handle.
And now we hollow...and hollow. It takes a while, but it’s one of those tasks where you can build up a steady rhythm and natter with friends until a cup magically appears. Straight or hooked spoon carving knives will do this task well, but you will find a long-handled hook knife is by far the most efficient, powerful and satisfying tool to use.

9. I use another long-handled hook knife called a twca cam to smooth the inside a little.
I’ve made my own long-handled hook knife from a Morakniv 164. Just carefully split the existing handle off with an old axe, grab a dry and sturdy stick and drill a hole smaller than the tang and tap it in. Glue it in place if you want, but a friction fit will do, and then whittle the end of the stick down to accommodate the ferule. This quick and easy upgrade produces an aggressive hook knife that slices away big shavings thanks to the leverage of using both hands.

10. Another hollowing method with a shorter handled hook made by Pete Trott.
To hollow, you begin by clamping the tongue in place and moving the hook knife around the rim of the drilled hole. Here lies the beauty of an endgrain cup, because you will always be hollowing across the grain, regardless of whether you move the knife left or right. If this cup was being hollowed perpendicular to the endgrain, you would need to perform a few mind acrobatics taking into account the four directions of grain you would need to follow to prevent the fibres from tearing.

11. Using a pull cut to refine the shape. Keep your elbows in and hands connected for extra stability.
And so, after numerous cups of tea from that seemingly demure old mug that required no grunts and groans to muster, and literally going round in circles many, many times, you will finally have a hollowed interior.

12. Carving a lip.
A new ritual
The exterior is carved with an axe and knife, but before you start swinging the axe, it’s time to saw off the tongue, leaving a base that’s thick enough to accommodate the drill bit spur. The axe does most of the shaping, and this is where you need to carefully align the top with the bottom. A little bit of wonky is fine, but too much and you’ll end up with coffee on your lap.

13. Make the bottom parallel to the top by holding a pencil at the same height and rotating the mug.
Don’t worry about carving a mug handle; wood is a fantastic insulator of heat, so unless you’re prone to poking out your pinkie when sipping your cuppa, carve a vessel that you can hold and enjoy its tactile beauty.
Once axed out, do some minor shaping with a knife, being sure to constantly feel for spaces where it may be getting a little thin; busting through a wall at this stage may bring on tears!

14. Sawing the bottom of the mug to ensure it sits just right.
Now bevel the bottom and tweak the rim to your liking, and there’s your cup, your mug, your goblet or whatever you want to call it. From here you can decorate it if you want. I’ve added texture with a tiny Japanese gouge and stained the exterior with sumi ink, also from Japan.

15. Make the bottom wide enough to be stable.
Before you drink from it, you will need to seal all those pores loitering at the base. I seal the inside with raw linseed oil, and the outside and bottom with rubbed-back shellac and more linseed oil (I leave the shellac on the bottom untouched, to really seal those pores).

16. Use the knife tip to bevel the lip and bottom with a lever cut.
Shellac flakes are used to fill any gaps, like those left by knots, or any cracks that may appear as your cup dries. Place some flakes on baking paper and microwave for 20 second bursts until melted. Now quickly roll the melted goo in the baking paper to form a stick. It’ll go hard in a few seconds.

17. Not the knot. Push these though and fill with pure melted shellac.
Take the shellac stick and melt the end with a lit match and apply the melted shellac to the gap that needs filling. Sand it back and you’ll have a durable, food safe filler in place. Shellac does start melting between 80–100°C though, so if you have holes to fill, you may want to reassign your coffee mug to a wine mug to avoid untimely leaks.

19. Black sumi ink was applied and lightly sanded to reveal the wood underneath. Shellac was applied to the outside and rubbed back with steel wool before coating all surfaces with raw linseed oil.
Let the making of this cup become the beginning of a new ritual: one of making something every day, and of course, if you’re a milk and honey person, there’s an off- cut from the log down there, waiting to be made into a teaspoon and milk jug.
Jeff Donne is a storyteller in words and wood. His Spoonsmith woodcraft school has recently changed to a new publishing and making venture, Under the 20 Bloodwood Tree, where his adventures in writing and woodcraft live together in one little hand-carved home. See www.underthebloodwoodtree.com