Carving Netsuke

Above: Susan Wraight, Sunbaker, 1998, European boxwood stained, inlaid amber eyes
Words: Susan Wraight
Photos: Terence Bogue
Susan Wraight is an internationally renowned carver of netsuke, a traditional Japanese artform. Her exquisite miniature carvings have won awards and worldwide acclaim with the result that her work is held in numerous collections. This story is republished from Australian Wood Review, issue 20, September, 1998.
Why carve on a small scale?
There are many advantages to be enjoyed when making a living by carving wood on a small scale – as those colleagues of mine who make large sculptures or furniture often tell me as they struggle to shift unwieldy baulks of timber into cavernous workshops, or sign large cheques to transport dining tables safely to exhibitions. Forgive me if I sound smug, but that is not the half of it.

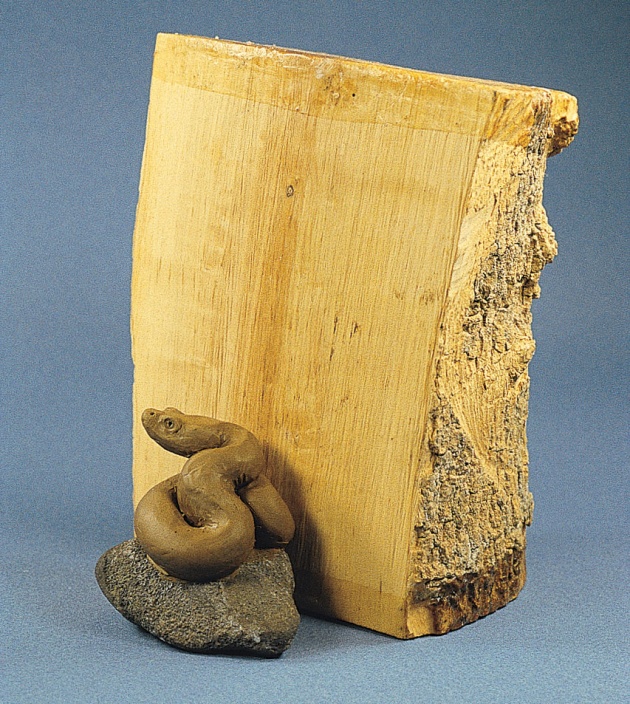
Susan Wraight, Spring: Frog on a taro leaf, 1998, boxwood, amber eyes
Imagine the low cost of timber; being able to put an entire exhibition into a small postpak box and sending it anywhere in the world for the cost of postage; being able to work whilst sitting on a beach leaning up against a palm tree if you choose to do so, and managing to squeeze a workshop into the smallest of spaces if necessary.
It is a flexible and comfortable way to work, but the best aspects for me are the contemplative nature of the process, and the reactions the carvings receive when people see them-especially when it's for the first time. Lord Chesterfield once wrote to his son: 'Have you learned to carve? For it is ridiculous not to carve well. A man who tells you gravely that he cannot carve, may as well tell you that he cannot blow his nose; it is both as necessary and as easy'.

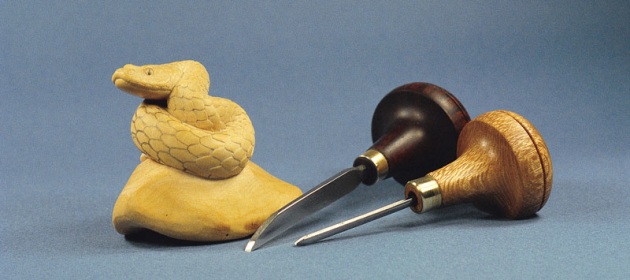
Commonly used tools for carving netsuke: three scrapers, four engravers and a block cutter
I have now been carving for decades, with almost as much enthusiasm as Lord Chesterfield, and over that time have often been asked to describe the techniques I use. Carving on a small scale can produce wonderfully intimate and engaging works, and I hope that this article will encourage more people to try it out for themselves.
Modelmaking
The first stage for me is to do some research into my chosen subject and begin to make some models in plasticine. This is helpful in a number of different ways. Firstly it helps me to think in 3D. The final model enables me to determine the composition of the piece and it is easier to predict any problems in advance.

Sawing out the block
Making a model also takes away the terror of picking up a block of wood and not knowing where to start, because it can be used as a pattern. I decide in which direction the grain will run through the carving, and hold the model up to the selected wood in the appropriate position. I draw around its profile and saw out the excess material. I repeat this for the front, side and top views of the piece. This leaves me with a rough block that already shows the approximate form of the model.

Roughing out
I use a motor tool to remove excess material. For the first six years of my professional carving life I was a hand tool purist and did everything by hand, but a bout of repetitive strain injury cured me of that. Whether using hand tools such as block cutting gouges, or a motor tool such as a Dremel or my own Electer, the principle is the same: the hard edges left after sawing the block are removed, and comparison with the model allows me to judge

Decorative Effects
Eye inlays: I usually inlay the eyes of animals I carve. The eyes are expressive, and animate the piece when inlaid with another material. My favourite inlays are buffalo horn when a dark eye is required and amber when something lighter is needed as was the case in Spring, shown above.
When inlaying eyes I first mark out the position carefully with pencil. I then carve or dril I one of the sockets to a depth of about 3mm. Inlay material is shaped into a tapered rod that can be filed to a tight fit in the socket. At this point I carve out the second socket, using the inlay as a templatethereby ensuring that both eyes are a similar size and shape. Inlay material is cut from the rod allowing plenty of excess above the eye surface, and glued into place. Once the glue has set, the eyes are carved to shape and polished.
Uki-bori: This is a Japanese technique, which results in a pattern of even, raised bumps across the surface of the work giving a rich texture and visual appearance. It is particularly effective for such things as a frog's warty skin, as on the back of the frog in Spring.
A piece of steel is shaped so that the tip corresponds to the desired profile of the raised texturing. The easiest and most effective is a small hemisphere, similar to the tip of a ballpoint pen. This tool is then pressed firmly and evenly across the area to be textured. Once this has been done, the surface is carefully pared down to the bottom of the many small depressions. The surface is once again smooth, although bruising may be visible. Warm water is then sluiced over the area, causing the compressed fibres to swell back to their original position-forming small, even bumps across the work. The Japanese carvers who used this technique to great effect in netsuke would also use it to sign their works.
Staining
After much experimentation over the years with various wood stains, drawing inks and some natural recipes that would make MacBeth's witches look askance, I have settled on fabric dyes as my favourite medium for colouring my carvings. They offer a marvellous range of colours, are reasonably resistant to fading, can be tinted subtly and are easy to use. I paint the dye on to a damp surface and, after drying well, rub back high spots to enhance detailing.
Finishing
At the moment I use either of two methods. For materials where I wish to bring out richness of colour I apply a light coating of almond oil, which I allow to dry thoroughly and then cover with a beeswax based polish.
On the advice of several other netsuke carvers I have recently been achieving very satisfactory results by applying neutral shoe polish to the surface of carvings and buffing it with a soft brush. Netsuke need to be handledthey are seen as much with the fingers as the eyes, and this latter method seems to make the surface more resistant to the adverse effects of handling.
It sounds easy, and up to a point it is – but I have been carving for many years (and am still learning). This article gives you the essentials, but leaves much detail for you to discover on your own. My intention has been to introduce you to carving on a small scale and to assure you that the joys of learning along the way are well worth picking up a tool and trying for yourself.
Q&A with Susan Wraight
AWR: How long does each piece take?
SW: Between 2 to 4 weeks full time, depending on the detail involved.
AWR: Do you use magnification?
SW: Since turning 40, yes I do. Depressing isn't it? I wear glasses that magnify x3 while I'm carving, and for checking really small detail I use a jeweller's loupe (x10). I don't work under it for long though – swimming in and out of the shallow depth of field makes me feel seasick.
AWR: What timbers do you use?
SW: Dense, close-grained and hard, with no pores and little, if any, figure. My favourite is European boxwood, but I am always trying new timbers and have used a wide range including such woods as holly, myrtle, sassafras, African blackwood, pink ivorywood and various fruit woods and acacias.