Bandsaw box basics: a first project
Words and photos: Neil Scobie
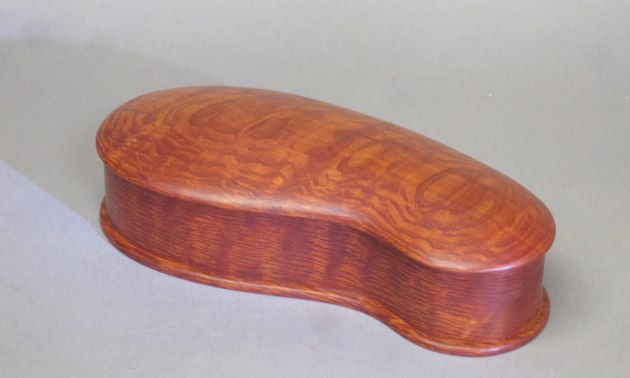
This is a basic project I taught in the 1980s when I was an industrial arts teacher in NSW. You can modify the shape, just be aware it’s harder to sand in tight curves. Choose a timber that is stable, cuts and sands well, and looks good. Red cedar, Qld maple, silky oak, Tasmanian myrtle or Huon pine would all be good choices. The box looks so much better if it’s made from a solid block so the grain matches all the way through.

Start by making a template
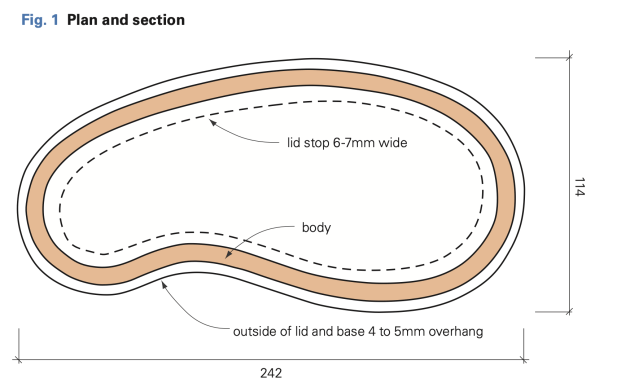
Trace the given shape using the diagram shown below or design your own; in either case make a template so you can make more if required. I drew the inside curve onto a piece of 10mm ply then cut it out with hole saws and a jigsaw. Once the inside shape is smooth, draw a parallel line around the outside 7mm away. Once you cut this out and sand it you have a template to start the project with. Remember to allow for the width of the saw cuts in your block of timber.
Step by Step

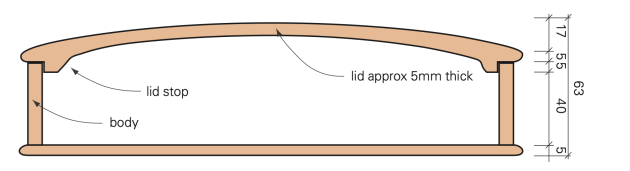
1. Square a block of wood so the wide face and the two adjacent edges are 90° to the face. Mark sections for the lid, body and base. A triangle was marked on the other side to show how the pieces go back together.

2. You will probably have to saw the lid and base sections off by cutting from the top and bottom. Set the sawblade to just over half the height of the widest part of the block and saw off the top from both sides. Go back to the jointer and re-flatten the top edge, then saw off the base. If you flatten one side before each cut then you will only need to thickness the second face.

3. Having thicknessed all four slices, assemble them as per the triangle. Before you cut the triangles off make sure you transfer the marking onto the new surface so you can keep the grain aligned. Now trace the template onto the top of the body slice and trace around it.

4. Using a hole saw of an appropriate size for each end, saw out the end curves, again working from both sides. Use a clean waste block under the cut to avoid chip-out.

5. Clamp the body in the vice and jigsaw out the centre waste between the two holes. Be careful not to overcut into the curves of the hole saw cut-outs.

6. Depending on the gadgets you own for sanding, clean up the inside surface. You do need to keep the edge vertical. There are a few ways to do this job. The drum sander shown is held in the drill press. It came in a kit of about five drums with spare sanding sleeves. Drill out a hole in the waste block under the drum so you can sand right down to the bottom edge. An oscillating drum sander is another good way to get the job done. You can work down through the grits with different grit sanding sleeves.

7. A home made drum sander with hot water insertion rubber tube fitted over a piece of plastic pipe also makes a good drum sander. Make sure you keep the timber 90° to the drum or to the base. Another method is a pump-up drum sander like the one shown in photo 19. As with the home made drum, you need to keep it square to the base. After sanding with any of these methods, hand sand the inside to 320 grit.

8. Using your finger on the inside curve as a gauge, draw a parallel line about 7mm from the inside edge. If your inside shape is the same as the template you could just trace the template.

9. Trace the inside shape of the body onto the underside of the lid for the lid stop. Use a sharp pencil so you have a fine line to work to. Next job is to bandsaw the outside of the body and the lid stop.

10. Using a linisher or similar, sand the lid stop back to the line, checking it fits firmly into the inside top of the body. By holding both pieces together and up to the light you will be able to see where sanding is needed. Next sand the outside of the body on the flatter part of the linisher or on a disc sander. Sand the concave curve on the narrow end of the linisher or use one of the above mentioned drums.

11. You now need to glue the lid stop to the underside of the lid. Use two small nails fitted halfway in to stop it sliding while you tighten the clamps. The white circles show where the nails are. These are pulled out after the glue is dried. Wipe the glue off with a damp cloth to save a lot of sanding afterwards.

12. Trace the base shape from the outside edge of the body by holding a pencil vertically against the body. This should give you about a 4mm overlap. Bandsaw the shape and sand back to the line.

13. Shape the top edge of the base using a 3mm radius round-over bit. You will have to hand sand the bottom edge as the bearing will run too far up the curve of the top.

14. Hand sand the upper surface of the base and apply glue to the bottom edge of the body. Clamp the base to the body and wipe off excess glue.

15. Mark a line to work to near the outer edge of the lid stop about 3mm in. Clamp the lid to bench, remove the two nails and hollow the underside. I used a Mini Arbortech with Mini Turbo disc fitted to work back to 2–3mm away from the line, leaving the top about 6mm thick in the centre. If you do not have a powercarving tool you can use handcarving gouges to achieve the same result, just a bit slower.

16. Use a power sanding pad in an electric drill to sand back to the line and get all the bumps out. I started with 120 grit and sanded up to 400 grit.

17. For rounding over the top, place the lid on the body and clamp one end onto the bench and use powercarving tools to round over the edges. Swap it end for end to round the other end.

18. Use a spokeshave to smooth and refine the shape.

19. The pump-up sander is an ideal choice for sanding the top. If a little bit of air is removed it will hug the curve much better. Finally, hand sand the whole box up to 600 grit. I used a pad of 0000 steel wool as the last sand to shine the dense sheoak before applying four coats of your favourite oil.
Neil Scobie was a hugely talented and much-loved woodworker who also wrote many articles and reviews for Australian Wood Review. His memory lives on in the furniture, boxes and art objects he created. Sadly, Neil passed away in 2016 – you can read a short remembrance here.