A Tray for Tea

Words and photos: Steven Der-Garabedian
It’s nice to be able to carry tea, coffee or cakes for your guests in a sweet little tray. This one even looks good sitting on a table waiting for those guests and is a great project to learn some new woodworking techniques. We’re going to veneer the base highlighting the beauty of wood. It’s not that difficult and doesn’t have to be complicated or expensive.
The joinery is on the smaller scale and easily accomplished using dovetails, half laps and even a pair of bridle joints. We’ll also curve the handle using bent lamination with an easily built form and then add a contrasting band. Lastly we’ll use some leather cord to create a wrap around the handle.
Start pressing
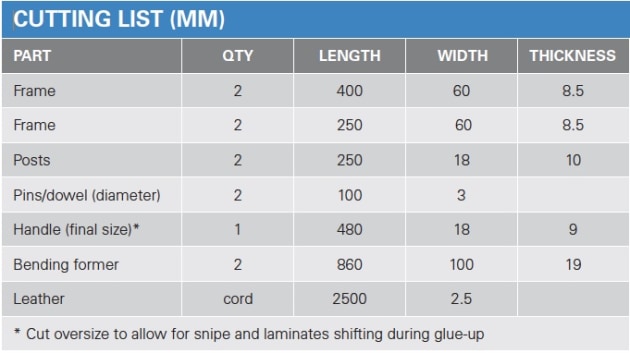
Select the combination of woods you want and machine the four pieces for the tray frame as shown in the cutting list below. Before we cut the joinery we’ll start to press our veneers so that it cures as we continue.
My favourite way of pressing veneers is to use an inexpensive vacuum press kit available from Roarockit. You’ll need to make a platen out of melamine, sized slightly smaller than the bag and 19mm thick. Make sure to round all sharp edges so as not to puncture the bag.
There are other ways to veneer such as hide glue and hammer veneering. This panel is small enough that you could also run with F-style clamps and cambered cauls. I sized the panel roughly 25mm longer and wider than final size. This will account for any shifts in veneer and trimming to exact size after the frame is built. While almost any adhesive will do the trick, glues made for veneers, such as Titebond’s Cold Press for Veneer, will work just that much better.
For the core I went with 6mm MDF and used it as my template to cut the two pieces of veneer. While I consider myself a rebel, there are two rules for veneering that should never be broken. The first is that you need to veneer both sides. The second is that you need to press the veneer perpendicular to the core’s grain direction. As MDF has no grain to speak of, this second rule doesn’t come into play.

1. When pressing the veneer to the base cut the cauls oversize, sand edges and cover their inside faces with packing tape.
Cover your bench with some newsprint and gather your veneers, glue, and substrate as well as a couple of cauls. Size the cauls about 6mm longer and wider than the panel and veneers. Knock off any sharp edges and corners with 120 grit sandpaper. Also cover the inside faces of the cauls with packing tape so they don’t stick (photo 1).
Apply glue to the core, cover it with veneer, then a caul, and repeat for the other side. Add a piece of blue masking tape along each of the four edges to keep the bundle together while slipping it in the bag.

2. Blue tape holds the bundle together while the bag is sealed.
Seal the bag’s open end and pump out the air (photo 2). I leave my pressings in the bag for at least four or five hours but longer does not hurt. When the pressing comes out let it sit for another 24 hours so it fully cures. Stand the panel up and let air get to all surfaces rather than laying it flat.
Pins or tails first?

3. While the veneer is pressing you can start on the joinery.
For the joinery on the frame (photo 3), I chose to go with a single dovetail with the tails on the longer pair of pieces (photo 4). Get ten woodworkers in a room and ask them about cutting dovetails with either pins first or tails first. You’ll get a healthy debate with half saying one way and half saying the other. Ask the same group about sharpening and it turns into a fist fight. At this time we can also cut the pieces for the posts and the handle. Leave these oversize for now in case they warp or twist.

4. The author chose a single dovetail but variations can be made.
When the panel has fully cured use a random orbit sander connected to a vacuum with 150 grit sandpaper and clean up any scratches or residual glue. As we have only so much veneer to work with don’t stay in one spot but rather keep the sander moving. We can tackle any remaining spots and nicks with hand sanding after sizing the panel and before gluing it into the frame. This initial sanding brings us very close to our final thickness. We can now cut the groove in the bottom of the frame.
Some planning required
Start with the groove 14mm from the bottom to allow a bit of space when we create relief cuts. There are many ways to cut this groove but here I’m using a box-slotting bit (photo 5).

5. Using a box-slotting bit on the router table to run a groove for the tray base.
You dry assemble and clamp your frame and run the bit around the inside. Depth is controlled by the bearings that come with the bit. With a narrower bit, I ran my frame around several times increasing the height gradually until the panel just fitted. Remember, we still have some hand sanding to do.

6. The corners of the groove can be squared off, or instead the corners of the base rounded.
The box-slotting bit leaves rounded corners and these can be squared off, or the panel corners can be rounded. I prefer the latter and use an offset marking wheel to draw the curve then use a chisel and a file to make it smooth. Using a flat washer of appropriate size will work just as well (photo 6).
A bit of relief
Reliefs are cut into the top and bottom edges. The ones on the top edges give a lighter look, while the bottom ones create feet in the corners which give less chance of a wobbly piece than with long flat edges.

7. These reliefs on the frame can be cut on the router table or choose another method.
The reliefs are easily cut on the router table with a rebating bit. I set up stops leaving 35mm from each end of the long bottom edges and 25mm on the short ones (photo 7). To make sure these are centred, flip the piece end for end and cut once more with the same stops. The top reliefs are slightly shorter at 80mm from each end of the long pieces and 60mm for the short ones. Remember to adjust the stops for the long and short pieces accordingly. Set the fence for a 7mm deep cut.
A smooth curve
Curves can be achieved in several ways, from steambending to cutting the actual curve out of solid wood. Bent laminations also work really well and the layers of glue add strength. For the bending former required, start with a piece of 19mm thick MDF that is 860mm long and 76mm wide.

8. Using a piece of moulding to draw the curve for the handle former.
Tack a couple of nails in each end 6mm in and 30mm up from the edges. Using a flexible piece of moulding or another thin and defect free piece of wood, push up on the centre line by 70mm and draw this curve (photo 8).
Bandsaw this shape leaving the pencil line, then sand to remove the line leaving a smooth curve. To see if you have a smooth curve roll it on your bench and any humps or dips will quickly become obvious.

9. Mark the handle stock with a cabinetmaker’s triangle before bandsawing laminations for the handle.
Cover the finished curve with packing tape then use a few screws and fasten it to another piece of MDF that is the same length but 100mm wide. Take the piece of wood that you’ve set aside for the handle and mark it with a cabinetmaker’s triangle. Bandsaw off a 4.5mm lamination and set it aside (photo 9). Run the remaining piece through the thickness planer and repeat the process until you get five laminations. Now run these through the thickness planer for a final thickness of about 3mm.

10. Showing the completed former and veneer chosen for contrast in the handle.
To create a contrasting band use either some dark veneer or cut an extra lamination and stain it black. I ended up using five thin pieces of dyed veneer (photo 10). To help with clamping cut some 3mm MDF to same the width as your handle pieces. Wrap one in packing tape and make sure it rests against your laminations.

11. If using veneer for the handle contrast, it helps to tape the ends down during glue-up.
Gather your clamps, glue and laminates. I prefer to use white glue for bent laminations as it won’t leave a visible glue line. Cover your bench, and if you went with veneer for the contrasting band like I did, tape the ends down so they are manageable, especially when covered with glue (photo 11).

12. Glued and assembled, the laminations and veneer are clamped and left to dry overnight.
Glue up the assembly with three laminations, the dark band, and finally two more pieces. Let this sandwich cure overnight (photo 12).
Almost there
Cut the two posts to final size and once more use the cabinetmaker’s triangle to keep track of top, bottom, inside and outside surfaces. Cut a half lap on the bottom inside of both pieces with your preferred method. I used a crosscut sled on the tablesaw with a stop. This half lap is the full width of the posts, 40mm long and 5mm deep.

13. When dry, run a flat edge on the jointer then trim it on the bandsaw.
Once the glue has fully cured on the bent handle, remove it from the former and clean it up. Run one flat edge on the jointer, then trim it on the bandsaw (photo 13). Run this through the thickness planer until you get roughly 9mm thick. Use a scraper and/or sandpaper to clean up the handle.

14. Filing the inside face of the handle slot lower to accommodate the curve.
The posts have a slot for the handle to drop into, a version of the bridle joint. A dedicated tenon cutting jig works well for this but once again use a method that you are comfortable with and have the tools for. Slowly creep up on the final width using the handle as the actual gauge. Cut the depth to just over three quarters of the handle’s roughly 18mm thickness.
One last detail is to make the inside face of this slot lower to accommodate the curve of the handle. This is quickly accomplished with a small file (photo 14). To test this fit, place the posts in position and drop the handle into the slot centring it along the tray.
Tiny little details

15. Mark the tops of the posts to the same angle as the handle before trimming.
To match the dark band in the handle create some ebony dowels or stain some micro dowels black. As a further refinement we can cut the tops of the posts to the same slope as the handle (photo 15) and instead of just chopping the handle ends off square, cut them back on an angle with a bit of an overhang.
Some assembly required

16. After a dry fit you’re ready to glue up the frame.
Complete a dry fit of all the pieces and also get rid of any scratches with some sanding and handplaning especially on the inside surfaces of the frame. Glue up the frame and panel assembly (photo 16). Once the glue has set, use a drawer board to plane the outside of the frame (photo 17). Sandpaper wrapped around a dowel will clean off any burn marks left by the router.

17. Use a drawer board to plane the outside of the frame.
Using masking tape, mark the positions of the posts on the sides of the frame and drill a pair of 3mm stopped holes through them and into the sides (photo 18). Apply glue and drive the dowels home using a clamp to seat them fully.

18. Mark the position of the posts and drill stopped holes for the dowel.
Centre the handle in the posts and mark the position with a wrap of blue masking tape. Apply glue and seat the handle in its place. Next, clamp a sacrificial piece of wood on the far side of the posts and drill for the 3mm dowel keeping the drill level and straight (photo 19). Apply glue to the pin and drive it through removing the sacrificial piece before the glue sets.

19. Drilling holes for the dowel in the top of the posts.
Final touches

20. The tray was finished in oil and wax.
Let the glue cure completely then flush up the pins using a saw and a chisel or block plane. Any scratches that happened during the assembly can be cleaned off with some fine sandpaper. I opted for two coats of an oil finish and later buffed with a fine furniture wax (photo 20).

21. Wax the leather cord and wrap tightly. Make a loop underneath the last three wraps, insert the end into the loop and pull firmly underneath.
One final detail is to add a leather cord wrap around the centre of the handle. If you’re into fishing this is an easy job. Start by waxing the leather then run the cord underneath the handle longer than is required. Start tight wraps around the handle until you are about three wraps away from the desired end. Make a loop of the cord underneath the handle and complete the remaining three wraps. Insert the end into the loop and pull it firmly underneath before finally trimming the excess (photo 21).
I hope this project got you trying new techniques or bringing old ones out of the cupboard. There are many different ways of accomplishing the tasks covered in the making of this tray. While I chose dovetails, mitred corners with splines would work too. Instead of bending the handle, a straight one will suffice. Instead of veneering the panel, a thin solid piece of wood will do. However, small details are what make our projects personal and take them beyond ordinary. By the way, the correct method is to cut pins first...on through dovetails anyway!
Steven Der-Garabedian is a fine furniture maker and teacher in Ontario, Canada. Learn more at www.blackwalnutstudio.ca