A swing-away seat for your workbench
Words and photos: David Chapman
Why sit at the workbench? Not laziness in my case, but severe spinal degeneration which prohibits me from standing for long caused me to try a stool on castors, but its significant nuisance value when not in use sent it to the council kerbside clean-up. Something which was at hand when needed, but disappeared when not, stimulated the idea of a swing-away seat attached to the workbench, which is a jarrah (Euc. marginata) bench from Workbench World in WA, and therefore immensely strong.
The concept was for the seat to rest on a frame which would be fixed to a vertical axle free to rotate in bearings attached to the front of the workbench. Materials on hand were checked for potentially useful items: I had a steel rod 450 x 22mm (axle), a Sydney blue gum (E. saligna) offcut 920 x 35 x 145mm from which the frame could be fashioned, and a piece of Murray River redgum (E. Camaldulensis) salvaged from an old fence post, which, being very dense and strong, was ideal material for the bearings and the jaws which would grip the axle. Concept plus available materials led to the design as shown below.

Above: The frame ready for the seat to be fixed. Lateral support member is of blackbutt (E. Pilularis)
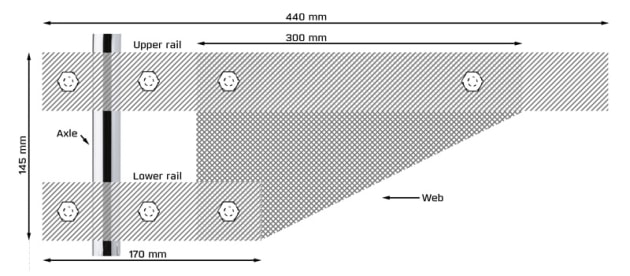
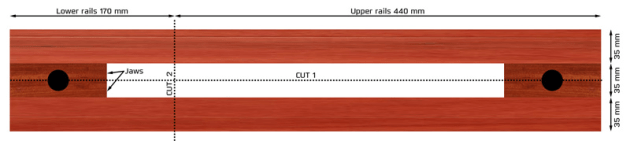
The design called for a pair each of upper (long) and lower (short) rails, fitted with jaws to grip the axle, which would be integrated with a web of the same material as the rails.
Showing the assembly for upper and lower frame rails with jaws.
The jaws were glued between the rails, and the assembly was drilled for the axle and assembly bolts before cutting as shown in the diagram above. The web was drilled accordingly. A patch of 120 grit abrasive paper was glued inside each jaw to maximise grip.

Upper bearing
Bearings were fashioned from river redgum and drilled at right angles to the grain. The upper bearing was fixed inside the bench apron, and the lower to a riser (see below) which has two functions: to locate the axle optimally in relation to the bearings, and to transfer much of the weight of the sitter to the floor.

Lower bearing glued and screwed to riser
Precise vertical orientation of the axle in the plane orthogonal to the bench face was achieved with very careful measurement and cutting, but in the other plane a magnetic angle finder was used for fine tuning, as shown below.
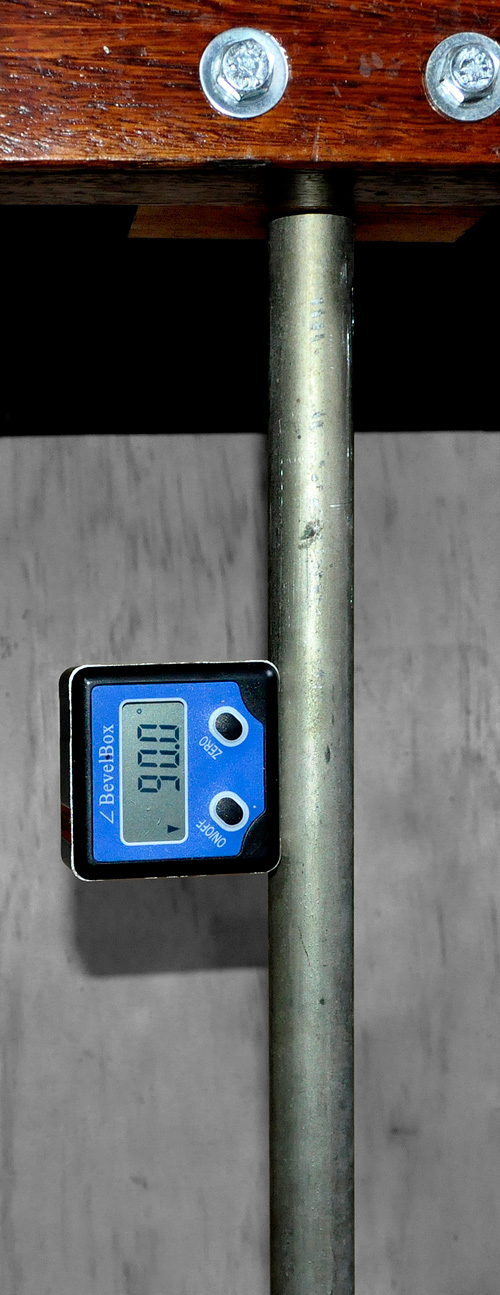
Aligning the axle
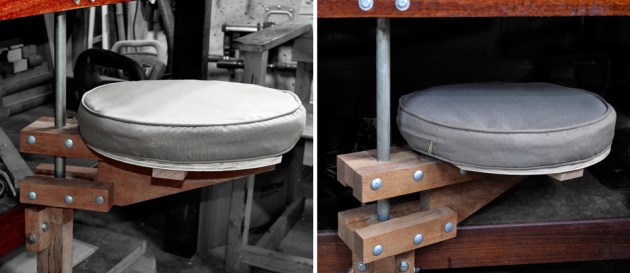
Both bearings were given a liberal smear of grease before assembly, and the lower end of the axle, which rotates against the endgrain of the riser, was smoothed and polished. An offcut of 12mm ply was cut to support the cushion.
David Chapman is a retired geoscientist who counts woodwork, creative photography, and serious reading amongst his interests. Email him at: ddc@fc7.com