Review: Make your own guitar kits

Completed kits, left to right: Pit Bull PRS-1, ST and SRK-30 bass
Words and photos: Raf Nathan
Make your own guitar? What a great idea for the woodworker who plays or knows someone who plays guitar. But instrument making is complex, requiring more than furniture and cabinetmaking skills. A kit could be a good starting point I thought, with pre-machined parts and hardware supplied.
Sourcing a kit
Having seen electric guitar kits on the web I searched locally and found a number of businesses importing and selling a variety of kits at varying prices*. You can buy from overseas but freight costs add to the price considerably.
Above: Checking for intonation on the SRK bass guitar.
Eventually three kits from different importers arrived at my workshop. A PRS from Pit Bull Guitars, an ST from Guitaraust and an SRK bass from DIYguitar.au. Eventually I found out all were made in China. Each importer sells a wide range of kits. In fact to me it seemed that DIY and Pitbull may have had kits from the same factory. The kits from Guitaraust seemed to be from a different source.
All came with fully shaped bodies and completed necks. The tasks needed were to polish the body and neck, fit the neck and then install the rest of the hardware, this being bridges, pick-ups, controls and machine heads. Sounds straightforward — maybe my woodworking skills weren’t needed.
What’s in the box?
Basically a kit will comprise a pre-shaped body and a neck with pre-fitted frets. The neck needs to be machined very accurately and made from very stable wood. All three kits had necks made from hard maple with rosewood fingerboards. The nut is a plastic inset on top of which the strings sit at the head end of the neck. The nut raises the strings up from the fingerboard. The bridge screws onto the body and raises the strings up at the other end. Behind the bridge there can also be another fitting where the strings are secured.
The necks in all kits were all pre-fitted to a routed out cavity. Necks can be glued or screwed in place. The Pit Bull neck is glued in whilst the SRK bass and the ST were screw-ons (sometimes called bolt-ons). Despite the kits being ready to assemble, there were still a number of things to do. Some pre-drilled holes, for example, needed enlarging or re-drilling in the correct position. But hey, we are woodworkers, so this should present no problems.
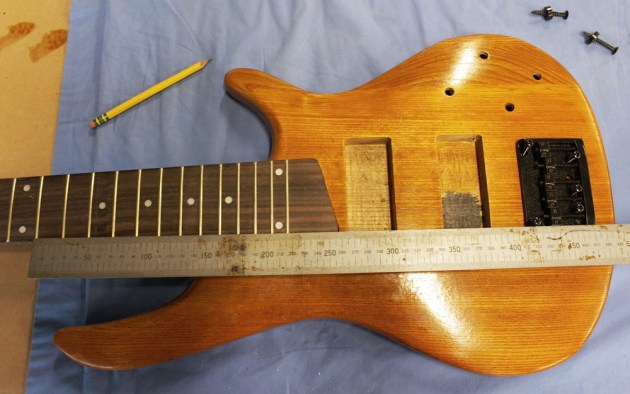
Intonation is setting the distance from the nut to the 12th fret and then from the 12th fret to the bridge. Apparently this measurement needs to be the same so the guitar is always in tune no matter which frets you are playing. You can compensate for this as there is a certain amount of adjustment available on the bridge. Usually small screws allow a few millimetres of movement forward or backwards for this. In my opinion the bass and ST guitars were close to perfect for intonation measurements but the PRS was quite a way out and I did carve away part of the body to allow the neck to be moved further in, without this the intonation would have been ‘out’.
Soldering skills are required at various levels of difficulty. The ST comes pretty well completely pre-wired. As a woodworker I looked at the bags of electronics supplied for the SRK bass with dismay. This element of the build was handed over to my son Ari Nathan to complete, as he is an electrical designer by profession and has practical skills in this area.
Pit Bull PRS-1

The PRS-1 design is inspired by a Paul Reed Smith Custom 22. American made Paul Reed Smith guitars feature superbly figured woods and have amazing polishing jobs. No instructions are supplied but Pit Bull has an excellent website with a forum section that will answer all your questions.

The guitar has a basswood body with a fiddleback maple veneer top. The basswood is very soft and the maple veneer was very thin. Unfortunately there was some glue seepage through the veneer at the edge in quite a few places. I thought deeply about how to handle these glue spots as sanding them out would mean removing the veneer.
The shape of this guitar is sculpted as it approaches the edge. The veneer was even thinner on the high points presumably from the factory sanding process. For me this meant the fiddleback tended to ‘fade out’ in those places. The routing was competently done, although there was some tear-out where the operator had presumably hand-drilled some of the holes for wiring. All the wood was unfinished but quite well pre-sanded.

The head of the neck is cut extra long to allow you to custom shape it. I went for a curved cut-in. The bulk of the waste was bandsawn away and the detail chiselled in. The maple neck has a rosewood fingerboard into which are inlaid small plastic swirl shapes which look great. I shellacked the maple neck and oiled the fingerboard.
The glue seepage meant there were white smudge marks and sanding failed to eliminate the glue. No instructions meant searching the Pit Bull website. There is a forum thread on the glue problem so it seems to be quite common. The best suggestion was to get a small wire brush and ‘tooth’ the glue to accept stain. I drove down to the hardware store to get a wire brush and tried this. Not impressed — it creates a solution but doesn’t look look good. Moving on and hoping for a brilliant idea to remedy the problem I decided to apply a ‘golden oak’ spirit stain. Not fully happy with the result I applied an oil stain a day later and then later a water-based shellac. Despite my care I wasn’t happy with the result and opted for a sprayed black gloss paint finish.
Initially I had trouble aligning the neck and attaining the correct measurements from the 12th fret. By chiselling out the neck cavity and setting everything up to my own standard a good reading was attained. Having said that it was later on difficult to get a consistent tune in all positions. With the body finally polished and the neck glued in place the electronics and mechanicals were completed.
Though there were elements of this guitar that were initially disappointing, this is a good guitar. The action is the best, making it the most playable guitar of the three. We were able to set up the action without any strings buzzing and it has a good sound. Kit supplied from www.pitbullguitars.com
SRK-30

The SRK-30 kit is for a five string bass guitar inspired by an Ibanez SR405. Ibanez are a Japanese guitar building company. The kit arrived very well packed and all components radiated quality. The body is made from North American ‘swamp ash’. The body was very well presented, all routing was neat and clean and minimal sanding was needed to prepare the wood. It has a screw-on neck with all pilot holes pre-drilled.

The holes in the neck base were not large enough for screw clearance so I drilled these out. I set the bridge in place with a few screws and checked the neck position in relation to the bridge. It was almost perfect. I wanted to move the neck closer to the bridge by about 3mm but with the pilot holes pre-drilled adjusting the position was near impossible. However there is adjustment on the bridge to take up some movement. Satisfied that it would all go together I fine sanded the neck and body and applied two coats of stain to the body and one coat to the neck.
Five coats of water-based Marcus Art shellac were next applied to the body, sanding between each. As the ash is quite open-grained the shellac was applied quite thickly to create build. Finally Gilly Stephenson wax was applied with fine steel wool then vigorously buffed.

The neck received two coats of shellac and wax. Fitting the neck was straightforward with the machine heads dropping into place later. I fitted the bridge securely and then handed the guitar over to my electronics whizz. Whilst all the electronics went together well for some reason there was no included toggle switch to change between the two pick-ups. You need to use the individual volume switches to do this.
Unfortunately the back cover plate did not cover the recess for the electronics, so I had to custom make one to fit which seemed a bit odd.
The action is pretty standard for a bass guitar so it is a bit high. The bridge adjustment needed to be raised as high as possible to get minimal string buzz plus there was a slight kink in the neck. Fitting better strings than those supplied will help the playability. Overall this is a good bass guitar. The SRK-30 was supplied by DIYguitar.au (however this site appears to now be closed).
ST

The ST kit is an unashamed copy of the legendary American Fender Stratocaster. Without doubt this is a classic of modern design dating from approximately 1950.
This was the best kit of the three. The grain matching of the ash for the body was good and the routing and overall presentation was excellent. The body came fine sanded with a light sealer coat. All holes were pre-drilled and all parts pretty well fell into place. The downside of this though is that apart from the polishing of the neck and body there is little else to do. Instructions were included although there are no work in progress pictures so some sorting out is required.

For the body I first sanded back the factory sealing coat then applied a jarrah coloured spirit stain. Leaving this overnight another stain coat was then applied. I used Livos Countertop oil for the polish. Six coats were rubbed in over a period of a week.
The soldering is all complete to the point where the pickguard has the controls already mounted. Despite this there were a few things omitted or wrong. Theoretically you don’t need soldering skills, however a grounding wire to the tremolo mount needed soldering in place. The lead from the input jack to the main circuit had a female connector and the connecting wires to the main circuit also had a female connector. They would not join so a new connection was needed, not a major problem though.

With the neck screwed in place as per the instructions I then went to fit the pickguard. It fouled however so the neck had to be removed again, the pickguard re-positioned and then the neck re-fitted. Be careful of instructions is the advice here I guess.
The intonation was good but to set the action the bridge adjustment needed to be raised high as possible to get rid of string buzz. Even then there was some high E-string buzzing.
Apparently because of the type of pick-up used shielding is required. This is a copper tape that is fitted into the pick-up cavities. This was purchased as an extra. The kit came supplied with good quality strings and offered a nice clear bright sound. It is enjoyable to play. Kit supplied from www.guitaraust.com.au
* Republished from AWR#82, March 2014. Kit models and availability will likely have changed since time of writing.
Raf Nathan is a tool and furniture designer maker who lives near Brisbane. See www.interwoodshop.com.au See also his recent video review of Bosch GKS cordless circular saws.