Co-Matic AF19 Power Feeder...and the real value of machinery
Words and photos: Darren Oates
In the space of fifteen months I have had three shoulder operations. This unfortunately is the side effect of my style of making. Just about all of my furniture has a curved laminated element to it which has me pushing wood through my bandsaw just about every other day.
I have calculated that over the past ten years I have pushed approximately 15–20km of timber through my trusty Hafco bandsaw. For me to carry on designing and making fine furniture I had to remove this element, so that was when I decided to research bandsaw feeders.
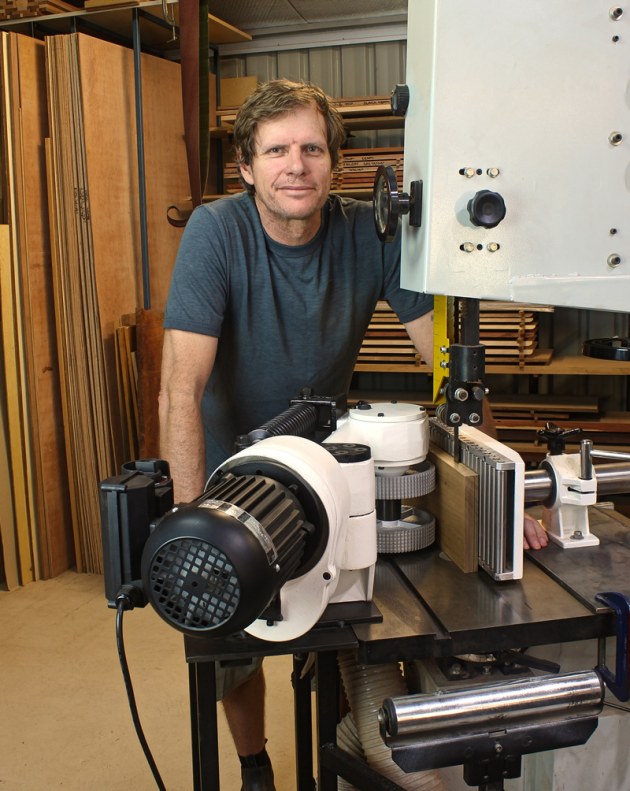
The only one I could find that suited my purpose and my budget was the Taiwanese made Co-Matic AF19. The unit had to be ordered in and arrived after eight weeks, packed in a well built plywood box which took some time to unpack as it was all nailed together. As with all machines purchased new, this one did not come with a power plug – you have to get this fitted to the supplied cable.
I ordered the three phase unit however the single was supplied. (The suppliers were apologetic and organised for the three phase to be shipped.) Both versions are rated at 1/2hp. It’s a 10 speed unit ranging from 1–15 metres per minute selected via a two speed power switch and through the five speed pulley-driven unit.
No assembly is required, only the mounting of it to your bandsaw. Normally this would be quick and easy: drill two holes into the bandsaw table for the roller fence and then four more for the feeder unit.
Set up in this way your bandsaw virtually becomes a resaw and due to the location of the feeder, normal operations cannot be carried out. I only have the one large bandsaw and even if I had the money would not have the space to set up a second one. So instead I made a portable jig that would allow me to easily connect and disconnect the feeder unit.
This took some pretty serious design work which I did while awaiting delivery so it could be hooked up
as soon as it arrived. I mounted the roller fence onto an 8mm plate that could be clamped to the table as shown above. This also allowed me to compensate for blade drift when fitting new bandsaw blades.
The feeder jig is moveable on four lockable castor wheels and locks to the bandsaw table with two vice grip pliers. It takes less than a minute to connect or disconnect the jig to my machine so very fast to go from bandsawing to resawing. The feeder comes with full size templates to work out where on your bandsaw the feeder and roller fence need to be mounted.

Photo 1 As you can see, I fitted infeed and outfeed rollers to the jig to assist with resawing. When the feeder unit is fitted the correct distance from the blade, the swivel mounting point half hangs over the edge of the bandsaw table. This was not a problem for me but your make of bandsaw may require you to fit a bracket onto the edge of your table to mount the feeder swivel base to.

Photo 2 shows the roller fence. This is a heavy duty outfit with 19 rollers with what I assume are bronze or similar replaceable bushings. This would normally be mounted with minimal space underneath the fence but mounting the unit to an 8mm plate has left the gap shown which to date has caused no issues.

Photo 3 shows the back of the roller fence and if you look closely you will see the ruler inscribed in centimetres adjacent to the notched extension column. This also shows the locking and extension handles for moving the fence in or out.

Photo 4 shows the five speed pulley housing. The wider green flat belt drives the lower set of pullies and the narrow V-belt is changed to suit the final speed required. On the side of the housing is a locking bolt which is loosened and a hex bolt which raises the lower pullies so the belt can be moved left or right.
On the housing door are shown belt positions that correspond to feed speeds. The lower pullies are then lowered and locked in place. This operation should be performed with the machine isolated from the mains supply.

Photo 5 The only maintenance points on this machine are an oil inlet port for the gearbox and a grease nipple for the swivel point. (Both grease and oil were supplied with the machine.) This image also shows the adjustable compression spring. There is a nut on the shaft which will compress or decompress the spring to adjust the pressure applied to the wood to push it against the roller fence depending on the width of the timber.

Photo 6 shows the serrated drive wheels. The machine was supplied with a cast fence that was mounted in front of the wheels. Mine broke off within the first five minutes of using the feeder. Having said that I believe this cover is totally unnecessary
and thought the machine was better without it. If you were that concerned that you may somehow put your fingers between the wheels and the timber that you were cutting, and had the same problem I did with the factory original, it would not take much to make one out of plate steel and mount it in place of the original.
Once the feeder was attached to my bandsaw it was a case of working out what speed to set. I started at the slowest setting and worked up until I found a comfortable cutting feed rate. This turned out to be a lot faster than I thought it would be. It took a bit of time to figure out how much to adjust the pressure spring on the swing arm so there would be no slippage from the serrated wheels on the timber, but this got easier the more I used it.
The maximum recommended width of timber the feeder can handle is 210mm between the feeder rollers and the bandsaw blade and 200mm between the roller fence and blade for a total of 410mm, but the way I have mounted the roller fence this could be extended for wider boards. The recommended minimum distance between the roller fence and the blade is 3mm but I have successfully cut 2mm laminations on this with no problems so I think that recommendation is a bit conservative.
One issue I had with the machine is having to adjust the compression spring after several passes as the board was getting thinner. Co-Matic make a pneumatic version of this machine which would alleviate this issue, but of course at a cost. I use this machine a couple of times a week and while it would be nice to have the upgrade it doesn’t bother me enough to warrant the cost.
Another issue with the compression spring arises when resawing wider boards into thin laminations. Once the wider timber has passed, the spring does come off the two spring guides at either end of it. An easy fix to this was to turn a cylinder of wood with an inner diameter slightly larger than the spring adjust rod and an outer diameter slightly smaller than the inside of the compression spring.
I then undid the spring adjust rod and slid this tube over it inside the spring, and this now keeps the spring in place. I had one occasion where I was resawing for about two hours constant with 50mm thick eucalypt boards. The single phase motor was getting rather hot to the touch and I will be interested to see how the three phase motor compares when it arrives.
The only disappointment I have with this machine is that I didn’t buy it five years ago, as it may have saved me from the physical and financial cost of three shoulder operations and recovery downtime, but as per usual you don’t learn the real value of things until it is too late.
For the ease at which it does its job I highly recommend fitting one of these machines to your bandsaw if your needs also require it.
First published in Australian Wood Review issue 95.
Bandsaw feeder supplied by Leda Machinery, www.ledamachinery.com.au