Wood Movement 101
Words and photos: Charles Mak
Diagrams: Graham Sands
If you work with manufactured boards only, such as plywood or MDF, wood movement is probably not a concern for you in building furniture that lasts. Solid wood will however move forever and one must find ways to cope with this.

1. Wood contraction caused the splits seen on both sides of the bottom of this holder.
Ignore wood movement and sooner or later you will find yourself struggling with the unavoidable: gaps, a stuck drawer, exposed unfinished wood or worse – a crack or split (photo 1). Here’s what you need to know: why and how wood moves, and how to handle some common movement challenges with a few tools and techniques.
Why wood moves
Wood swells and shrinks with changes in humidity because the wood cells exchange moisture with the surrounding environment. Humid air will cause the wood to expand as the cells absorb moisture; whereas during dry seasons the cells release moisture into the air, causing the wood to contract in size. With this knowledge, you can predict how wood parts will behave when the season changes. For example, if you cut a solid cabinet door in a dry environment, you can expect the door to become larger when the wet days arrive and vice versa.
How wood moves
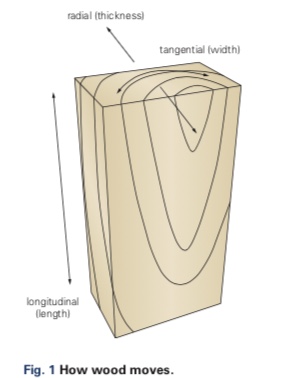
To cope with any movement, we have to pinpoint where the wood will expand or contract. Luckily, wood does not move randomly but in a predictable manner. Wood moves mainly across the grain/along the growth rings (tangential shrinkage), about twice as much as along the radial rays (radial shrinkage) as shown in fig.1. Wider and thicker boards therefore move more than narrow and thin ones. In practice, we can safely ignore the negligible movement along the length (longitudinal shrinkage) and along the thickness in material that is less than 35mm thick.
Species and sections matter
Different species and sawn sections move in different amounts. Mahogany and black walnut, for example, alter little in their dimensions with humidity change as opposed to say, beech and red oak. In addition, the amount of movement also varies between backsawn and quartersawn timbers. Quartersawn timbers move only half as much as backsawn in width, while backsawn wood moves less in thickness.
Estimating movement
Most furniture makers make allowance for wood movement by fitting the stock wider or narrower, usually within the range of 1.5–6.5mm for small to medium size projects. However, we can find out the amounts of movements accurately if seasonal wood movement is a big concern.

2. This guide takes the guesswork out of finding the dimensional change in timbers. Unfortunately there are no Australian species on this Lee Valley chart.
My timber kit consists of a moisture meter and a wood movement chart – at a cost of under $40 – and I use it to calculate the dimensional change where needed (photo 2).

3. Push the pin probes about 5mm into the wood edge or surface, but not into endgrain.
You can also invest just in a moisture meter and use any online shrinkage calculator such as the one from Eco Wood Design* to find out the desired allowance (photo 3).
Dealing with movement
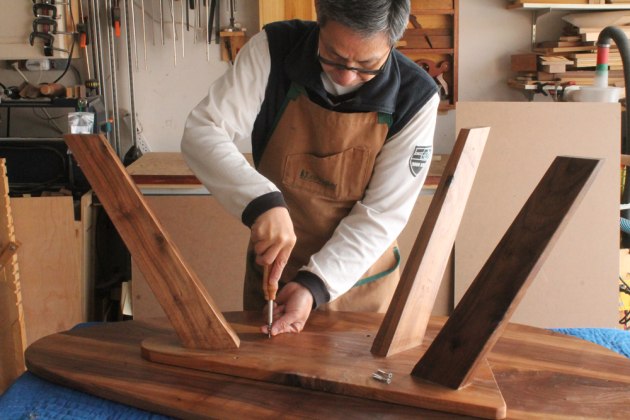
Managing wood movement should not be an after-thought. I start a project with wood movement in mind when choosing species and sawn sections, and solid wood vs man-made board. Here are some coping techniques that have served me well over the years.
Be prepared
I keep newly acquired timber in my workshop or house for several weeks or a couple months to acclimate to the environment before use.

4. Using short lengths of wood to sticker boards allows air movement for even drying.
To reduce big swings in moisture content always keep wood away from direct sunlight or air vents as heat will accelerate moisture loss. Finally, I stack and sticker the wood to allow it to reach a state of equilibrium with the surrounding atmosphere (photo 4).
If you experience swings in humidity within a short period of time, try to do all your stock jointing and thicknessing in one go. This will prevent distortions and ensure a proper edge glue-up before freshly planed edges or surfaces react with the environment.
Cross-grain assemblies
Cross-grain assemblies deserve attention, because these joints expand and contract in different directions, weakening the joint over time. The key here is to allow one of the mating components to move. For example in a breadboard end glue only the centre area and not the whole length of the end so the board can move inside the end.

5. Use bought table clips set into grooves, or make your own to allow tops to move.
Another example of cross-grain assembly is attaching the solid top to its aprons in a table. For my accent table, I used Z-clips, allowing the top to move across its width (photo 5).
Go with the grain

6. Orient the board with its heart side on the outside to keep a tight joint.
We should work with the grain not just to avoid tear-outs but also to handle wood movement. As an example, in carcase or drawer construction with backsawn boards, I choose the heart side for the outside of the build, because as the board cups in the direction opposite to the ring curve, it will tighten the joints (photo 6). On p.87 there are more suggestions on how to use grain orientation to your advantage.
Panel strategies

7. The plywood back keeps this cherry cabinet from racking (and its door from binding).
In a cabinet or furniture case construction, I eliminate any panel movement risks by choosing plywood panels over solid wood panels, if possible. Unlike a solid wood panel, plywood, for example, can be glued in place as the back of a case holding the case square or used as a drawer bottom (photo 7). Veneered plywood used in a stub tenon joinery is just as attractive as the traditional frame-and- panel back, while also being easier to make and more rigid.

8. Don’t ‘picture frame’ a panel top unless it’s made from manufactured board.
Plywood is also the right material to use as a case top if you want to ‘picture frame’ the top with solid wood. Since the plywood top does not move, the mitre joint on the solid wood frame will stay tight in all seasons (photo 8). If the top is solid wood, use a breadboard design so the top can swell or shrink without destroying the joinery.
Preventing warping
Warping is especially common with larger pieces when uneven moisture change takes place. For example, if you put less finish on the bottom of a tabletop, the underside will absorb more moisture and expand more quickly, causing the top to bow in the middle in a dry season. To ensure even moisture transfer in wood, I always apply the same amount of finish on all surfaces, not just the top or outer sides.

9. Screw slots allow the tabletop to expand and contract without splitting.
In a typical project, you would address wood movement concerns with more than one technique. When I recently built a walnut coffee table, I chose quartersawn wood for both the top and the base, used screws in elongated holes to attach the top and yes, applied an equal number of coats of wipe-on poly on the whole piece (photo 9). These are some of the ways to go about building fine furniture that won’t self-destruct.
* Download from Eco Wood Design at www.ecowooddesign.com.au/wood-movement
Avoiding Wood Movement
1. The general rule of thumb is that you fit tight in a humid season and loose in a dry season.
2. The ratio of tangential versus radial movement (T/R ratio) gives you
a good feel about how stable a species is. The greater the ratio
is, the greater the chance of the species cupping. For example, jarrah with a T/R ratio of 1.4 and cherry of 1.9, is less likely to cup than red oak at a ratio of 2.2.
3. Choose the right mix of the species and cuts for the critical parts or joints of your projects.
4. Know your local heat and humidity well to plan and
provide for wood movement. For example, my workshop which is also my garage at night becomes very humid during winter when the snow brought in by the cars melts. If a cabinet is built for the shop, I take this into account when calculating the expansion/ contraction allowance.
Grain Orientation
1. Backsawn board tends to cup towards the bark side while a quartersawn stock shrinks more towards the bark. Avoid jointing boards of different grain such as a quartersawn to a backsawn edge.
2. Should backsawn boards be joined with the endgrain in the same direction or alternated? Glued-up boards with the endgrain alternated tend to have a smaller warp than a large glue-up with repeating endgrain orientation. However, I tend to go with what looks best on the face that shows.
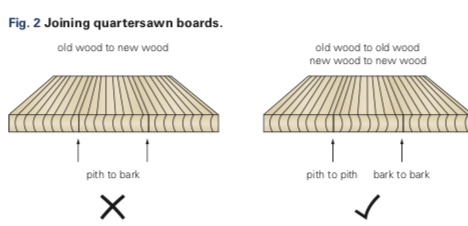
3. When edge-jointing quartersawn boards, join new wood to new wood (bar to bark) and old wood to old wood (pith to pith) to get an even joint, because new wood moves more than old wood, see fig.2 below.
Charles Mak lives in Canada and is a regular contributor to Australian Wood Review.