


Words and photos by Robert Howard
I have fallen in love with these beautiful tools. I had originally included them in my list of Unfamiliar but Useful Tools (see AWR #61), but it became obvious that they were worth an article on their own.
In general, the more freedom an individual tool allows, the greater the creative freedom it gives to those who master it. A chisel, for example, is a more versatile tool than a plane—it can be used for a wider variety of work than a plane can. But the plane can do its small range of very specific work more quickly and easily than a chisel can, and more accurately. In a similar way, we can compare a drawknife with a spokeshave: the drawknife is a spokeshave without the constraints of depth and direction of cut imposed by the spokeshave body.
A drawknife can be used for everything from taking very fine shavings, up to what is essentially controlled splitting, where the tool behaves like a hand powered froe. For removing large amounts of wood in a controlled way they have no equal. They do the same job as spokeshaves in a fraction of the time, but you do need to be very skilled to get as good a finish as the spokeshave will give you.
I use a drawknife on most of the components of my chairs—legs, seat, back splats, top rail, arms and the rockers. My practice is to remove the bulk of the wood with the drawknife and then finish with a spokeshave. Sam Maloof used to do the same work with routers and/or shapers, but I find them all noisy, messy, dangerous and plain unpleasant to use. They are also much more expensive to buy, run, tool-up, repair—and to replace. Their speed and efficiency is supposed to be enough to justify all that extra expense, but I wouldn’t bet on that.
I am currently experimenting with leaving my chairs with a tooled, rather than sanded finish, and this means sculpting all the joints. A normal large drawknife is too big for this, and I don’t know of a spokeshave with a tight enough radius to do the job, but I found the very small Veritas drawknife was perfect for the job—much to my surprise. I had not considered using such a tool for such fine finishing work, but it worked superbly.
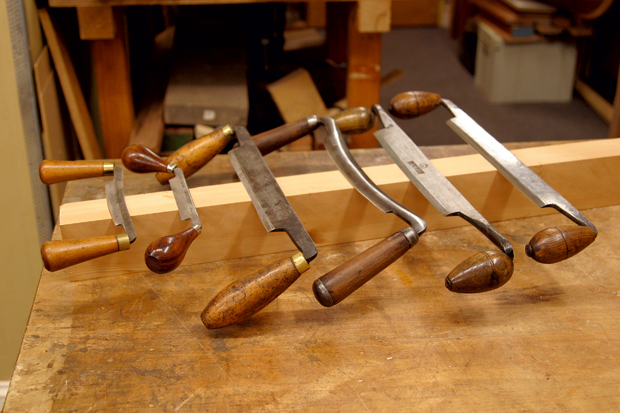
Some drawknives are designed to be used bevel down, some bevel up, and (going by how the tool feels in my hand) some for use both ways. The difference between them is in the design of the handles. Some handles lie in the same plane as the blade, and I use this type with the bevel down. Some handles are tilted slightly at an angle to the plane of the blade, and I use these bevel up. The last type has the handles set like the handlebars of a bike, cranked away from the plane of the blade but parallel to it. These feel quite comfortable both ways. In a pinch, they can all be used both ways, but with some of them you will find that, in order to get the blade to cut, you have to force your wrists into an uncomfortable position. That is telling you that the tool is not meant to be used that way.
Below: All of these drawknives have their blades resting flat on the piece of wood. This shows the various angles the handles have been set at relative to the blades. Those on the drawknife second from the right also have been offset downwards like the handlebars of a bicycle. The brands shown (left to right) are C E Jennings (an American brand), Veritas, Robert Sorby, unknown, I & H Sorby, and Robert Sorby. All but the Veritas are secondhand.
Sometimes the blades are straight, sometimes they are curved. Some are large, some delightfully small. They come in a wide range of shapes and styles, because at some time in the past they were used, in some form or another, in a wide range of trades. Coopers used them for many routine tasks, and the designs varied to best suit those tasks. They were also used widely in chairmaking. In fact, R. A. Salaman’s Dictionary of Woodworking Tools quotes a Mr L. J. Mayes who was writing in High Wycombe in 1950 about the Windsor chair trade, that the drawknife was ‘the most universal tool in chair making’. He also stated that ‘the accuracy achieved by a skilled craftsman is of a kind that needs to be seen to be believed’. Wheelwrights used them, as did carpenters, gunstock makers, shipwrights, mast makers, and no doubt cabinetmakers.
Holding the work
One traditional way of holding the work was on a shaving horse as shown above. These are fairly straightforward to make, and are a joy to use. They are amazingly efficient in the way that all the forces work together. Your feet operate the vice, and the harder your hands pull on the knife, the harder your feet push on the vice. The work is held tight, but is instantly released when you stop cutting, and can be quickly manipulated into the next required position. It is a fascinating, highly evolved, super-efficient workbench.
The work can also be held in a conventional vice on a workbench, although racking can be a problem when the work is held out at one end of the vice chops. Another solution is to clamp a bar clamp of the necessary length in the bench vice, and clamp the workpiece. This works well for spindle or leg work, though to protect the edge of the drawknife, you would be advised to fix a wooden face to the near end of the clamp.
Sharpening
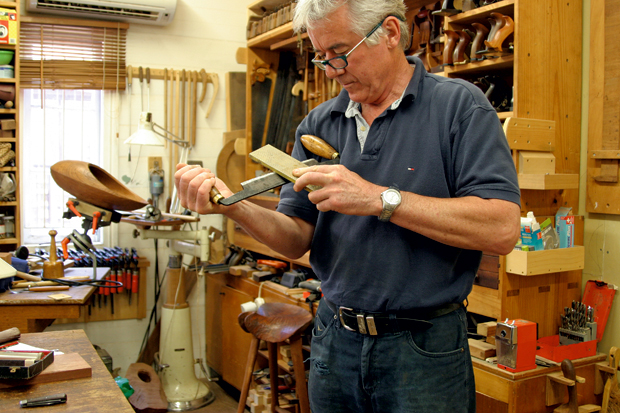
The most important point about sharpening drawknives is to always run the stone away from the edge. If you go the other way you can easily lose a fingertip or two. The best angle for sharpening a drawknife will depend on whether you are using it bevel up or bevel down, and on the wood you are intending to use it on.
Below: One way of holding a drawknife to sharpen it—if you are a leftie. Reverse the position for right handers.
Because the drawknife is a free blade, we cannot model its use on a plane, because that is a blade that has its cutting action determined by the geometry imposed by the plane body. So if the drawknife is used with the bevel-up, its cutting action is similar to that of a paring chisel. Used bevel-down, its cutting action resembles that of a carving tool used bevel-down.
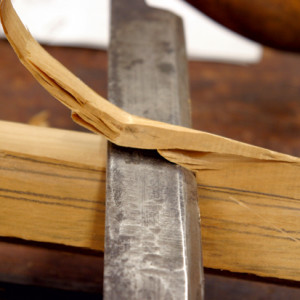
Above: Drawknives excel at removing large amounts of wood quickly, and, provided due care is taken with grain direction, without risk.
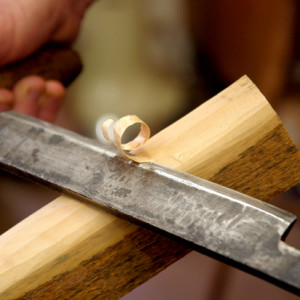
Below: Even a large drawknife will easily take small and delicate shavings.
In both cases there is a compromise to be made between how easily the blade cuts (the lower the bevel angle, the better), and how long the edge remains sharp (the higher the angle, the better). When used bevel-up, however, carving tools indicate that there is an additional consideration: higher bevel angles result in narrower bevels (i.e. the distance from the tool’s edge to the heel of the bevel is shorter), and this affects how smoothly the tools cut on a given curved surface. A long bevel on a tool will chatter when cutting a tight radius. This is because when placed on the curved surface of the wood, the tool will rest on two points: the edge, and the heel of the bevel. The further apart these two points are, the more the edge will tend to dig in and ‘catch’ the wood, before being torn out by force exerted by the guiding hand of the carver (or by the tool body in the case of a compass plane or a spokeshave). The closer the two points are, the closer the tool is to being able to ride on the bevel, once the edge penetrates a small distance into the wood surface, and this will produce a smoother cut, and minimise or eliminate the chatter.
The new Veritas drawknife has a primary bevel that I estimate to be 17°. A small secondary bevel would raise this to, say, 20°, which is pretty much where many carving tools bevel angles are. All my older drawknives have angles closer to 30 or 35°, but that is most likely due to ‘angle creep’ during sharpening. One of the primary problems when you sharpen without a honing guide is that you cannot easily be certain that you are actually honing the edge. It is difficult to know if the edge is on the stone or up in the air, so in order to be certain we overcompensate and tip the tool forward until we are certain the edge is contacting the stone. If this is done each time we resharpen, the bevel angle slowly creeps up.
All this means we need to choose sharpening angles in much the same way we do for our carving tools or paring chisels. We either choose a happy mean, or vary the angle to suit the wood and the work. You can try starting with an angle around 20° and increase it if the tool chatters too much, or the edge doesn’t last long enough.
The sharpening process differs from that used with regular woodworking tools. Instead of moving the tool over the stones, you will probably find it more comfortable to move the stones over the tool. Brian Boggs demonstrates both the use of the tool, and the sharpening process, on his excellent DVD.
As with any sharpening process, you will need to begin with a coarser stone, and work through to your finest finishing stone on both the front bevel and the back of the blade. Just how coarse your beginning stone will need to be will depend, as usual, on the condition of the blade when you start. When preparing an old blade for the first time, I begin with the coarsest diamond stone I have (the DMT ‘extra coarse’ black). If preparing a new blade, or resharpening, I usually start with a 1000 grit waterstone.
Hold the tool with one handle in your hand (your left hand if you are right handed, and vise versa for lefties), and the other handle tucked into your shoulder of that arm, so that the blade faces away from your body. Hold the stone with your other hand and, after feeling carefully to gauge the angle of the tool surface, stroke the stone firmly across and along the drawknife blade. Take as many strokes as you need to cover the length of the blade, and work evenly back and forth over the length until you have a continuous burr on the surface under the edge, and all visible damage has been removed from the edge. You then repeat the process with each subsequent stone until the job is done.
If you find this way of holding the tool too difficult, try somehow clamping it to your workbench so you have both hands free to guide the stones. However, if you do this you will almost inevitably have one hand on the edge side of the blade, so you would need to be very careful in order to avoid cutting yourself. It is not a method that I recommend.
As with all woodworking tools, the sharper you can get it the better it will cut, so it is worth putting in the effort to get it right. If you can do that you will not need to ask whether it has been worth the trouble. The smile on your face will be the answer to that.
Conclusion
Using hand tools is where all the challenge and sheer pleasure of woodworking is for me. I love their quiet efficiency, and the creative freedom that they allow. The drawknife is a shaping tool, and an extremely versatile one. It can be used for very crude but extremely fast work, or for fine and delicate finishing cuts, and everything in between. Like all old tools, it has a highly evolved basic form, with many variations. And, like all old hand tools, it is being rediscovered by a new generation of woodworking enthusiasts. I wholeheartedly recommend that you discover their joys as well.
This story first appeared in AWR#70, 2011
Learn more about Robert Howard here