


Story by Richard Vaughan, photos by Rebecca Nathan
The router is an extraordinarily versatile and even essential woodworking tool. But routers are fast and powerful and, like chainsaws, they come with insufficient guidance on safe usage. And like other power tools they have the relentless potential to perform grievous bodily harm on the unprepared operator. If nothing else the kick of a mishandled router can give you such a fright that you plonk it back in its box and stash that box on a remote shelf. And I’ve had enough woodworkers confide in me over the years to know just how common that is. So before we discuss some of the basic points of usage, here is a check list for safe and effective use of the router as a hand tool.
Safety checklist
These are the basic five harm reduction preparations you’ll routinely take care of before you even think of turning the tool on.
1. Keep it clean
You need to make sure that the work area, both bench and floor, are clear of obstructions so the power cord can’t catch on anything and jerk the tool, and you won’t stumble over scrap wood or whatever. Having a clean work surface reduces the chance of the workpiece being marked, or moving when you’re routing it.
2. Get a grip
Make sure the piece you are working on is very securely held. Because the router bit is moving fast with power behind it even a slight budge of the workpiece can introduce unwanted dramatics. Use at least two sturdy clamps because holding with only one clamp can allow pivoting. Using sticky mat under the workpiece, as well as good clamps, gives extra security.
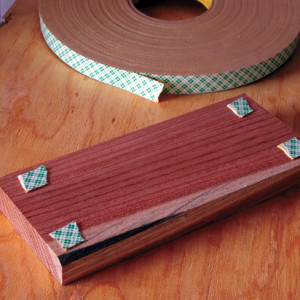
As shown in the photo above, double-sided tape is a very handy technique for holding smaller workpieces when clamps would get in the way. Use the kind with foam in it to give a bit more allowance for the texture of wood than stationery tape will do. Attach the workpiece to a larger piece of ply or MDF which you can then hold with clamps. Four thumbnail sized bits of tape are quite sufficient for a good grip.
Because the forces are sideways on the tape rather than directly up from it the grip is surprisingly strong. I routinely use tabs of this double-sided tape to hold a workpiece to a pattern when shaping to a profile on the router table. To remove I use a broad old chisel to lever the pieces apart, then roll the tape off with a thumb.
3. Visibility
If you can’t see what you’re doing how can you hope for accuracy? As well as attached dust extraction, which is essential for health anyway, it is often helpful to have a fan blowing over the work to clear any residual dust which may obstruct your view of where you intend to rout. An adjustable lamp to illuminate the cutting is also essential as far as I’m concerned.
4. Personal protection
Hearing damage is cumulative and permanent. The ear is one organ that the human body, amazing though it is, is unable to self repair, so quality hearing protection is a must.
Eye protection also needs to be a habit. Whether it’s due to a ricocheting sliver of wood, or a chip off the router bit, even a stylish glass eye has very little to recommend it.
The glues of manufactured boards, as well as the dust from many timbers, are known to be toxic. Therefore a dust extraction system which is triggered by turning on the tool is a very worthwhile investment in your health.
5. Length matters
Another safety measure in my workshop is to always use an extension lead when using a power tool, so I never have the distraction of being pulled up short, or jerked off line, by the cord being not quite long enough.
This safety checklist is summarised in the photo on p. 25 which also shows how best to hold the router in use. Now we’ll look at some of the other things to keep in mind when using the router.

Above: A comfortable and stable stance with a firm hold of the router is the key to confident control of it.
Using the router
Understanding the direction that the router cuts in and developing a light touch in usage are two facets of routing that will lead to successful operation.
1. Direction of cut
The direction of the rotation of the bit is marked on many makes of router, but if it’s not on yours you can remind yourself with a texta arrow on the base. If you think of the router as a ‘very fast chisel’ it is natural to remember to push the cutting edge of the bit into the work.
You go forward when the work is on the left of the router, ie you will be moving anti-clockwise around the perimeter of the work, as in the diagram right. If you should happen to bring the router back along the work you will be participating in ‘back cutting’, also known as ‘climb cutting’. The ‘climb’ describes what the router will want to do. Very rapidly. Towards you.

However there are specific occasions when back cutting is appropriate (we’ll look at these soon), and you can undertake this technique with suitable caution. Most of the time however you take care to clear the cutting edge from the work at the end of each pass. Brushing it accidentally against the work as you bring it back can verge on being an extreme sport. In short you will be using the router as deliberately as you use a chisel for fine paring.
When you need to make a hollow in the middle of the work to inlay a nameplate for example, you will still be pushing the left side/leading edge of the bit into the work but you will be moving clockwise. Ensure that you have an end cutting router bit so you can plunge it directly into the middle of the area you wish to remove and then move in ever increasing circles clockwise until you come as close to the knife marked border as you’re comfortable with.
When routing across the grain the point of exit is very prone to tearout but it is simple to prevent, or at least minimise this. When routing an edge moulding, onto a tabletop for example, you should start with an appropriately light setting across the end. When you continue down the long grain edge you will remove the splintering of the first cut. Then continue across the other end and repeat the process.
Some woods will splinter in spite of this approach. You can save the day by putting a piece of masking tape over the surface where the bit will exit before you start routing. This will hold the fragments so you can glue them back in place once you have finished routing. Another technique is to clamp a piece of scrap wood to the back edge of the workpiece to support the surface as the router bit exits. Thinking of the router as a chisel is the cue to the second hint for happy routing.
2. Lightness of touch
People using the router routinely make the mistake of attempting to remove too much in a single pass. Consequences can include the resultant surface being torn and/or charred, the router bit snapping, the bit grabbing and kicking the router who knows where, and the bit working down in the collet and making a deeper than intended cut.
If you think of it as a tool for paring rather than hasty woodchopping you should avoid these sources of angst. The tool is fast. This gives you the time to approach the desired result gradually, and this approach saves the time wasted in repairing avoidable damage.
When to back cut
Back cutting can be a useful technique once you are aware of the potential hazard. Attention to a good grip and stable stance, the work being thoroughly secured, and your lightness of touch, become even more relevant.
1. At the exit of cross grain routing
An option for dealing with breakout when routing across endgrain is to bring the router slowly back into the work at the exit point. Coming in just the diameter of the bit will do the trick and you can then start routing in the standard direction.
2. Curved work
Routing the edge of curved work, such as a circular tabletop, involves cutting against the grain, and you can encounter this even on straight cuts. Many woods react badly to this treatment but back cutting can let you get away with it. If you have a problem it’s most likely because you’re trying to take off too much at once.

Take care of your bits
Router bits are almost exclusively made with tungsten carbide these days. This makes for much better durability in Australian hardwoods and in manufactured boards, but this hardness also means the edge is brittle and very prone to chipping if the bits are allowed to rattle against one another, or roll off the bench onto a concrete floor.
To be effective the bits need to be clean and sharp. The charred gunk that can build up on the bit will interfere with cutting and will burn the wood you’re routing. It’s a simple matter to scrape it off with one of those snap-off knives and then brush the bit vigorously with a brass wire brush. Dull bits will make a mess of good work and need professional sharpening, or if they’re budget bits you simply replace them.
Typical router applications
When fitting hinges you can guarantee uniform flat-bottomed rebates of accurate depth when you use a router, or better still a trimmer. You may need to extend the fence (as in the middle photo below) for a more complete contact with the workpiece.
To get exactly the right setting on the job you’ll need to do a practice set out on some scrap, ideally off-cuts of the same material. Mark out the edges of the rebate with cutting gauge and marking knife in the usual way, then set the fence so that the bit cuts exactly to the gauge mark. You then set the depth of the cutter by reference to the flap of the hinge as shown in the photo right. Start with a light pass on the outer edge, perhaps a bare millimetre, to ensure a crisp junction at the knuckle of the hinge, then remove the remainder with a series of passes finishing as close to the knife marks at each end as you feel confident about. Squaring the corners and removing the rest of the waste with your regular chisel is simple.
If the workpiece is narrow you can increase the bearing surface by clamping some square dressed timber behind it. The photo below right shows how a similar approach can be used to accurately remove the waste from the sockets of lap dovetails.
There is ever so much more to know about what can be done with the router once you are confident about being safely in control of it.
Richard Vaughan is a furniture designer/maker and teaches woodwork and also router usage workshops in Brisbane. See richardvaughan.com.au Email: richard@richardvaughan.com.au
Richard Vaughan is a Contributing Editor for Australian Wood Review, learn more about Richard here
This story first appeared in Australian Wood Review magazine, issue 63.