


Words and photos by Ray Halpin
Using recycled timber presents many challenges and creates foreseen and unforeseen design opportunities. Opportunity knocked when I was asked if I would like some built in bed frames made from Victorian ash that were being removed from Fenner Hall at the Australian National University.
I decided to make an 8 seater outdoor table and chair setting with the wood. My motivation for making a table and chairs was threefold. Our family outdoor setting that was made from ironbark 23 years ago was past its best and needed replacing. Secondly, I had made tables before but I had only ever made a chair with the assistance of someone else. I wanted to design and make the chairs and what better way than to use wood that cost nothing! Finally I wanted to set myself design challenge by using only the recycled ash.
The Design
My approach to design is not conventional in that I do not draw or configure models. I have always found the need to start making the piece and the design and construction will evolve simultaneously. At times this approach creates challenges or “design opportunities” that can produce some creative results. This project was no exception.
This approach to design suited this project because when using recycled wood the quantity and quality of the recovered wood is what would ultimately determine the design. The wood had dowel and nail holes and damage that occurred when taking the bed frames apart. I de-nailed the wood, graded it by quality, length, depth and width. The usable wood was seasoned and remarkably straight. When the known quantity and quality was determined work began in earnest.
The Table Top
I wanted a table that would sit eight people comfortably. The lengths that could be used for a table top were 40 x 40mm ranging from 1660mm to 1750mm in length. I was able to retrieve 26 pieces of sufficient quality at a length of 1650mm. Then the process of dressing and dimensioning the wood began and I ended up with 26 pieces at 36 x 36mm each. This would give me a table top of 1650mm x 1010mm.
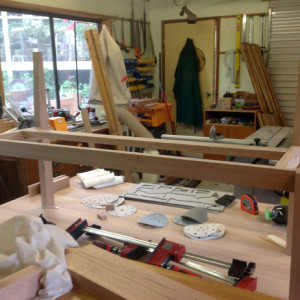
The 26 pieces then had to be laminated. A dry fit demonstrated this task required the glue up to be divided into four stages and then a fifth glue up to join the four pieces together. By keeping the first four parts less than 320mm in width I was able to run each through the thicknesser to remove any imperfections. It worked perfectly well save for a gap that was left in one of the joins. The top assembled was no light weight and I was reluctant to try and saw off the offending piece and re-join it. I decided to treat it as a “design opportunity”.
Over the past five years I had used casting resin and sea shells in jewellery boxes. I decided that the poor join in one of the table top pieces could be enhanced by inserting a shape with a router and filling it with resin and sea shells. The first attempt at this produced a result that I was very unhappy with it and I then decided to make a template that could be used with a router that would run the length of the table top shaped like a river or a snake. I removed the casting resin and shells from the first attempt with a great deal of difficulty and designed an MDF template to guide the router as shown below.

My wife Robyn began the process of inserting black and white stones that I collected from a beach in New Zealand.
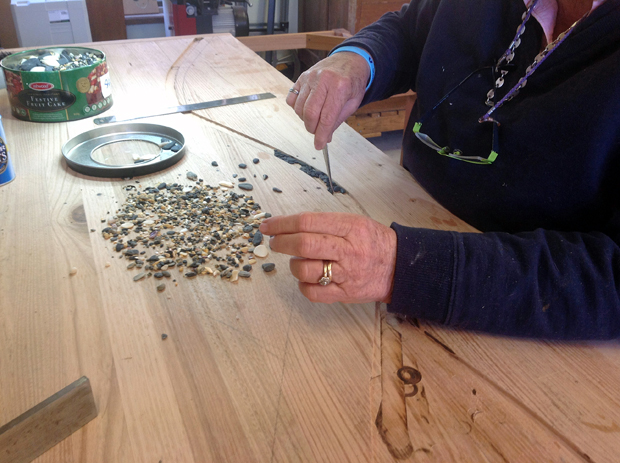
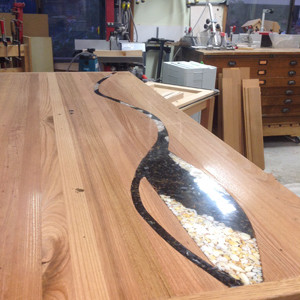
The next step was to pour the casting resin on top of the stones which takes about 5 to 7 days to harden. Once hardened it can be sanded and the result was very pleasing. Other holes in table top were also filled with casting resin and sea shells. The resin was poured so that it sat proud of the routed out shape and was subsequently sanded using 60 to 3000 grit. Below you can see the result resin unsanded (left) and sanded. I was happy with the outcome.

The Frame
The wood to make the table frame and the legs all had to be laminated as the available wood after dimensioning was not of sufficient thickness. In order to make a sturdy leg each leg had to be laminated give an 80mm by 65mm dimension. Each of the frame pieces also had be laminated into the dimensions outlined in the cutting list below.
|
|
Quantity |
Length |
Width |
thickness |
|
Table top |
1 or 26 x 36mm |
1650mm |
1010 |
36mm |
|
End pieces |
2 |
1010mm |
36mm |
36mm |
|
Legs |
4 |
720mm |
80mm |
65mm |
|
Frame |
|
|
|
|
|
Ends |
2 |
650mm |
65mm |
25mm |
|
Sides |
2 |
1350mm |
65mm |
25mm |
|
Internal spacers and support |
2 |
728mm |
65mm |
25mm |
|
Corner supports |
4 |
220mm |
65mm |
23mm |
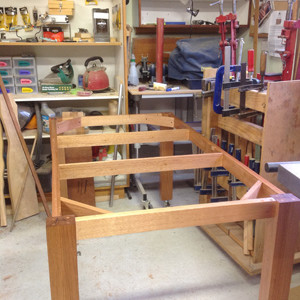
The frame was then joined using a Festool domino machine. Whilst I had become very efficient at laminating wood I was using far more of the wood than I have anticipated. Before I glued the frame together I decided that because this table was heavy and would be moved around an outdoor deck frequently it would be better on wheels for ease of movement.
Chairs and Benches
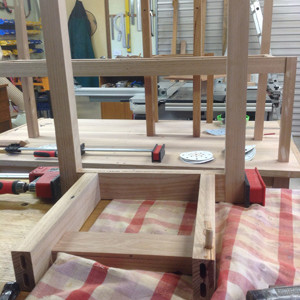
The only piece of the entire structure that did not require pieces to be laminated were the chair and bench legs. In terms of design I based the structural support of the chairs and benches on Evan Dunstone’s Alpha Chair. The photo below show how the chairs were assembled.
I could not shape the seat or the back of the chairs because I did not have sufficient wood of the quality that was required. The seat and back had to be flat. Given that this was an outdoor setting the legs had to be substantial as they are going to get wet sooner or later. So I designed a back leg profile that was straight and was not thinned at the bottom. I made a template for the legs using MDF and shaped them using my spindle moulder.

The seats and backs of were all joined using the last available pieces. However I did not have enough pieces for the back and seats of the bench of the same length to have a rectangular back and seat. The next design opportunity was to shape the seat and backs with a diagonal cut so that I could use the small lengths with large ones. At the end I had one piece of wood left!

|
Chair |
Quantity |
Length |
Width |
Thickness |
|
Back Legs |
2 |
825mm |
60mm |
40mm |
|
Front Legs |
2 |
445mm |
40mm |
40mm |
|
Support Frame |
3 |
330 |
65mm |
30mm |
|
Seat |
1 |
500mm |
370mm |
18mm |
|
Back Rest |
1 |
500mm |
280mm |
18mm |
The side benches were only a larger form of the chairs. The same technique and structure were used for the two side benches (see below).
|
Bench |
Quantity |
Length |
Width |
Thickness |
|
Back Legs |
2 |
825mm |
60mm |
40mm |
|
Front Legs |
2 |
445mm |
40mm |
40mm |
|
Support Frame sides |
2 |
330 |
65mm |
30mm |
|
Front support |
1 |
1390mm |
65mm |
30mm |
|
Back Support |
1 |
1260mm |
370mm |
30mm |
|
Seat |
1 |
1650mm |
370mm |
20mm |
|
Back Rest |
1 |
1650mm |
280mm |
20mm |
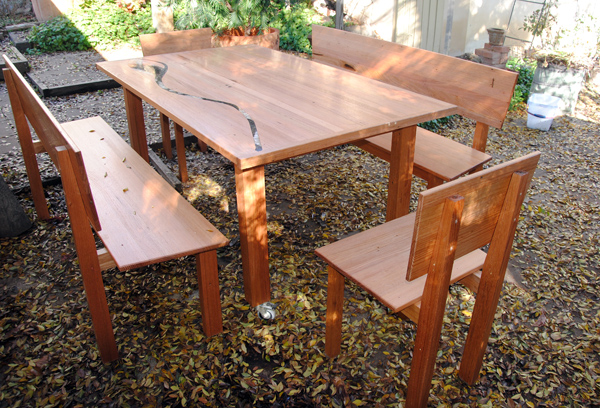
The Result
It is functional and comfortable and my family thinks it looks great!
I decided to finish the table and chairs with Sandolin Hardwood Oil. I had never used this product before but I chose it because of its water and weather resistance qualities. It also gave a clear natural finish.
I entered the setting into the ACT Woodcraft Guild competition at the Canberra Timber and Working with Wood and it provoked much comment. It has expanded my skills greatly in making large templates for use with a router and with a spindle moulder. I achieved my major objective of making a chair on my own and working entirely within the parameters imposed by the amount of wood I could use from the recovered wood. In the end I have one piece of the Victorian ash remaining.
Ray Halpin is a Canberra based solicitor who received no formal training in woodwork at school. He is a member of the ACT Woodcraft Guild and likes making jewellery boxes and furniture. Ray says he has learned most of skills through the Guild and by entering their annual competition over the last 10 years.