


Story and photos by Anton Gerner
For years I had thought about making a mobile tool cart to take on-site for installation work — a unit that can hold everything you need and double as a small workbench for sawing or fitting parts. Some time ago I had a few days spare so I finally decided to design and make one.
First I had to work out exactly what I wanted to put in it. I made a list with two columns: stuff we always need and stuff we sometimes need. I decided to permanently keep all the stuff we always need in the cart and provide space for the stuff we sometimes need. The idea was that for most installations we could simply roll the unit out without having to think about what to take. I already had most of the tools that would be permanently kept in the cart, but there were a few tool cart dedicated tools that I went out and bought.
The size of the cart was determined by working out what would be a useful small workbench top size, and designing everything to fit within this. The unit ended up 800 x 500 x 900mm high. Another consideration was the space it would take up in our van and workshop.
Once I knew what I had to fit in, it was simply a matter of working out a workable combination of drawers, doors and compartments. This took several hours and a full size drawing, working through the various options for the best use of space.
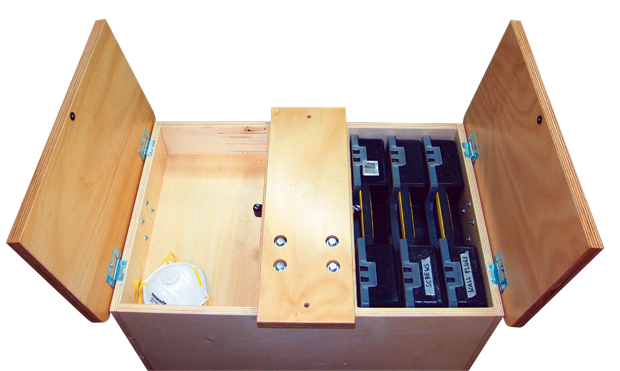
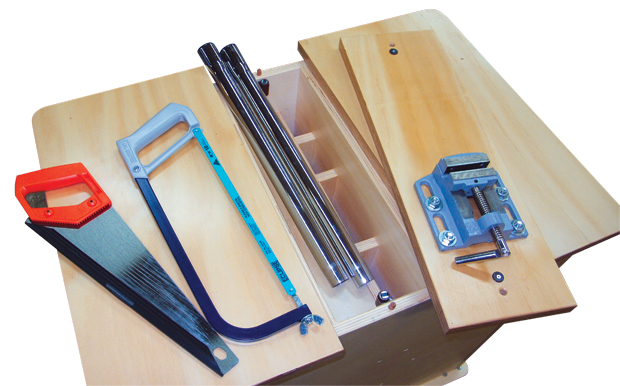
One important feature I wanted to include was a vice. I attached this to a flip-over panel so the top of the tool cart can double as a flat work surface.

The top has two hinged lids. Under one are three plastic organiser boxes filled with various screws, wall plugs and bolts. The other reveals a space for drills and other tools.
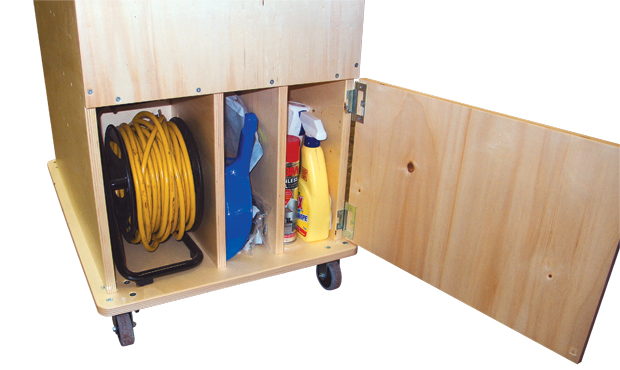
The lower section contains two compartments with a hinged door at each end of the trolley. One area contains a vacuum, for on-site clean up, and the other has a roll-out power lead, cleaning products and spare vacuum and garbage bags.
I made the cart from 18mm poplar plywood that I had on hand. This was the ideal material as it is very light, strong and looks good. The top was made from 25mm thick plywood.
Once the design and cutting list had been worked out, the construction was straightforward and fast. Each piece was cut to size on the panel saw and then just glued and screwed together. I did however take the time to sand each piece prior to assembly.
The three drawers are also made from plywood, screwed together and fitted on Hafele side mounted soft closing runners. Small bevelled edge blocks of plywood are used as handles, simply screwed on. The top two drawers contain hand tools, such as chisels, hammers and screwdrivers. The bottom drawer is kept free for holding extra tools. One thing still missing from the drawers are dividers. I chose not to install these for a while, so I could see if anything needed to be added, and to make sure I was happy with what was in each drawer.
Both the doors and flaps were hinged with non-mortise hinges. These hinges simply screw on and don’t require a hinge mortise. Small slide bolts are used to keep the doors shut.
Once constructed, casters rated for 60kg each were bolted to the base and heavy-duty handles attached. Every edge and corner was rounded over with a 3mm radius bit in a trimmer router. The whole piece was sprayed with three coats of single pack lacquer to provide some protection to the surface.
After taking the tool cart to several installations I now realise what a timesaver this is. Having everything we need in one unit, without having to get ready for each installation and carry multiple toolboxes saves us time. The workbench top has come in handy several times for cutting small pieces, preparing hardware and as a general work surface. Our clients have also been impressed too, with one saying: ‘Your tool box is as nice as your furniture’.
This story first appeared in Australian Wood Review magazine, issue 65.
Learn more about Anton Gerner at www.antongerner.com.au