Wrap Around Bookcase

Words, photos and illustration: Graham Sands
This bookcase is a 25mm thick ‘wrap around’ rectangle with no back. Its purpose is to hold large books in
a lounge room. Figured wood and strong visible joints embellish the case. It has an adjustable 25mm shelf which is visually separate from the external frame, blending in with the books.
New Zealand rimu
Rimu (Dacrydium cupressinum) is an exceptionally beautiful timber which was used extensively here in New Zealand
as a structural and finishing timber, much like jarrah in Western Australia. However, it has been protected now for many years and supplies for furniture making have become scarce.
I was lucky to source only six 900mm lengths of 30 x 150mm sawn heart rimu which had been in storage for twenty years. I would have liked to continue the grain around the frame, but with the short lengths this was not achievable. The shelf is wenge being the blackest timber I could source. All the boards were machined, matched and joined with dominos.

Joinery
This project was also a reason to tune up my Triton finger jointer after many years of lying idle. I used it on my workbench (AWR#53) and a frame for a set of drawers (AWR#56). The Triton RTA 300 router table and FJA 300 finger jointer are designed and made in Australia, were introduced in 2001 and are still available today.
The finger jointer comes complete with a special half inch diameter router bit which has segmented cutters so the chips are small and don’t clog the extraction ducts.

1. Freshly cut test piece. Note the 12.7mm spiral up-cut bit fitted actually cuts down in table and set to cut 0.5mm longer fingers than board thickness.
To get the best quality cut achievable I used a tungsten carbide spiral up-cut bit (which actually cuts down on a router table) instead (photo 1).

2. Two dust extractors clear larger chips, one above and one below. Note clamps, sacrificial board and extra finger portion on the workpiece, which will be trimmed off when all joints are cut.
To clear the much larger chips I used two extractors: one clearing under the table and the other with a large diameter hose clearing above (photo 2).
I did multiple test cuts, each time adjusting the finger width using feeler gauges to get a gap free joint that I was happy with and could be fitted together without too much friction.

3.Final test pieced used as guide, from finger jointer start point ‘reference’, to make sure that board joint line falls in centre of central finger on piece to be jointed.
The jointer comes with a start point guide which offsets the mating boards so they can be cut together. The number of fingers for the joint is uneven so each end of the joint is the same and there is a central finger. I used the final test piece as a guide to determine the start point for each joint so the line between the two joined boards fell in the centre of the central finger (photo 3).
The stock was rip sawn to the start point and parallel to board join line. The stock was left a little wider than required for number of fingers (23) and trimmed to the last required finger after making the joints. The jointer can accept two sets of joints at once (four 25mm pieces) however I just did one joint at a time to ease chip extraction, and not a skerrick remained after each pass.
Following the jointer instructions I set the bit height for a 0.5mm longer finger than the thickness of the boards. I taped all surfaces of the joint area and added a sacrificial board at the end of the cut to prevent tear-out (photo 2).
The glue-up

4. Glue-up. Clamping in two directions on each of two joints. Four long curved cauls enable clamp bars to run beside each other. Only the very corners can be seen while clamped, so a dry test is important.

5. Pieces of 2mm thick plastic were taped
to each finger side. Plastic strips are also taped to the cauls to apply pressure only to finger sides.
The two bottom joints were glued separately, then together with the top. To get even pressure to pull all the fingers tightly together in two 90° directions (unlike dovetails) and to allow room for positioning the clamps I used curved cauls longer than the joint (photos 4, 5).
Segments of 2mm plastic, to which glue doesn’t adhere, were taped to each finger and a strip on the caul to concentrate the pressure on the finger sides (photo 5).

6. The 0.5mm protruding finger ends are easily sanded flush. This is when you find out if the joint has pulled together.
After glue-up the finger ends sanded flush easily using a sander fitted with a hard backing disk (photo 6). This is the ‘reveal’ moment where you are thrilled with a gap free joint. I really like the pattern of endgrain and long grain alternating in equal amounts along the sides of the joint!
Fitting the shelf
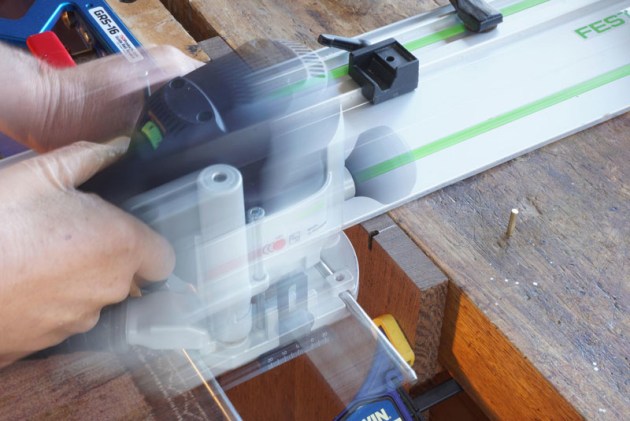
7. A router on a guide rail with a stop fitted is used to cut a recess for the shelf pins.
The inside faces of the sides of the bookcase were drilled to fit 3/16" dia pins which I cut from some spare brass rod. One set of holes is positioned so the shelf sits half way up. The holes are 40mm from the sides and at 32mm centres vertically.
The shelf has corresponding slots cut underneath with a guided router and stop (photo 7).
This is an idea borrowed from Ikea’s Billy bookcase. It locks the shelf in position, and leaves the underside of the shelf free of protrusions so books can be stacked up without catching. Instead of brass rod you can pull the 5mm steel pins out of Hafele shelf supports and drill 5mm dia holes.
Guide lines are marked on the shelf while fitting so the edges can be trimmed flush to the sides of the case. Red tyre casters give a ‘design magazine pop’ to the piece which was professionally finished.
Graham Sands is AWR’s illustrator and a keen woodworker who has written several stories for the magazine. He lives in Titirangi, New Zealand.