Wood: reading the grain

Words and photos: Robert Howard
An understanding of grain is fundamental to working wood, but there seems to be a fair degree of ignorance and confusion about exactly what grain is. The most common example of this is the statement ‘Look at the wonderful grain in that piece of wood’. More often than not, what we are being asked to look at is not grain at all, but figure.
Grain and figure
In terms of woodworking, grain generally refers to the direction of wood fibres, so we can tell if we are cutting with or against the grain. A common analogy is animal fur, and the difference felt when you stroke one way or the other.

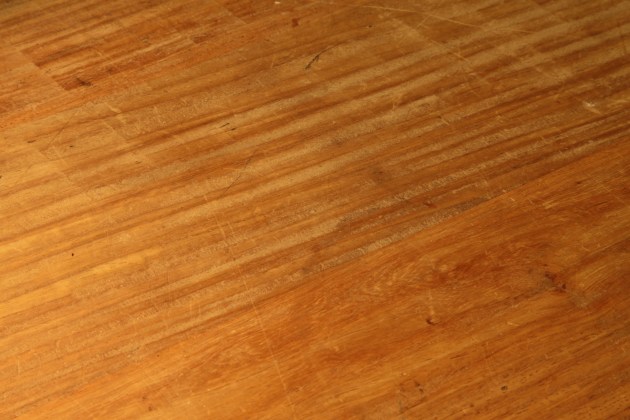
1. Tear-out on fiddleback blackwood board. This fiddleback figure is caused by wavy grain running down the length of the board.
There are many other ways the term grain is used (endgrain, long grain, open and coarse grain, and so on) but I am only interested here in how it affects us when we want to cut wood. A full discussion of the broader field can be found in Bruce Hoadley’s Understanding Wood, a must-have book for any serious woodworker.

2. Figure caused by the growth rings in a red cedar board. If you wanted to plane the top edge of the board, the figure suggests planing from right to left. The grain, however, actually runs from left to right.
Before cutting a piece of wood, we need to try to determine the direction of the grain, or in other words, the way the fibres are lying in the wood, so we can cut ‘with the grain’. In many woods, any attempt to cut against the grain will result in tear-out (photo 1). It is here that confusing figure and grain will often lead us astray (photo 2).
So what is figure?
Figure is the look of a wood surface, but mostly describes those that are unusually distinctive or beautiful. In its most mundane form it usually describes the pattern made by the growth rings of the tree. Because trees do not grow as perfect cylindrical forms, and the form of their growth rings varies even more, when a saw cuts a flat plane through the log, this plane intersects with the growth rings in unique and often distinctive ways.

3. Growth rings on the endgrain continue out onto the face grain; 4. Quartersawn figure; 5. Backsawn or crown cut figure
Photo 3 shows how you can trace the edge of a growth ring around a board. The way we break logs down determines the patterns the growth rings form on the faces of the cut wood. There are two pure forms of cut we can make. A radial or quarter cut is where the saw passes through the centre or pith of the log radially all the way along its length (photo 4). The other is to cut on the tangential plane (photo 5), where the cut is tangential to the growth ring (usually known as flat or backsawn), again all the way along its length.

6. When a board contains both fiddleback and interlocked grain, the two produce a more complex figure.
Each of these cuts gives a distinctive form of figure on the cut surface. These can be further enhanced by the colour of the wood, particularly by differences in colour between the early and late growth rings, and the size of the medullary rays (most dramatically with quarter or radially sawn woods such as silky oak species).

6. When a board contains both fiddleback and interlocked grain, the two produce a more complex figure.
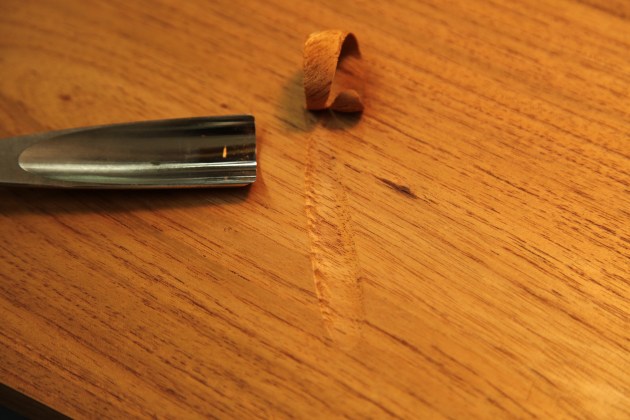
None of the figure considered so far depends on grain direction. However, there are some cases where the figure is dramatically enhanced by what is happening to the grain. Burl, fiddleback, quilted, blister, bird’s eye and curly figure are all caused by local changes in the grain direction that result in the light reflecting differently off the wood, depending on the angle at which we see it (photo 6).

7. Tight fiddleback in a blackwood board.
In fiddleback figure (photo 7), the grain runs in waves along the length of the wood, causing periodic alternations in the direction of the grain (photo 8). More often, however, the periodic alterations occur across the width of the wood (photo 9). This happens when the longitudinal grain (because of some sort of genetic switch), starts to spiral up or down the tree.

8. The edge of a quartersawn board of Toona calantas, showing the pores and the growth rings in lockstep. This is true on any quartersawn surface.
9. Interlocked grain on the face of a quartersawn board of New Guinea rosewood in my workbench. The grain direction reverses from one stripe to the next all the way across.
Anyone who has spent time at the firewood pile with an axe, will be painfully aware of the consequences of this. This wood simply will not split across the growth rings (photo 10). Turn it 90°, however, and it springs apart along the rings without a problem. This wood is known as interlocked, and when cut radially produces ribbon or stripe figure. This is very common in Australian hardwoods. It can occur in combination with wavy grain (photo 11), in which case it can produce roe, broken stripe, or mottled figure, depending on which one predominates.

10. Interlocked grain in a piece of ironbark from the firewood pile; 11. The rear of the same piece of ironbark, showing fiddleback as well as interlock. Note how the wood has split cleanly along this surface.
While grain direction changes can produce stunning figure, in general figure does not depend on grain. Rather, it is caused by the particular way the growth rings of the tree intersect with the plane of the wood surface. Grain is responsible for some figure, but not all figure is caused by grain.
Reading grain direction
Reading grain direction is generally easier with woods that botanists classify as hardwoods. These are from trees that flower, whose seeds are contained in a fruit, and whose wood contains pores. Pores are vessels of varying size that run longitudinally in the tree, and many are split when the log is sawn. Split pores lie on the longitudinal surfaces of the boards, and many are easily seen with the naked eye (photo 12).

12. The dark lines are the growth rings. The smaller black dashes are pores split by the saw and show the grain direction; 13. Resin canals on the edge of a block of radiata pine can be used to read the grain direction.
Softwoods (in botanical terms, the conifers) have no pores, but many have resin canals (the pines, spruce, larch and Douglas fir species). In the pines these can usually be seen by the naked eye (photos 13, 14).

14. Resin canals on the face of the block shown in photo 13 can also be used to read grain direction; 15. The length of a pore cut by the saw varies from full length when it runs parallel to the surface, to a dot when it is vertical to the surface, so variation in length across a board reflects variation in grain direction.
Both the pores (in hardwoods) and the resin canals (in some softwoods) lie along the grain and can therefore be used to indicate the grain direction. When planing the surface of a board we look at its edge to determine grain direction on the face, and vice versa. For many boards this will work well, except where bends in the growing tree cause the grain to flow in and out. Here we may need to plane in one direction for part of the board, and to reverse for other parts.
If the grain direction reverses too many times in a short distance (photo 15), it becomes inefficient to keep changing the cutting direction and we are in the same situation as with fiddleback grain. Interlocked grain presents a similar situation on quarter or radially sawn faces. Here the narrow strips of grain run in opposite directions (photo 9), and have to be planed at the same time no matter which direction we choose to work in. In all these cases we will always be cutting against the grain some of the time.
To reduce or eliminate tear-out here we can use a normal plane with very sharp blade, a closed up throat, and a fine cut; or we can opt to use a high angle plane (either a normal plane with a high angle frog, for example, or a low angle, bevel up plane with the blade sharpened at an angle between 40 and 50°).
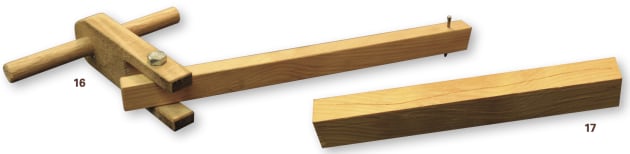
16. A quickly made grain scribe with a sharpened nail is on the end; 17. The line left by the nail of the wood scribe follows the grain on a short piece of pine.
Grain scribing
If we cannot read the grain using the pores or resin canals, we can always use the old suck-it-and-see method, where we simply take a cut and see what happens. Or, we can make ourselves a simple grain scribing tool, as shown opposite below in photo 16.
This has a sharpened nail in the end of a trailing arm attached to a handle by a vertical pin. If we place the nail on the wood under a little pressure and pull on it, the nail will scratch a line along the wood following the grain (photo 17). A few hours spent with this, experimenting with a wide a variety of woods will probably teach you more about reading grain than words and photos ever will.

18. One corner shows the grain running in the same direction on adjacent face and edge of board; 19. The other corner has grain running in opposite directions on adjacent face and edge of board.
The third dimension
Most cabinetmaking operations are basically two-dimensional. We read the grain on one edge of a board and work usually at right angles to it. But sometimes we need to work in three dimensions, as a carver routinely does, and that changes things dramatically.
A simple example is where we need to plane a small chamfer on a corner, or a small round-over. On the edge the grain on horizontal and vertical surfaces runs in the same direction (photo 18), so planing the chamfer is easy and problem free. But on the other side (photo 19), the grain runs in opposite directions on the adjoining faces. How do we deal with this?
When we need to plane in one direction and then the other for reversing grain, there is always a tricky point just where the two meet. If we go too far in either direction, we will get tear-out. The same thing happens when we carve, only this time the tricky point happens when our cut on the chamfer or round-over passes a critical angle. This is when the dominant grain transitions from one face to the other, and where we need to begin planing in the other direction. Or switch to using a high angle plane.
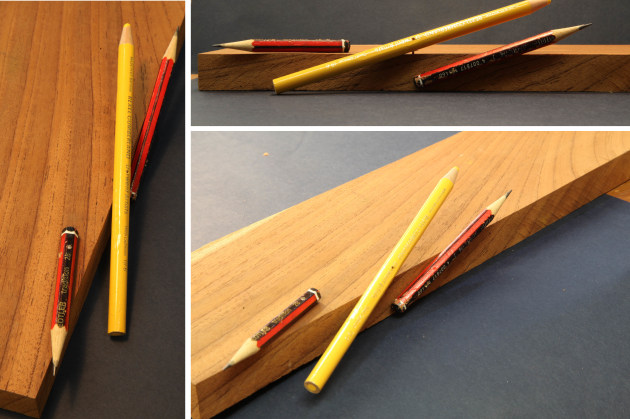
Clockwise from above: 20. The lower red pencil shows grain direction in the top; 21. Righthand red pencil shows the grain direction in the edge; 22. The yellow pencil shows the combined direction of the two red pencils.
A good way to understand what is happening to the grain here is to place a pencil on one face of the board along the grain direction, as shown by the pores or resin canals (photo 20). Now look for the grain direction in the adjoining face of the board (photo 21), and move the pencil (while maintaining the first angle) to indicate this second direction. The position of the pencil (photo 22) shows the way the fibres are lying in the board.
If the angle of the grain direction is similar in each face, the transition line will be around the 45° mark. If the angles are different, the grain direction indicated by the larger one will dominate until, when the smaller angle approaches zero, we are back to having only one grain direction to worry about.
Grain for carvers
Woodcarvers face a unique situation that does not usually confront furniture makers. This occurs because most carving is done with curved blades, or gouges.
23. Diagonal cut across the grain made with a shallow carving gouge. Note the differences in the left (against the grain) and right hand (with the grain) edges of the surface of the cut.
If we take a straight grained piece of wood, this is most easily shown when we make any cut diagonally across the surface, as shown in photo 23. At any midway point the gouge is simultaneously contending with three different grain directions and two transition lines.

24. Grain direction on each side of a gouge cut can most easily be imagined by thinking of the cut as a trench.
To best see this, imagine the cut as rectangular in cross section (photo 24). Here we can easily see the three major surfaces of the cut, two vertical and one horizontal. The best we can hope to do is to get the direction of the grain to go in the same general direction in the horizontal surface and one of the vertical surfaces. No matter what we try, we will always have to cut against the grain on the other vertical surface. The only way to avoid this when making a single cut is to carve either up and down the board (provided the wood does not have interlocked grain) or preferably across it (where we are working independent of grain direction).

25. Carving a doughnut into the face of a board. Grain direction of the outer and inner edges of the doughnut are as shown. All against the grain edges of the cuts are on the waste side.
This is fundamental to woodcarving and one of the major learning curves facing the beginner. Fortunately, when carving there is usually a waste side to most cuts so you learn to cut so the against-the-grain side is in the waste. If you can’t you can begin with a small cut (with a sharp tool) in a safe area, and then enlarge this from both sides with cuts in the direction of the grain.
When carving a doughnut shape as in photo 25, we can see how the direction of the cuts in each quadrant of the circle reverses as we move from carving the outside shape to the inside.

26. Flutes carved into inside of a bowl. Grain direction can vary on each side of the flutes as they progress around the bowl, as well as from top to bottom.
This situation gets particularly tricky when you start working more complex surfaces, such as the compound curves on the inside of a bowl (photo 26). Even for a simple cut straight down the inside of the bowl to the bottom centre, the grain direction on each side of the cut changes as you move from the 12 o’clock to the 3 o’clock to the 6 to the 9 to the 12 o’clock positions relative to the grain. We can see that it’s not an exaggeration to say that carving is dominated by considerations of grain direction.

27. The left ridge carved in the same direction on both sides, one with and one against the grain. The righthand ridge is cut with the grain on both sides.
However, it is not just tear-out that the carver has to avoid. It can generally be dealt by watching what is happening as you cut, and simply change direction when the tear-out occurs. A more difficult problem to correct can occur if the carving involves creating a sharp internal ridge. Many woods such as Huon pine can be excellent carving woods, but be weak in a short, cross-grain situation such as a ridge (photo 27).
This is dealt with by cutting each side of the ridge in the correct direction relative to the grain, otherwise the wood will crumble away along the top edge. The first cut is critical because it’s the one that does much of the damage internally in the wood on the against-the-grain side, but this is not visible until the cut on the other side is later made.
There is a useful, general rule that carvers have evolved for relatively straight grained wood (which is preferred in most cases): when carving wood where the grain direction is horizontal, work from high to low with any cut; or, when the grain direction is vertical, work from low to high.
Finally
We can fret endlessly about all the theory of grain direction, and how to read it, but when it comes down to actually cutting wood, the most important thing is to pay attention to what is happening at the cutting edge of your tool. If this contradicts what your theory reckons should be happening, ditch the theory and change the direction of your cut.
In the end, what works is what is important. This is not to say that theory is irrelevant, just that sometimes we simply get it wrong. We can greatly reduce the chances of this happening if we get better at applying the theory to the many unique pieces of wood that we have the good fortune to work with.
Robert Howard is a woodworker and sculptor who lives in Brisbane. He teaches regular woodwork classes from his studio.