Why I like sanding...

Above: Just some of the options available for hand sanding curved surfaces. Clockwise from front: 3M Sandblaster flexible sponge, cork block and scouring pad, flexible backed abrasive, kitchen sponge/ scourer combination.
Words and photos: Richard Vaughan
Most woodworkers complain about sanding and I really do wonder about this and believe it’s time to question that notion. Over time ‘sandpaper’ has lost the sand, and the paper now has alternatives which are more effective and durable, although paper backing is still standard in sanding belts to prevent the stretch that cloth alone would allow. Cloth backed abrasives are more flexible as well as longer lasting and mesh versions are a further evolution in improving the sanding experience.
Enjoy the journey
As one who makes one-offs in solid wood and loves curves I do get my share of hand sanding, and I don’t want to waste energy resenting it. It is a process I do progressively. Apart from the fact that it is generally easier to sand components before assembly it gives a change of pace, a break from machining, a time to consider stuff. This may be thinking about refining a process, or developing a jig or something else.
That pragmatic approach of using the time is part of enjoying sanding while you get done something that has to be done.
Added to that is the real pleasure involved in fingertips constantly exploring to check that the lines are sweet and the surface is fine. Wood is made to be touched and sensual is good. I make sure I’m as comfortable as I can be, sitting on a suitable stool whenever possible rather than stooping, having a fan keeping the dust from my breathing, and choosing music or a podcast to suit my mood at the time.
Get ready
Having lights that can be shone from various oblique angles is another essential. This enables picking up even the minor cross grain scratches and tiny chip-outs that are almost certain to become visible with finish and awkwardly obvious once the piece is installed. There is a very wide range of powered tools for sanding flat surfaces and although the principles above do apply to tabletops and panels, the focus here is on shaped work.
Get set
For starters it is good to remember that steel is for shaping and efficiently removing what is not part of the shape you want. Power tools, rasps, files, rifflers, spokeshaves and the blessed scraper are the primary shaping tools. Sanding is almost exclusively about refining rather than shaping.
Working across the grain rips off wood rapidly but leaves grooves that must be removed by working along the grain with the tool, or grit of sandpaper that made the grooves, before moving to the next finer tool or grit. Using your lights at oblique angles will show when it is okay to move to the next grit. It is pointless to count on moving to a finer cut to remove coarse cuts. That inevitably means more time and effort, and unnecessary resentment of sanding.
Making tools for a particular job is what our species is good at and here are some tools and tips on using them that may put some joy into sanding for you.
Go
Sandpapers, more accurately known now as ‘coated abrasives’, have evolved (photo 1).
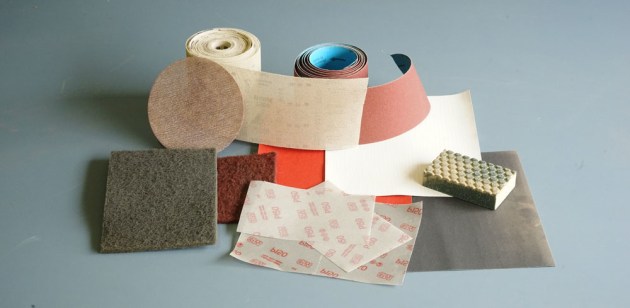
1. The evolving face of modern abrasives show a variety of materials with cloth and flexible backings.
Garnet paper (red) is still available but the standard abrasive is now aluminium oxide (white, and wet and dry black) Cloth-backed gives increased durability, the mesh gives an even longer life and when used in discs it also enables significantly improved dust extraction.
Aluminium oxide impregnated sponge is widely used in car body shops and is very useful in woodworking. The very thin and remarkably flexible Sandblaster sheets from 3M are a recent addition to the range of coated abrasives available, and their abrasive coated sponges are another option.
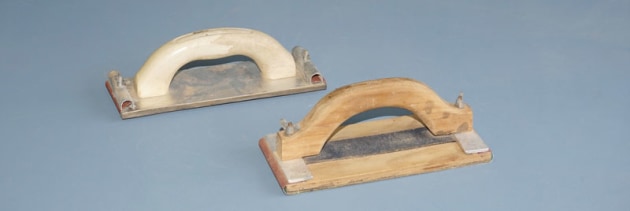
2. Store bought and shed made tools are convenient and comfortable to use.
Two variations of a plasterer’s sanding tool, one off-the- shelf and the wider shed-made version, are great for taking out the hollows in any larger radius convex curve (photo 2). They are also much better than a regular cork block for removing any power tool sanding swirlies on a large flat surface.
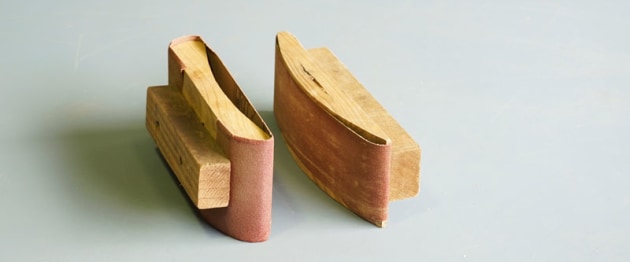
3. Concave and convex sanding tools are worthwhile making.
Examples of bespoke sanding tools are shown in photo 3. They were bandsawn to match the inner and outer surfaces of a cylindrical cabinet I made many years ago. Their very basic construction took minimal time but assured a very satisfactory surface. They have been a useful part of my tool kit since, and been added to along the way.

4. Various sizes of dowels with sandpaper attached are handy for reaching tight curves and holes.
Various dowels can serve as mandrels for sanding inside curves, such as on mouldings or inside holes (photo 4). You can effectively make a rat tail rasp to suit the job in both diameter and grit.
Shaping the edge of ply or wood is another way of sanding concave details, and of course ply can also be shaped to deal with convex forms in mouldings or detailing. The result will be much more consistent than relying on the flexible surface of folded sandpaper or fingertips.

5. Tweezers help to keep things at arm’s length.
Avoid sticky fingers and the irritation of overspray by using tweezers to hold the sandpaper, and making sure the excess lands on waste paper (photo 5). Spray adhesive will hold the sandpaper reliably in place and then be refreshed when the sandpaper dulls.
Spray adhesive, preferably the kind described as repositionable, is readily available from stationery suppliers and is better than PVA because it won’t make the sandpaper curl. Spray adhesive is also quicker. Spray the back of the paper and the surface, then allow both to tack off for a couple of minutes. This way you’ll get a contact glue effect with immediate and long lasting adhesion.
This is relevant when using sandpaper to add grip to jigs. If you expect to renew the sandpaper then you press the sandpaper to the ply while wet. You can easily peel it off when it needs replacement.

6. An easy way to flatten box components.
Boxmakers will know the set up for truing the junction of lid and box shown in photo 6. MDF or chipboard is more likely to be flat than an offcut of wood or even ply, however make sure it is truly flat before relying on it to flatten the work. Wide sandpaper such as the roll shown is available and preferable to butting up narrow sheets and use of spray adhesive gives a flat surface.

7. Taping off some areas can help avoid scratches.
Sanding often involves a meeting of opposite grain AM directions but good old masking tape can prevent ugly
cross-grain scratches (photo 7).
8. Sanding into joins with sandpaper glued to ply.
Photo 8 shows how sanding into shelf to carcase or rail to leg junctions are easier when you use spray adhesive to have sandpaper right to the edge of a piece of ply. Allow the sandpaper to overlap slightly then cut it flush with a snap-off knife so you can sand right to the corner. Two grits on the one sanding board is handy.

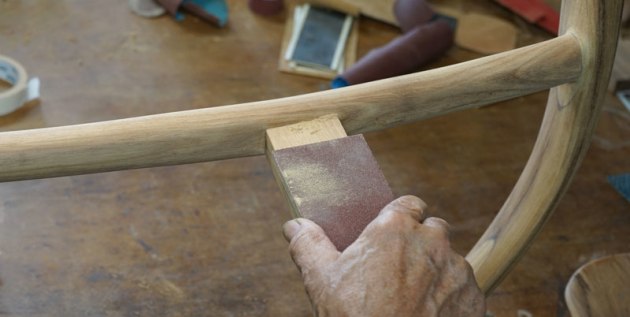
9. Flexible and cloth-backed abrasives are good for sanding curved components.
There are some very beautiful sanding bows made to more elegantly sand such complex curves but lacking one of those you can simply use hand held strips of cloth backed or flexible abrasive (photo 9).
Your hand can get hot and tired when sanding shaped surfaces. A scourer sponge makes a good buffer between hand and abrasive for such jobs. The coated sponge from 3M serves the same function. Dense foam rubber glued to a cork block helps form an even concave curve such as in the seat shown here. There is quite a range of sponge rubbers and it is worth your while stocking a selection of pieces for various sanding jobs.
Richard Vaughan is a furniture designer/maker in Brisbane who also runs woodwork classes. See richardvaughan.com.au