Turning a natural edged bowl

Words and photos: Andrew Potocnik
To be perfectly honest, I would never have begun this project if the wood was my own—to me this piece of ‘master grade’ gidgee was so precious it would simply sit in my stash for years to come, waiting for that moment of divine inspiration.This piece was about 300mm wide—really big for this species, and riddled with rare figuring. How could I do it justice?

As well as extracting the best result from this wonderful piece of wood I also wanted to salvage as much usable wood from the blank as possible. I was uncomfortable and tentative as I began.
To cut the blank to a circle I used one of a series of round templates I’ve made to fairly standard diameters—200mm, 250mm and so on. Each was marked out with a compass and cut out on a bandsaw. I drove a nail through the centre point of the template and attached it to the blank.
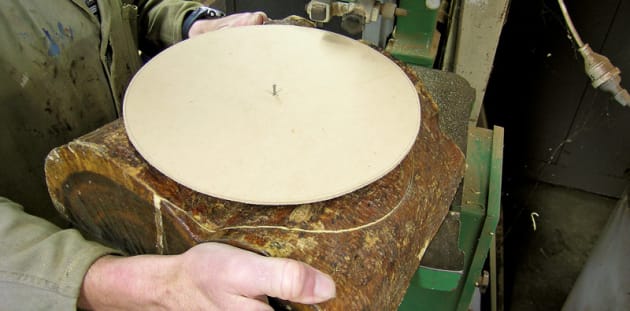
Bandsawing to the template left me with a true circle as shown below.

To gain the most out of a natural-edged blank you need to consider the high and lows of what will be the rim. Most people like a turned form to be balanced. I mounted the blank between centres and adjusted it so that when rotated the two high and two low points matched. I marked this line with a piece of chalk and then measured to the closest point at
the base of the blank.

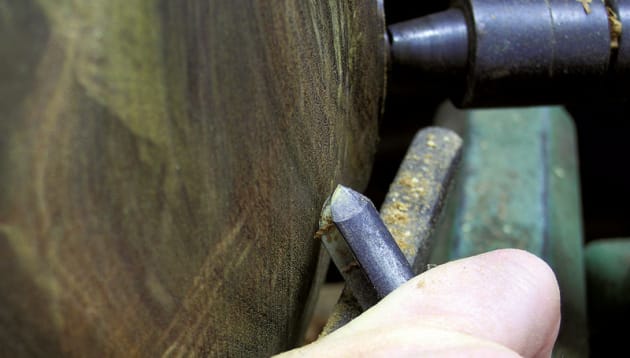
Another chalk line was made to show the wood I could cut away and use for another project.

I used a Stewart System Lance tool to part this away. In hindsight, cutting on a 45° angle would have yielded even more.

Rough shaping was done with a 16mm deep fluted bowl gouge working from ‘the known to the unknown’, as I like to call it. The lathe speed was set at about 500rpm as the unbalanced mass of wood can cause the lathe to wobble and prevent a clean consistent cut. It’s best to first cut from the centre of the blank to the outer edges, ‘downhill’ in turning terms—cutting down the fibres, much as you would plane down the grain of a triangular piece of wood.
Before refining the overall shape I shaped the base and cut a tenon with a sharp parting tool so the form could later be held in a scroll chuck. For the final profile I rolled my 12mm bowl gouge over and pulled it along the gidgee, using it as a shear scraper.
I find it easier to control the tool if I drag it towards me rather than pushing it away from my body. When it comes to refining the upper edges of the undulating form it’s time to cut in from the unknown to the known. This prevents tearing off outer edges of grain as you exit the form.
In an ideal world a clean off-the-tool surface would eliminate sanding, but I’m nowhere near that ideal so here’s what I did. With the lathe slowed to about 350rpm a Vic Wood rotary sander fitted with a 120 grit pad did most of the work. If you sand at a very high speed heat created from friction of the abrasive rub- bing against the wood will lead to heat checks or cracks caused by overheating the surface.

Protruding surfaces should be sanded by hand with the lathe stationary to prevent rolling the edges over, thinning and deforming them. It takes a bit more effort but the results speak for themselves. The same process was followed using 180, 240 and 320 grit sandpaper. If you don’t have a rotary sander velcro-backed sandpaper simply hold your abrasive paper up to the spinning wood, but don’t forget those bits that need to be sanded manually with the wood stationary to witness the beautiful figured grain exposed.
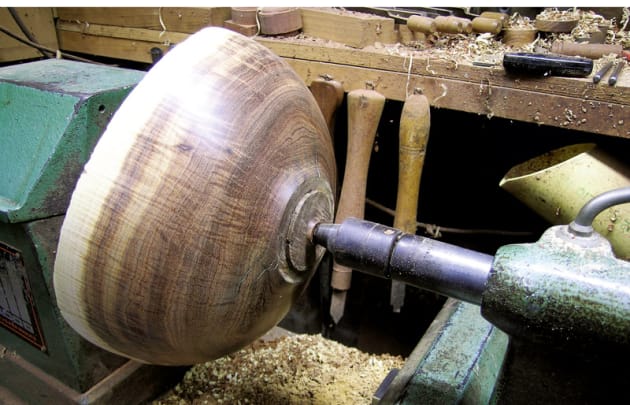
The blank was removed from the lathe, the driving spur removed and replaced with a scroll chuck. I have a couple of these but find my Vicmarc is the most versatile. The tenon on the base was fitted into the chuck, the tailstock pushed up against the centre point left by the driving spur before locking it into place. This helped to align the bowl before the chuck was tightened to hold it between scroll chuck and tailstock (photo 8).

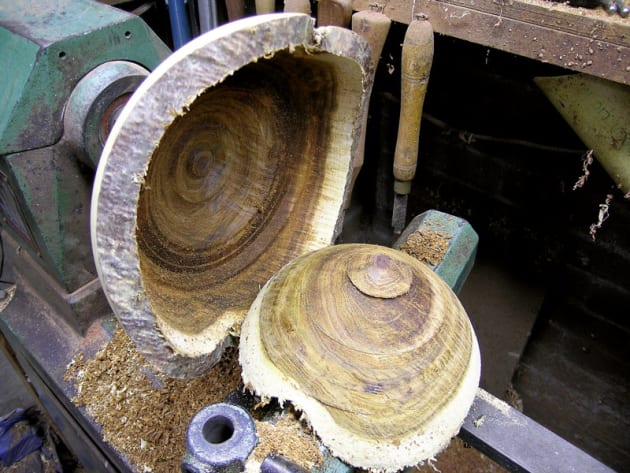
Time to maximise timber! I used a Kelton centre saver tool kit to cut free as big a piece of wood from the inside of my bowl as I dared. The photo below shows how much wood can be saved for another project, and how much hollowing you’ve eliminated—a double saving.
To hollow the inside of the bowl I used my trusty S-shaped tool rest. I made this years ago and it still serves my needs today. It was exactly what I needed to allow a deep fluted gouge to travel smoothly from the rim of the bowl to its base. To complete the full sweep of the interior I used the two gouges shown sharpened to various angles.

Depending on depth of bowl, how steep the sides are, how hard the wood is, if it has interlocking grain or wild figuring, I will use a variety of tools based on what works best. If the wood co-operates, good, if not try another tool until you achieve the surface and form you’re after.
A heavy (10mm thick, 30mm wide) scraper finished the curve at the bottom before checking overall wall thickness with figure-eight calipers and sanding the interior. I use several tools for this process—sanding pads fitted to a re-
13 versible cordless drill for flatter sections, an angle drill for steeper sides, and a rotary sander. Protruding ‘wings’ should still be hand sanded to prevent rounding over edges—another way to eliminate stray turning marks even if you don’t have mechanical methods of sanding.

Reversing an almost completed form can be tricky and there are some expensive devices available that make the process easy but I like to work with low tech, low cost methods, so I fitted a scrap of wood to my scroll chuck and rounded its outer edges as shown below.

With the non-slip pad shown held over the rounded wood, the bowl was reversed, pushed up against the pad and aligned by bringing the tailstock centre into the original mark...
... and left way back in the roughing process so the base could be refined and hollowed.

A gouge sharpened to a long narrow curve will allow you to turn down to a tight small tenon. This type of gouge is typically used for detail work on spindle turned items, but here it reduces stock that will need to be hand carved later on. Pay careful attention to the thickness of the base—you don’t want to accidentally cut it too thin and ruin the whole bowl. An experienced pair of ‘finger gauges’ is very handy but you can measure the thickness of your wood prior to reverse chucking it using calipers. Just keep a mental record of how much wood is available and how much you can hollow—aim to leave about 4mm plus in the base. If you leave too much the bowl will feel heavy, if you leave too little you’ll most likely be nervous until the bowl is finished.
Sand the base whilst the bowl is still on the lathe working through the grits. With the bowl moved to a padded workbench use carving gouges to trim off remnants of the turned stub, followed by a little scraping and hand sanding.
Most wood will move to varying degrees once sawn or turned and will continue to expand or contract according to season or air moisture content. I left this bowl in an indoor environment for two to three weeks so it could settle before flattening its base. The blank I began with was waxed to retain any internal moisture but now was the time when that moisture would escape. Even if your timber is bone dry, there may still be a little bit of moisture or tension that will cause the finished item to move just a little bit before you apply a finish.
To track moisture loss I measured the bowl on a set of kitchen scales, recorded the result, left the bowl in a stable indoor environment for a couple of days, measuring until the weight stopped changing. Confident that it had settled, I flattened the base on a sanding board—nothing more than a piece of MDF with several pieces of abrasive paper of varying grits attached by way of spray adhesive. This board allows me to flatten bowl bases so I can sign them. Usually I use a black pen but on darker woods I carve a hallmark.
Finished with polyurethane the bowl was complete and I still had a range of off-cuts teasing me to create other projects that may do this wonderful piece of wood justice.
Andrew Potocnik is a woodwork teacher and woodturner. Learn more about Andrew Potocnik here.