Turned and Carved Shell Box
Words and photos: Neil Scobie
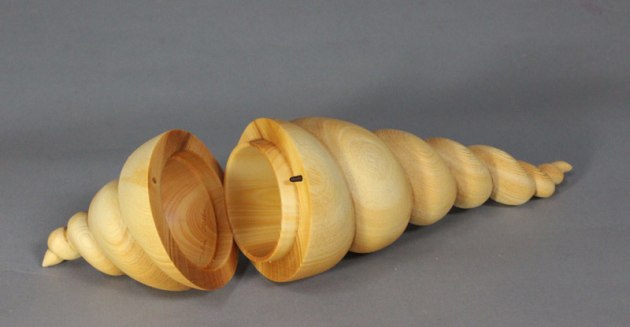
Like many of my turned and carved pieces, this one is inspired by nature. I’ve never seen an auger shell on any of my beach walks but I bought one in Lakes Entrance in Victoria about ten years ago and its shaped intrigued me.
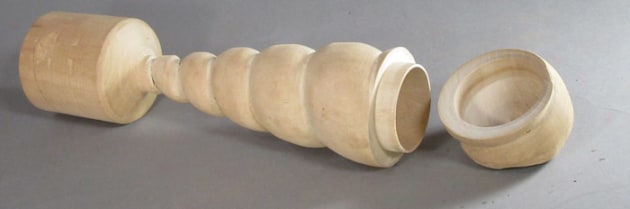
I started with a prototype made from white beech to see how I could carve spirals and hollow the top and bottom sections (photo 1).
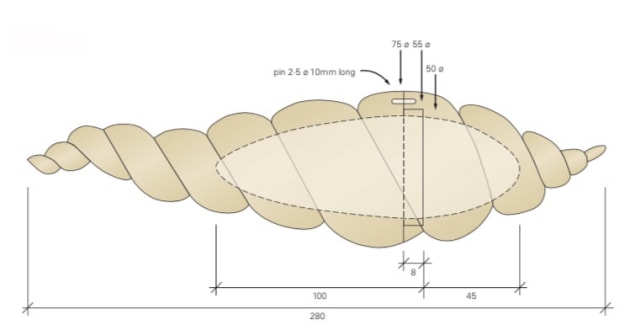
A full size drawing helped to get the correct thickness of the walls. Looking at the shell, I thought about curving the tail and changing the spirals on the lid.

A plasticine model was invaluable here (photo 2). I chose an 80mm square x 285mm long piece of Huon pine that had prominent growth rings as my intention was to sandblast the outer surface to mimic the texture of the shell.
First the turning...

I placed the wood between centres and turned the initial shape allowing for spigots at each end to go into the chuck (photo 4).You can do this with a 20 or 25mm wide roughing gouge. The long nose or shark jaws fitted to my Vicmarc chuck vibrated less when hollowing the longer base of the shell. Later the curved spirals at each end were carved from under the spigot areas.

In photo 5 the plasticine model is on top for comparison. Pencil marks show where the lid tenon and cut off area will be.

Using a parting tool, cut in two separate parting lines, one for where the pieces will separate, the other for the lid tenon (photo 6). At this stage leave the tenon bigger in diameter and shorter in length. Part into about 10mm in diameter, then either saw or twist off the last bit.

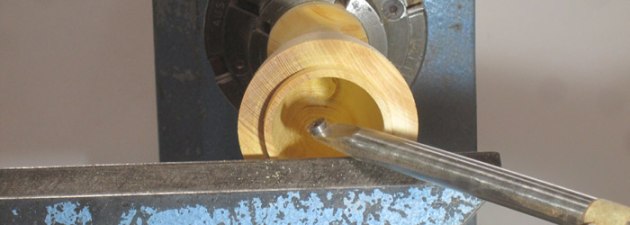
I like to turn the lid section first with the hollow and parallel sides to suit the box tenon. Your drawing should show you the diameter the hollow needs to be. Leave enough thickness in the wall to allow for the decreasing diameter of the twisted spiral top section. I aimed to end up with about 4–5mm in the smallest wall thickness at the bottom of the spiral V-section. Most of the hollowing can be done with a 10mm diameter deep fluted gouge (photo 7).

You can either have a step on the inside to suit the tenon or just leave parallel sides (photo 8). Remember the box lies on its side so a firm fit is required. A round skew chisel does a great job cutting a step, but a small spindle gouge works as well.
The inside of the lid should be fully sanded now because you won’t be able to re-chuck the lid after the spirals are carved. Remember not to sand the step as it won’t be parallel any more.

Remove the lid from the chuck jaws and replace it with the bottom section of the box. If you have any run-out in the jaws, or the bottom is wobbling in the jaws, now is the time to turn it back to centre. Use a small spindle gouge or a skew chisel to turn the tenon to suit the step on the lid (photo 9)...

and check the two flat surfaces match well to avoid gaps (photo10). If they don’t, simply re-turn the shoulder on the base section with a sharp spindle gouge or a skew chisel.
Hollowing the bottom section is the same process but deeper. Start with a 10mm deep fluted gouge and cut from the outside towards the centre using the bottom half of the gouge with the flute of the gouge is pointing to 2 o’clock (photo 11).

Alternatively you can cut from the centre of the base towards the outside rim, with the flute pointing towards 10 o’clock. This method is actually cutting with the grain. Either way will get the job started. A Vermec hollower works well to cut from the middle towards the rim (photo 12).

A homemade Velcro cylinder sander is good for sanding the insides (photo 13). Start with 120 grit and work up to 600. Spring-loaded calipers will let you check the wall thickness all the way down from the rim to the base so you know how deep you can carve the flutes.

To mark out the spirals place the lid back on the base and support the centre of the lid with a tailstock revolving centre. I made the widest flutes just below the join of the lid, marked the flutes with a soft pencil, and then wrapped 5mm masking tape around. Slowly twist the chuck by hand and holding the tape tight at an angle until the lines look right (photo 14).
...then the carving

To cut in to the depth of the spiral flutes, draw a marker pen line on a Japanese pull saw about 6mm from the cutting edge as a depth gauge while sawing. Saw on one side of the thin masking tape, rotating the form as you cut (photo 15). You don’t need to saw the ends as these will be reshaped with curves.

Remove the masking tape and start shaping back from the saw cuts. Use a 25mm wide bevelled edge chisel to take off small amounts of wood while rotating the form slowly by hand (photo 16)...
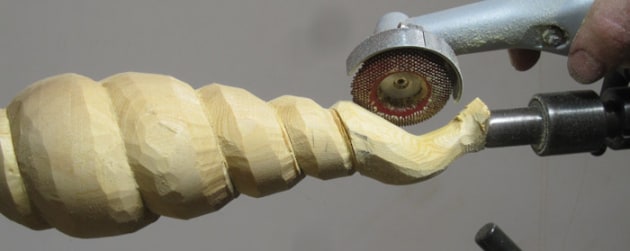
...or use a cylinder burr driven by a rotary tool such as a Foredom carver (photo 17). If you are a right-hander you may find it better to reverse the form in the chuck. I used a rotary rasp disc held in a Proxxon carver to curve the spiral ends of box. Carve down both ends so you can hold them either in the hollow headstock or tailstock spindle, or by a small cup centre in the tailstock spindle.

Being able to swap from end to end is very handy. Make sure the curve on the tail end spirals in two directions (photo 18), taking care not to get too close to the bottom of the inside hollow.

When carving the lid spiral, hold the tail end in the headstock spindle and the lid end supported by the tailstock cup centre (photo 19). Again I used the Proxxon carver to get the rough slope of the lid spiral and followed by pencilling in the spiral centre lines.
The cylinder spiral cutter in the rotary tool was used to carve the centre lines and round them over. Holding the form by hand gave more control as I could just keep rotating the shell (photo 20).
Aligning the lid
Before you start sanding the spiral turn a 2.5mm diameter pin about 10mm long so you can keep the spiral lined up when the lid is on. I tapped a 12mm panel pin into the broad side of the lid flat and then cut off the head of the pin. Now line up the grain and spirals then push the base onto the pin. Remove the pin and drill 2.5mm holes and glue the pin into the base or lid. Now when you sand, the grain and spirals will always be aligned.
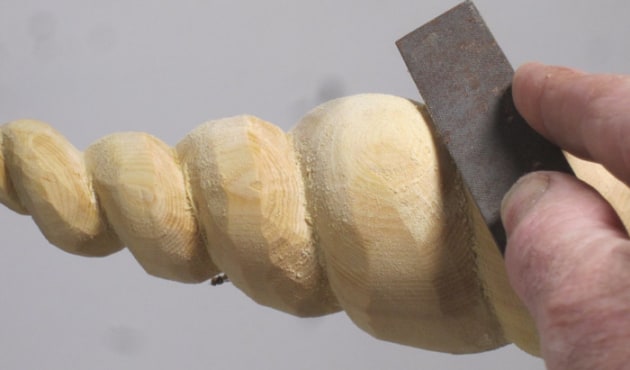
You can sand the spiral with a flat second cut file, where you can cut with both the flat face and the side of the file (photo 21).

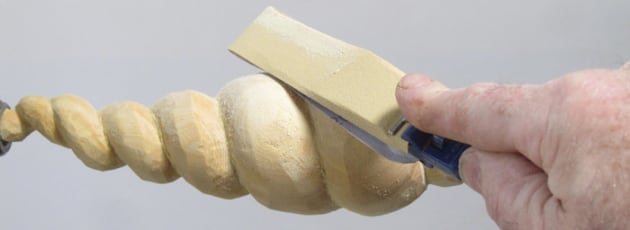
You could also use a sanding board, starting with 120 grit and working up to 180 grit only if you intend to sandblast the piece (photo 22). When sanding a form like this you have to make sure you keep roving the small hills until there are no hollows left so you’re left with a smooth surface.

Use a triangular file to sharpen up the intersection lines between the spirals (photo 23). Having the piece suspended between centre spindles helps so the piece can be rotated as you sand. All that needs doing now is to use a sharp knife to shape the ends then sand these ready for sandblasting.
Sandblasting looks good on wood with prominent growth rings. I have a sandblasting box with 50/60 grit ground up glass. If you want to have a go and do not have a good setup, make sure you use gloves, dust mask and face shield to protect yourself.
Finishing off
I used a white scouring pad (about 1000 grit) to smooth and remove any torn grain before oiling the box. An airgun helped to blow oil out of all the low spots when wiping it off.
I was very happy with the finished result but knew that preparation was the key. The drawing and prototype helped to establish wall thicknesses and the plasticine model allowed me to get the curves looking right.
Neil Scobie passed away in May, 2016 and wrote this story for the magazine in the months prior with the knowledge that he didn’t have long to live but still wishing to share his knowledge. The many projects and reviews which Neil has written for AWR over a 20 year period are listed in an 23 ‘authors index’ which may be downloaded here.
