Topping it off: A Table Project

Words and photos: Andrew Potocnik
There are strange ways in which designs evolve in the mind of a maker. I woke up one morning where my mind must have been sparked by something the night before and I had an idea for several coffee table designs buzzing, so I grabbed a piece of paper and began sketching and annotating possible extensions of the basic design.
Still excited with my idea, I headed off to my local super hardware store to see what standard timber sizes were available and what the costs were. I had my teacher’s hat on, thinking along the lines of a design that could be made with minimal custom machining of timber, especially when there are many woodworkers out there who don’t have all the machines required to create components that make a design just right. Likewise, school teachers need projects that students can make with commercially available timbers, but that also allow for personalised variation.

Shopping for wood
Checking timber sizes and costs, I made my way through the timber aisle with note pad in one hand and tape measure in the other. My enlightening discovery came however as I made my way to the cash register and the pile of clearance items on offer.
My eye caught some laminated, sanded and plastic wrapped boards that I thought could well be the source of ready made tabletops just waiting to be cut to size, and depending on cost, a great source of material for the project I had in mind.
Looking through sizes available, I became aware of a lady moving around another stack of timber excitedly telling a friend about a discovery she had just stumbled upon. When I saw what had set her off, I was equally excited – a clearance stock of laminated and sanded discs of 400mm and 600mm diameter plastic wrapped pin oak boards marked down to a ridiculously low price. There is no way you could buy material, machine and sand it to size at this price.
I lashed out and bought several discs of 600mm at $10 and some of 400mm at $5, prices that the public accepts as being the true value of a material that is already underpriced.
The legs and frame are made from contrasting blackwood. For the two rails I used 420 x 65 x 19mm sections and for the legs, 530mm lengths of 45 x 45mm wood.
Turned and tapered legs
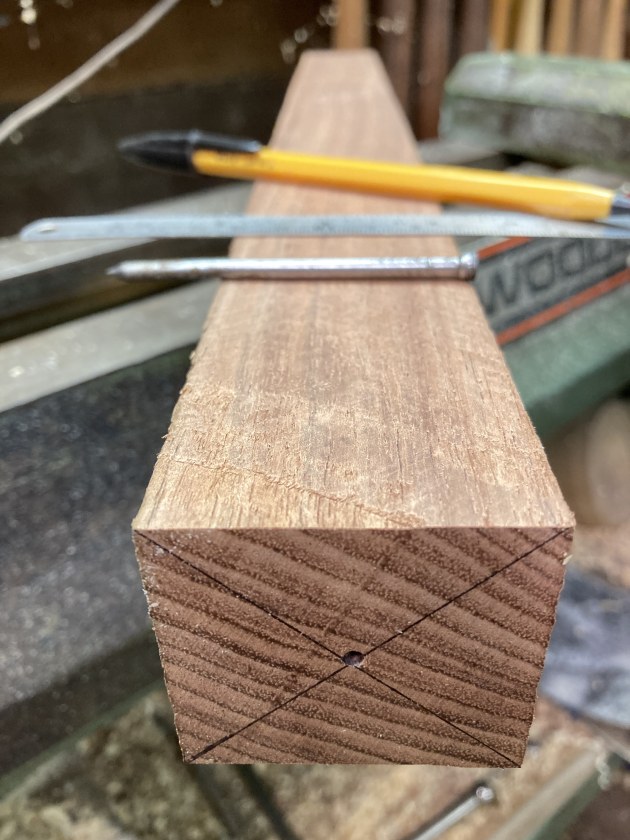
Being a turner, I saw this project as having round legs, but you could easily follow my design with tapered square legs. I began by marking the ends of each leg using the old crossed diagonals intersecting in the middle of a square method, and centre punched each of the eight ends (photo 1).

Mounted on the lathe and rough turned, the diameter of what would be the top portion of the leg was checked using vernier calipers, aiming for a diameter of 43mm (photo 2).

As I had made legs of this design previously, I already had a story stick which was used to set out lines for the bevel, thickness of the top and the beginning of a taper (photo 3).

The end of the leg was trimmed down to 20mm diameter and the taper turned, checking its straightness frequently with a ruler (photo 4) before sanding through to 320 grit.

A small MDF template was used to ensure a consistent angle and length on each leg. In photo 5 you’ll also notice the majority of waste material was removed from what was to be the flat top of each leg. You can use a variety of tools to achieve the flat surface, but to reduce tear-out of endgrain, I used a beading tool, which rolled slightly into the grain, acts as a shear scraper and leaves a smooth surface.

The same result can be achieved with a skew (photo 6) and both can be used to slice a clean surface on the bevel, which will require minimal sanding and allow for neat definition where intersecting surfaces meet. To me, definition is a key to successful design, and excessive sanding is where a wonderful idea can lose its visual ‘crispness’.
Marking out the rails

With all legs turned, I cut a trial rail at what I thought might be an appropriate angle at each end. A mistake in reading the scale on my drop saw resulted in a 6° angle when I was aiming for 1°. Taping the legs and rail together I could see that the splay of the legs was far too great (photo 7). Another one at 3° yielded a better result, and so the blackwood rails were cut at the correct angle.

The underside of the rails was to have a slight curve, so I used the tried and true method of flexing a steel rule to an arc and then tracing along its edge. A second pair of hands helps here (photo 8).

The main lines for the cross-halved joints were marked out (photo 9), but not cut just yet. Sometimes you need to prepare for coming stages, but not execute them just yet.

The ends of the rails have a concave surface for the legs to fit snugly into. To sand this I needed the underside of each rail to sit flat on another jig, hence they were left flat. Photo 10 shows the set-up I used on a spindle sander fitted with a 40mm diameter sleeve.

Photo 11 shows the set-up a little more clearly – a piece of 18mm thick ply cut to a 3° angle allows the correspondingly angled rail end to meet the spindle face-on. A 30mm thick piece of MDF was clamped to the table of the spindle sander so the ply and rail could be pushed into position and align square to the table. It sounds complicated, but the logic is simple.
Rail joinery

Now I could move ahead with the marking out done earlier by bandsawing the curved underside of the two rails (photo 12)...

...then sanded to a flowing curve on a belt sander (photo 13).

With both rails taped together, I marked out holes through which screws would fit to fasten the tabletop once all components were assembled (photo 14). Centre punched, 5mm clearance holes were drilled at each end of the rails, and enlarged to 10mm about halfway into the rails so screws would protrude far enough from the top of each rail to hold the top in place (photo 15).

Back to the cross-halving joints that needed final dimensioning and cutting. Each was separately bandsawn (photo 16)...

...and then fettled to size with chisels until a neat joint was achieved (photo 17).

Keeping it simple, I opted for dowel joints and used a doweling jig that is easy to operate. The key is in careful set-up and accurate marking of joint holes (photo 18). Seat the jig flat against the surface you’re drilling into and ensure each hole is drilled to the same distance. I applied masking tape to brad pointed drill bits to give a clear entry point and depth in each hole.

Dowel centres were used to transfer markings for corresponding holes on each of the legs. More masking tape and labelling of matching components! A 12mm spacer placed under the rail raised its centre just high enough to match the middle of each leg, but I needed to press the top section of each leg flat on a supporting board so both components aligned and then pressed the centres into each leg (photo 19).

To support the legs while drilling, I made a carrier which is simply a block of 90 x 45mm pine with two 45° cuts made on a tablesaw. This was fitted to the table of my drill press and held in place with double-sided tape – the key here was in centring the carrier. I used the brad point of my drill bit pressed into the middle of the V to push the block onto the drill table. Each leg was then slid into place for the two holes to be drilled parallel to each other (photo 20). Note that I oriented the growth rings with the holes so that once assembled they would radiate out from the centre of the table.

Photo 21 shows a test fit with dowels in place and a slight rounding over at the end of each rail. Fortunately all went well and components fitted neatly without fuss or any need for the fine adjustment which is sometimes needed.
Rail and leg assembly

Now that all joinery and shaping was complete I was ready to complete each leg, sawing off the stub, paring it flat with a chisel and then sanding flat and smooth with a sanding block (photo 22). All components received a finish after masking tape registration marks were first removed. Instead I used pen and moved them to surfaces that would be hidden when joined.

Once the finish had dried, it was time to assemble the legs and rails; however, a couple of cauls were needed so the clamp could apply even pressure to the angled joints (photo 23). My preferred method of applying glue is to squeeze a small amount onto a scrap block and then transfer it to where it’s required with a sliver of veneer. This allows me to control the location and amount of glue.

While the two sets of legs were drying, a set of spacers was made using some 3mm thick blackwood scrap left over from a previous project. Four pieces about 40mm long and 25mm wide were taped together with double-sided tape (photo 24)...

...and a centre hole drilled a little oversize for screws to fit through with ease (photo 25). They were then sanded to size on a belt sander, with the edges hand sanded and eased, and a finish applied.
All on top

The tabletop was removed from its plastic wrapping and edges sanded smooth on a jig that I made to hold my random orbital sander (photo 26). Although the pin oak was already sanded to about 120 grit, and a perfect circle, I sanded through to 320 grit and then eased top and bottom edges by hand before applying a finish.

With all components completed (photo 27) I had a flat pack table needing only four screws to assemble, or dismantle for packing or transportation (photo 28). The cross-halving joints were pushed together without application of glue, screws inserted into the rails and through the spacers before being driven into pre-drilled holes in the top, and there it was – a table made with standard off-the-shelf dimensioned material, a pre- cut top and potential for further development.
Andrew Potocnik is a wood artist and woodwork teacher who lives in Melbourne. Learn more at www.andrewpotocnik.com